IaC/Terraform
2주차(2)_Terraform을 통한 다중 웹 서버 배포 (ASG & ELB)
- -
CloudNet@ 팀의 가시다님께서 Leading 하시는 Terraform T101 Study 내용 요약
해당 Terraform Study 는 Terraform Up and Running 책을 기반으로 진행 중입니다.
이전 글에서 배포한 VPC에 서버를 배포해보자 !!
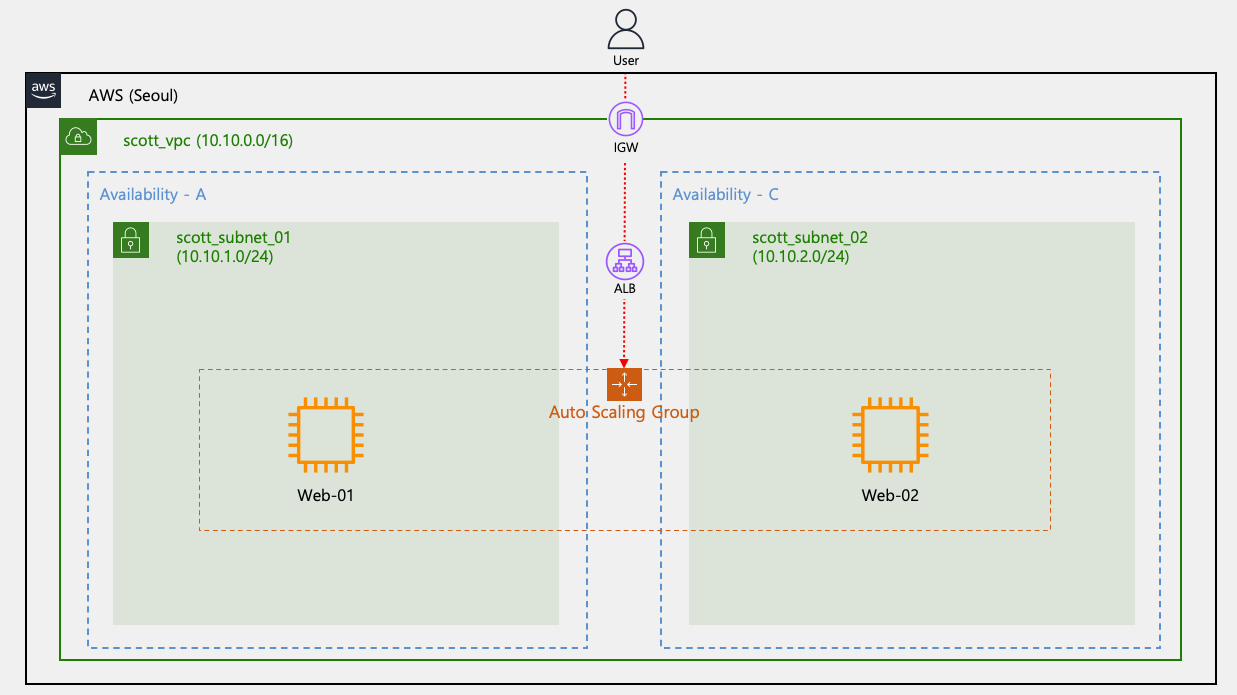
1. Architecture
2. 웹 서버를 위한 sg.tf 파일 생성
- http를 위해 80 포트 Open
resource "aws_security_group" "scott_sg" {
  vpc_id      = aws_vpc.scott_vpc.id
  name        = "terraform SG"
  description = "terraform Study SG"
}

resource "aws_security_group_rule" "scott_sg_inbound" {
  type              = "ingress"
  from_port         = 0
  to_port           = 80
  protocol          = "tcp"
  cidr_blocks       = ["0.0.0.0/0"]
  security_group_id = aws_security_group.scott_sg.id
}

resource "aws_security_group_rule" "scott_sg_outbound" {
  type              = "egress"
  from_port         = 0
  to_port           = 0
  protocol          = "-1"
  cidr_blocks       = ["0.0.0.0/0"]
  security_group_id = aws_security_group.scott_sg.id
}
3. Auto Scaling Group 을 위한 asg.tf 파일 생성
3.1. Launch Configuration 생성
resource "aws_launch_configuration" "scott_launch_config" {
  name_prefix     = "terraform-launch-config-"
  image_id        = "ami-0e9bfdb247cc8de84"
  instance_type   = "t2.micro"
  security_groups = [aws_security_group.scott_sg.id]
  associate_public_ip_address = true

  user_data = <<-EOF
              #!/bin/bash
              wget https://busybox.net/downloads/binaries/1.31.0-defconfig-multiarch-musl/busybox-x86_64
              mv busybox-x86_64 busybox
              chmod +x busybox
              RZAZ=$(curl http://169.254.169.254/latest/meta-data/placement/availability-zone-id)
              IID=$(curl 169.254.169.254/latest/meta-data/instance-id)
              LIP=$(curl 169.254.169.254/latest/meta-data/local-ipv4)
              echo "<h1>RegionAz($RZAZ) : Instance ID($IID) : Private IP($LIP) : Web Server</h1>" > index.html
              nohup ./busybox httpd -f -p 80 &
              EOF

  # Required when using a launch configuration with an auto scaling group.
  lifecycle {
    create_before_destroy = true
  }
}
Lifecycle 이란??
원래 테라폼은 새로운 리소스를 생성할 때, 기존 리소스를 삭제한 후에 생성한다.
하지만 "create_before_destroy = true" 를 통해 리소스 교체를 반대로 할 수 있다. (새로운 리소스 생성 후, 기존 리소스 삭제)
왜 해당 옵션이 필요한가에 대해 의문을 가질 수 있다.
이는 AWS 리소스에 대한 이해가 필요한데, 시작 구성은 한 번 생성하면 변경이 불가능한 리소스이다. (새로 생성해야 함)
이 때 문제가 발생하는 데
Auto Scaling 이 Launch Configuration 을 참조(Reference)하여 구성되어 있으므로,
디폴트 설정으로는 해당 리소스를 제거할 수 없다.
Launch Configuration 에 변경을 가하면 삭제 후 생성해야 하는데,
삭제하면 Auto Scaling이 참조하는 내용이 없어지므로 오류가 발생 !
따라서 "create_before_destroy = true" 옵션을 통해
Auto Scaling 이 참조할 수 있는 새로운 리소스를 생성 후 이전 리소스를 삭제하도록 해야한다.
3.2. Auto Scaling Group 생성
resource "aws_autoscaling_group" "scott_asg" {
  name                 = "scott_asg"
  launch_configuration = aws_launch_configuration.scott_launch_config.name
  vpc_zone_identifier  = [aws_subnet.scott_subnet_01.id, aws_subnet.scott_subnet_02.id]
  min_size = 2
  max_size = 10

  health_check_type = "ELB"
  target_group_arns = [aws_lb_target_group.scott_alb_tg.arn]

  tag {
    key                 = "Name"
    value               = "terraform-asg"
    propagate_at_launch = true
  }
}
4. Load Balancer 를 위한 alb.tf 파일 생성
4.1. ALB 생성
resource "aws_lb" "scott_alb" {
  name               = "terraform-alb"
  load_balancer_type = "application"
  subnets            = [aws_subnet.scott_subnet_01.id, aws_subnet.scott_subnet_02.id]
  security_groups = [aws_security_group.scott_sg.id]

  tags = {
    Name = "terraform-alb"
  }
}
4.2. ALB Target Group 생성
resource "aws_lb_target_group" "scott_alb_tg" {
  name = "terraform-alb-tg"
  port     = 80
  protocol = "HTTP"
  vpc_id   = aws_vpc.scott_vpc.id

  health_check {
    path                = "/"
    protocol            = "HTTP"
    matcher             = "200-299"
    interval            = 5
    timeout             = 3
    healthy_threshold   = 2
    unhealthy_threshold = 2
  }
}
4.3. ALB Listener 생성
resource "aws_lb_listener" "scott_http" {
  load_balancer_arn = aws_lb.scott_alb.arn
  port              = 80
  protocol          = "HTTP"

  # By default, return a simple 404 page
  default_action {
    type = "fixed-response"

    fixed_response {
      content_type = "text/plain"
      message_body = "404: page not found - Kimalarm's terraform Study"
      status_code  = 404
    }
  }
}

resource "aws_lb_listener_rule" "scott_alb_rule" {
  listener_arn = aws_lb_listener.scott_http.arn
  priority     = 100

  condition {
    path_pattern {
      values = ["*"]
    }
  }

  action {
    type             = "forward"
    target_group_arn = aws_lb_target_group.scott_alb_tg.arn
  }
}
4.4. ALB Domain Output 출력
output "scott_alb_dns" {
  value       = aws_lb.scott_alb.dns_name
  description = "The DNS Address of the ALB"
}
5. 리소스 확인
5.1. Terraform 배포
terraform init && terraform plan && terraform apply -auto-approve
5.2. Auto Scaling 확인

5.3. ALB 확인

5.4. ALB Domain 확인

- 새로고침을 눌러서 다른 Web Server 로 트래픽이 들어가는 지 확인해보자

실습 진행 후에는 반드시 리소스를 삭제하자!
terraform destroy -auto-approve
다음에는 Terraform 상태파일 격리에 대해서 알아보겠다.
'IaC > Terraform' 카테고리의 다른 글
| 2주차(4)_S3, DynamoDB 를 활용한 tfstate 파일 관리 (0) | 2022.11.10 |
|---|---|
| 2주차(3)_terraform.tfstate 란 무엇인가?? (0) | 2022.11.10 |
| 2주차(1)_Terraform을 통한 VPC 배포 (0) | 2022.11.09 |
| 1주차(4)_Terraform을 통한 EC2 웹 서버 배포 (0) | 2022.11.09 |
| 1주차(3)_Terraform을 통한 리소스 배포 (0) | 2022.11.09 |
Contents