IaC/Terraform
2주차(4)_S3, DynamoDB 를 활용한 tfstate 파일 관리
- -
CloudNet@ 팀의 가시다님께서 Leading 하시는 Terraform T101 Study 내용 요약
해당 Terraform Study 는 Terraform Up and Running 책을 기반으로 진행 중입니다.
이번 게시글에서는 저번에 배웠던 tfstate 파일 이론에 대해서 하나씩 살펴보자
먼저 AWS S3 와 DynamoDB 를 활용한 tfstate 파일 원격 저장 및 관리에 대해서 알아보자 !
1. S3 와 DynamoDB 를 위한 backend.tf 파일 생성
- 해당 파일은 별도의 directory에서 생성하는 것을 추천한다.
mkdir tfstate-test && cd tfstate-test
1.1. S3 Bucket 생성
provider "aws" {
  region = "ap-northeast-2"
}

resource "aws_s3_bucket" "scott_s3_bucket" {
  bucket = "scott-terraform-study-tfstate"

  // S3 Version 관리
  versioning {
    enabled = true
  }
  // Bucket 삭제 방지 (true : 활성화 , false : 비활성화)
  lifecycle {
    prevent_destroy = true
  }
  // Bucket 암호화
  server_side_encryption_configuration {
    rule {
        apply_server_side_encryption_by_default {
            sse_algorithm = "AES256"
        }
    }
  }
}

output "s3_bucket_arn" {
  value       = aws_s3_bucket.scott_s3_bucket.arn
  description = "The ARN of the S3 bucket"
}
Bucket 삭제 방지를 하는 이유
tfstate 파일이 보관되어 있는 S3 버킷은 굉장히 중요하기 때문에,
혹여나 실수로 삭제되는 것을 방지하기 위해 "prevent_destroy = true" 옵션을 부여한다.
해당 옵션이 활성화가 되어 있으면, terraform destroy 명령어를 수행하여도 오류가 발생한다.
정말 삭제하기 위해서는 해당 옵션을 주석 처리하고 destroy 명령어를 수행하자.
Bucket 암호화를 하는 이유
이전 게시글에서 확인하였듯이, tfstate 파일 안에는 Account 정보나 각종 리소스 정보 등의 민감 정보가 저장되어 있다.
암호화를 하지 않고 저장할 경우 해당 정보는 그대로 노출되어 있기 때문에 보안에 굉장히 취약하다.
tfstate 파일을 S3 버킷에 저장할 경우, 반드시 암호화를 실행시키자
1.2. DynamoDB 생성
resource "aws_dynamodb_table" "scott_dynamodb_table" {
  name         = "terraform-locks"
  billing_mode = "PAY_PER_REQUEST"
  hash_key     = "LockID"

  attribute {
    name = "LockID"
    type = "S"
  }
}

output "dynamodb_table_name" {
  value       = aws_dynamodb_table.scott_dynamodb_table.name
  description = "The name of the DynamoDB table"
}
1.3. Terraform 실행
terraform init && terraform plan && terraform apply -auto-approve
- S3 Bucket 확인

- DynamoDB Table 확인

2. Backend 활용
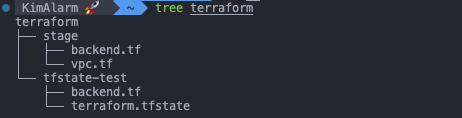
- stage 디렉토리 생성
mkdir stage && cd stage
2.1. backend.tf 파일 생성
- 앞에서 생성했던 bucket 이름과 DynamoDB Table 명을 넣어주자
- key 는 tfstate 파일이 저장될 path
terraform {
  backend "s3" {
    bucket = "scott-terraform-study-tfstate"
    key    = "stg/terraform.tfstate"
    region = "ap-northeast-2"
    dynamodb_table = "terraform-locks"
    # encrypt        = true
  }
}
2.2. 테스트를 위한 vpc.tf 파일 생성
provider "aws" {
  region  = "ap-northeast-2"
}

resource "aws_vpc" "scott_vpc" {
  cidr_block       = "10.10.0.0/16"
  enable_dns_support   = true
  enable_dns_hostnames = true

  tags = {
    Name = "terraform-study"
  }
}

resource "aws_subnet" "scott_subnet_01" {
  vpc_id     = aws_vpc.scott_vpc.id
  cidr_block = "10.10.1.0/24"

  availability_zone = "ap-northeast-2a"
  map_public_ip_on_launch = true

  tags = {
    Name = "terraform-subnet-01"
  }
}

resource "aws_subnet" "scott_subnet_02" {
  vpc_id     = aws_vpc.scott_vpc.id
  cidr_block = "10.10.2.0/24"

  availability_zone = "ap-northeast-2c"
  map_public_ip_on_launch = true

  tags = {
    Name = "terraform-subnet-02"
  }
}


resource "aws_internet_gateway" "scott_igw" {
  vpc_id = aws_vpc.scott_vpc.id

  tags = {
    Name = "terraform-igw"
  }
}

resource "aws_route_table" "scott_rt" {
  vpc_id = aws_vpc.scott_vpc.id

  tags = {
    Name = "terraform-rt"
  }
}

resource "aws_route_table_association" "scott_rt_association_01" {
  subnet_id      = aws_subnet.scott_subnet_01.id
  route_table_id = aws_route_table.scott_rt.id
}

resource "aws_route_table_association" "scott_rt_association_02" {
  subnet_id      = aws_subnet.scott_subnet_02.id
  route_table_id = aws_route_table.scott_rt.id
}

resource "aws_route" "scott_default_route" {
  route_table_id         = aws_route_table.scott_rt.id
  destination_cidr_block = "0.0.0.0/0"
  gateway_id             = aws_internet_gateway.scott_igw.id
}
2.3. Terraform 실행
terraform init && terraform plan && terraform apply -auto-approve
- init 실행 시 원격 s3 백엔드와 연결
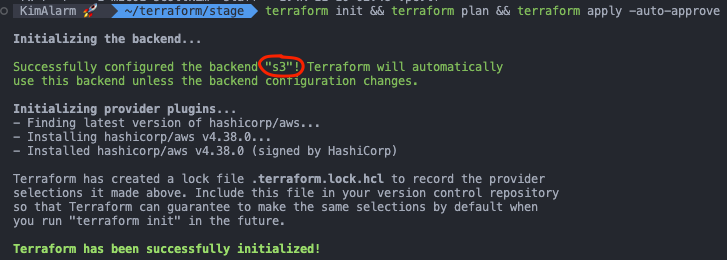
- apply 후 Local 위치에 tfstate 파일이 존재하지 않음
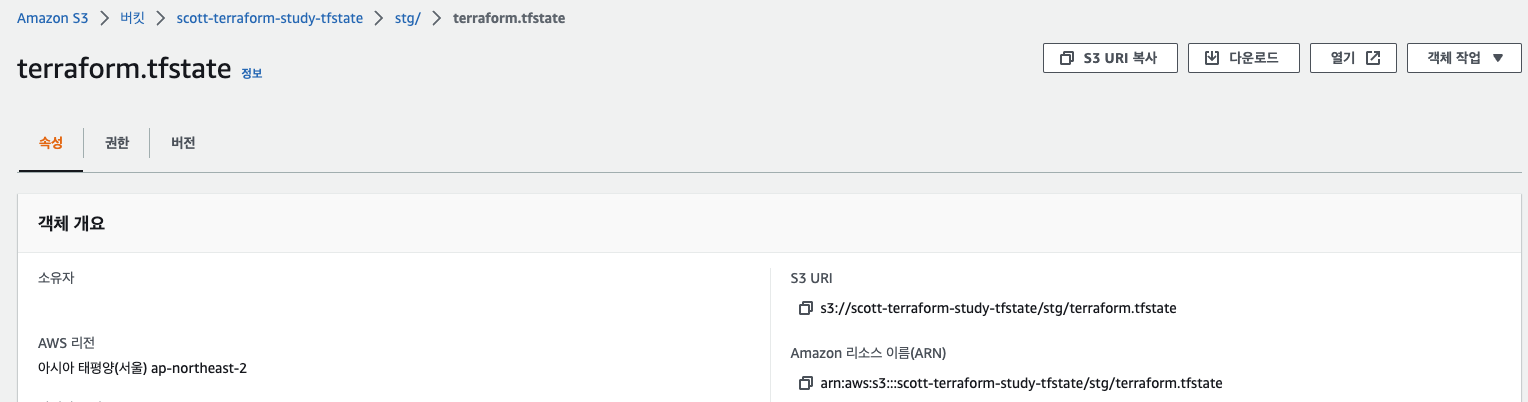
3. Backend 확인
3.1. S3 bucket 확인
3.2. DynamoDB 확인

3.3. DynamoDB 잠금 확인해보기
- vpc.tf 에 변경을 가하고 배포해보자 (Tag 변경)
resource "aws_vpc" "scott_vpc" {
  cidr_block       = "10.10.0.0/16"
  enable_dns_support   = true
  enable_dns_hostnames = true

  tags = {
    Name = "terraform-study-01"
  }
}
- 배포와 동시에 DynamoDB Table 에 가서 확인해보면, lock 이 걸려있는 것을 확인할 수 있다.
- 이 때, 다른 사람이 terraform apply 명령어를 가하면 오류가 발생하여 충돌을 방지한다.

DynamoDB Lock 에 대한 정보
- 해당 작업의 ID
- 작업 형식
- 해당 작업을 누가 호출했는 지
- Terraform Version
- 호출 시간
- 호출 Path
{
    "ID":"41602152-098d-0524-fb71-5c6d3041e6e4",
    "Operation":"OperationTypeApply",
    "Info":"",
    "Who":"{MyPC}.local",
    "Version":"1.3.2",
    "Created":"2022-11-09T18:11:07.015925Z",
    "Path":"scott-terraform-study-tfstate/stg/terraform.tfstate"
}
실습 진행 후에는 반드시 리소스를 삭제하자!
terraform destroy -auto-approve
이번에는 S3 와 DynamoDB 를 활용해 tfstate 파일을 관리하는 방법에 대해서 배워보았다.
다음에는 tfstate 파일을 격리하는 여러 방안에 대해서 알아보자 !
'IaC > Terraform' 카테고리의 다른 글
| [Infracost] 테라폼 리소스 비용 한눈에 보기 - 1. Local 환경에서 실행 (0) | 2022.11.12 |
|---|---|
| 3주차(1)_Workspace를 이용한 tfstate 파일 격리 (0) | 2022.11.10 |
| 2주차(3)_terraform.tfstate 란 무엇인가?? (0) | 2022.11.10 |
| 2주차(2)_Terraform을 통한 다중 웹 서버 배포 (ASG & ELB) (0) | 2022.11.10 |
| 2주차(1)_Terraform을 통한 VPC 배포 (0) | 2022.11.09 |
Contents