AWS/Security
온프레미스 환경에서 IAM Roles Anywhere 를 활용한 AWS 리소스 접근
- -
이번 포스팅에서는 IAM Roles Anywhere 기능을 활용하여
온프레미스 환경에서 AWS Access Key 를 사용하지 않고, AWS IAM Role 을 사용하여 리소스에 접근하는 방법에 대해 알아보겠습니다.
1. 개요
최근 많은 기업에서 클라우드를 도입하고 있다곤 해도 아직까지 모든 인프라를 클라우드 상에서 운영하고 있는 곳은 그리 많지 않습니다.
많은 조직에서 아직까지 인프라는 온프레미스와 클라우드를 혼용해서 사용하는 일명 하이브리드 클라우드 형태로 운영하고 있을 것입니다.
이러한 경우 온프레미스와 클라우드 간 네트워크 트래픽은 VPN 혹은 DX (Direct Connect) 를 이용하여 구성하곤 합니다.
하지만 온프레미스 Application 에서 AWS 리소스 (ex. s3) 에 접근해야하는 경우,
네트워크 트래픽 통신 만으로는 이를 해결하기 어렵습니다.
통신이 허용된다고 할지라도 많은 AWS 리소스는 RBAC (IAM) 기반으로 접근 제어를 하기 때문입니다.
그렇기 때문에 기존 온프레미스 환경에서 AWS 리소스에 접근하기 위해서
권한있는 Access Key 와 Secret Key (Long-lived Credential) 를 발급하여 이를 해결하곤 했습니다.
이런 경우 주기적으로 Credential 을 교체해주는 것이 필요하고,
혹여나 키값이 노출되었을 경우 보안 사고가 발생할 수 있기 때문에 이를 관리하기 쉽지 않았습니다.
AWS 에서는 이러한 문제점을 해결하기 위해 IAM Roles Anywhere 서비스를 출시했습니다.
1.1. IAM Roles Anywhere
공식 문서
What is AWS Identity and Access Management Roles Anywhere? - IAM Roles Anywhere
What is AWS Identity and Access Management Roles Anywhere? You can use AWS Identity and Access Management Roles Anywhere to obtain temporary security credentials in IAM for workloads such as servers, containers, and applications that run outside of AWS. Yo
docs.aws.amazon.com
IAM Roles Anywhere 를 사용하면 온프레미스 환경에서 AWS 의 단기자격증명 (STS) 을 통해 AWS 리소스에 접근할 수 있게 됩니다.
또한, AWS 리소스에 액세스하기 위해 AWS 애플리케이션에서 사용하는 것과 동일한 IAM 정책 및 IAM 역할을 사용할 수 있습니다.
IAM Roles Anywhere 를 사용하기 위해서는 인증 기관(CA) 에서 발급한 X.509 인증서를 사용해야 합니다.
이후, 해당 CA를 IAM Roles Anywhere 의 Trust Anchor 로 등록하여 공개 키 인프라(PKI)와 IAM Roles Anywhere 간에 신뢰를 구축합니다.
AWS 관리형 서비스인 AWS Private CA 를 사용하여 CA를 생성한 다음 이를 사용하여 IAM Roles Anywhere와의 신뢰를 구축할 수도 있습니다.
다만 비용이 굉장히 비싸기 때문에, 이번 포스팅에서는 OpenSSL 을 이용한 사설 인증서로 데모를 진행하겠습니다.
IAM Roles Anywhere 용어
- Trust Anchor
Trust Anchor 는 AWS Private CA 또는 외부 CA 인증서 에 대한 참조로,
이를 통해 IAM Roles Anywhere 와 인증 기관(CA) 간에 신뢰를 설정할 수 있습니다.
- IAM Role
해당 IAM Role 에 온프미스 워크로드에게 허용할 IAM Policy 를 부여해 사용합니다.
- IAM Profile
IAM Profile 에서 IAM 세션 정책을 정의하여, 온프레미스 워크로드 세션에 대해 생성된 권한을 제한할 수 있습니다.
1.2. 데모 아키텍처

1. AWS Trust Anchor 와 연동된 온프레미스 인증서와 키를 통해 AWS 에 자격증명을 요청합니다.
2~4. AWS Private CA 혹은 Self-Signed CA 에서 요청이 허용되면 IAM Role 과 연동된 IAM Profile 의 권한 제어를 확인한 후 단기 자격증명을 제공합니다.
5. 단기 자격증명은 IAM Profile 과 연동된 IAM Role 에 접근할 수 있는 권한이 부여됩니다.
6.해당 IAM Role 을 통해 AWS 리소스에 접근합니다.
1.3. 인증서 제약 사항
Client Certificates
- 인증서는
x.509 v3 certificate수준 필요 - basic constraints 에
CA: false포함 - Key 는 반드시
Digital Signature존재 SHA256또는 그 이상의 알고리즘 필요
CA Certificates
- Key 에
Digital Signature,Certificate Sign,CRL Sign포함 - basic constraints 에
CA: true포함
2. 온프레미스 Private CA (Certificate Authority) 구성
온프레미스 환경에서 OpenSSL 을 통해 IAM Roles Anywhere 에서 사용할 수 있는 인증서를 발급하겠습니다.
데모에서는 RSA 키 대신 타원곡선키인 ECDSA 암호화를 사용해보겠습니다.
2.1. Trust Anchor 에 등록하기 위한 인증서 생성
ECDSA 암호화를 통해 사설 인증서를 생성할 예정인데,
이 때 ECDSA 에서 가장 많이 사용 되는 형식인 secp384r1 을 사용하겠습니다. (prime256v1, secp384r1 는 동일 형식)
Certificate Authority 를 위한 타원 곡선 키 생성
openssl ecparam -genkey -name secp384r1 -out rootCA.key
Root CA 의 Certificate Signing Request (CSR) 를 위한 Config 생성
touch root_request.config
데모를 위한 최소한의 필요 권한만 설정하였습니다.
####################### Req Section ##########################
# This is used with the 'openssl req' command to sign a request
[req]
prompt                 = no
string_mask            = default
distinguished_name     = req_dn

[req_dn]
countryName            = KR
localityName           = Seoul
organizationName       = Kimalarm Inc.

######################## CA Section ##########################
# This is used with the 'openssl ca' command to sign a request
[ca]
default_ca             = CA

[CA]
# Where OpenSSL stores information
dir                    = .
certs                  = $dir
crldir                 = $dir

new_certs_dir          = $certs
database               = $dir/index
certificate            = $certs/rootCRT.pem
private_key            = $dir/rootPrivateKey.pem
crl                    = $crldir/crl.pem
serial                 = $dir/serial.txt
RANDFILE               = $dir/.rand

# How OpenSSL will display certificate after signing
name_opt               = ca_default
cert_opt               = ca_default

# How long the CA certificate is valid for
default_days           = 3650
# The message digest for self-signing the certificate
default_md             = sha256
# Subjects don't have to be unique in this CA's database
unique_subject         = no
# What to do with CSR extensions
copy_extensions        = copy
# Rules on mandatory or optional DN components
policy                 = simple_policy
# Extensions added while singing with the `openssl ca` command
x509_extensions        = x509_ext

[simple_policy]
countryName            = optional
stateOrProvinceName    = optional
localityName           = optional
organizationName       = optional
organizationalUnitName = optional
commonName             = optional
domainComponent        = optional
emailAddress           = optional
name                   = optional
surname                = optional
givenName              = optional
dnQualifier            = optional

[ x509_ext ]
# These extensions are for a CA certificate
subjectKeyIdentifier   = hash
authorityKeyIdentifier = keyid:always
basicConstraints       = critical, CA:TRUE
keyUsage               = critical, keyCertSign, cRLSign, digitalSignature
Root CA 의 Certificate Signing Request (CSR) 생성
openssl req -new -key rootCA.key -out rootCA.req -nodes -config root_request.config
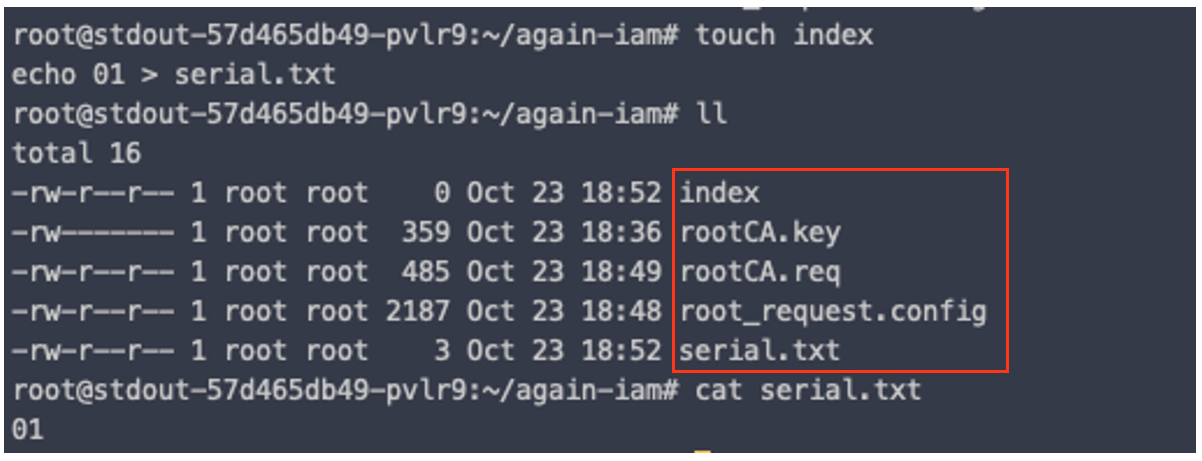
인증서 발행을 위한 Serial Number 생성
touch index
echo 01 > serial.txt
CA certificate 생성
AWS Trust Anchor 에 등록할 CA 를 생성해줍니다.
openssl ca -out rootCA.pem -keyfile rootCA.key -selfsign -config root_request.config -in rootCA.req

발행이 성공하면, Serial 숫자가 상승하는 것을 알 수 있습니다.

CA certificate 발행 확인
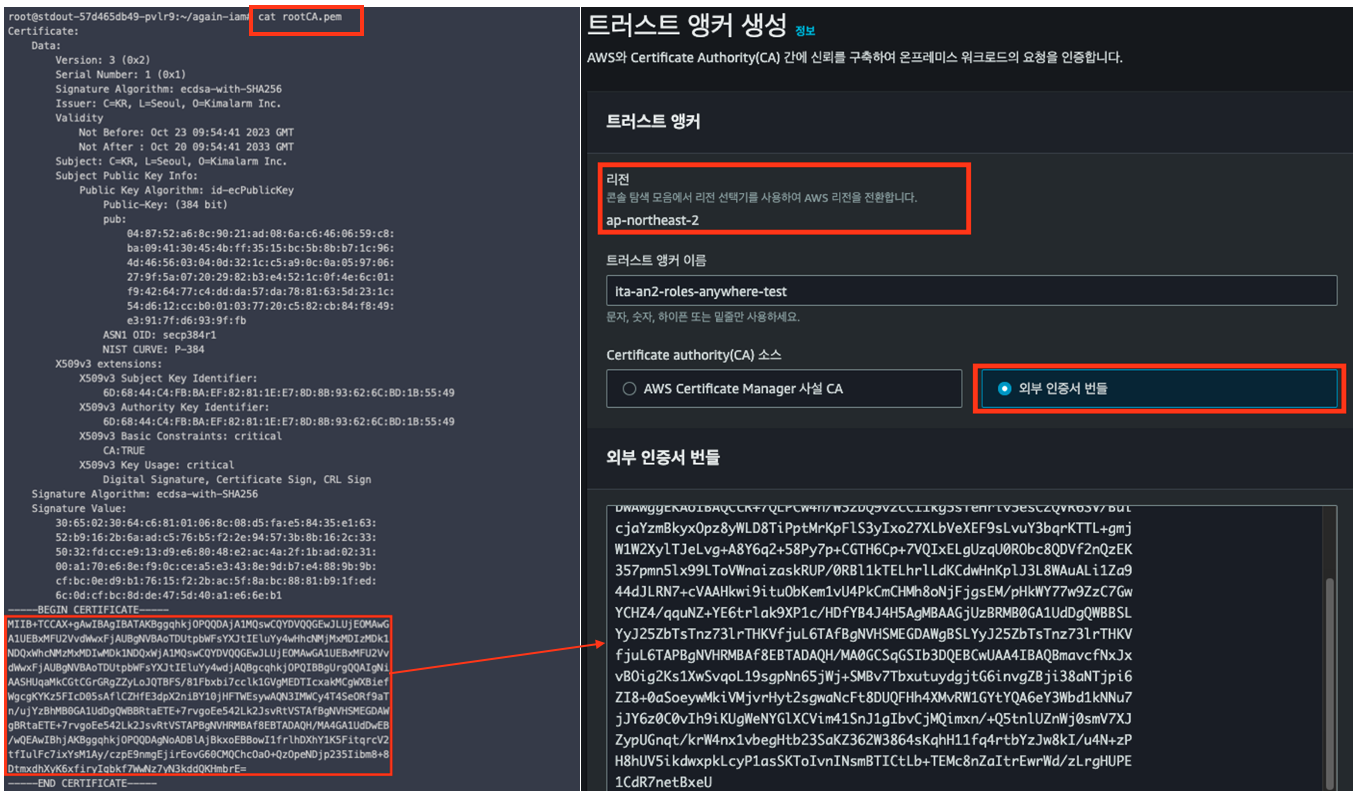
생성한 CA 가 유효한 지 확인합니다.
openssl x509 -noout -text -in rootCA.pem
이 때, Version 이 3 이어야 이후 인증 오류가 발생하지 않습니다.

2.2. Trust Anchor 인증서 등록
이제 생성한 CA 를 AWS IAM Roles Anywhere 에 등록할 차례입니다.
AWS IAM Role 대시보드에서 밑으로 내리다보면 Roles Anywhere 를 위한 UI 가 존재합니다.

Trust Anchor 를 생성하기 전, 한 가지 주의해야할 점은
IAM Role 은 Global 서비스이지만 IAM Roles Anywhere 는 Region 서비스입니다.
그렇기 때문에 IAM Roles Anywhere UI 에서 버지니아 북부로 진입하도록 되어 있는데,
이를 서울 리전으로 변경한 후 Trust Anchor 를 생성합니다.

OpenSSL RootCA 인증서 입력
앞서 생성했던, rootCA.pem 파일의 인증서 값을 복사하여 Trust Anchor 에 넣어줍니다.
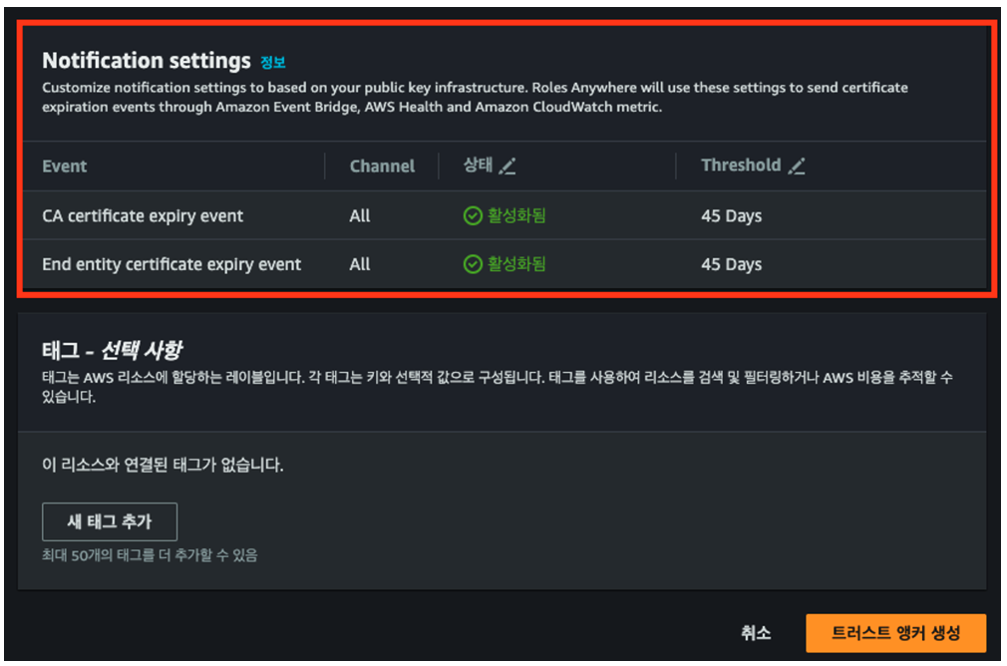
이 때, 인증서 만료 기간에 따른 EventBridge 알림 설정도 필요하다면 가능합니다.
2.3. Roles Anywhere 에 연결할 IAM Role 생성
이제 온프레미스 환경에서 사용할 IAM Role 을 생성해보겠습니다.
신뢰관계 설정
IAM 신뢰관계에서 Roles Anywhere 를 찾아 선택합니다.

IAM Policy 생성
온프레미스에서 S3 에 접근하기 위해 다음과 같은 권한 정책을 부여합니다.
{
    "Version": "2012-10-17",
    "Statement": [
        {
            "Sid": "S3Access",
            "Effect": "Allow",
            "Action": [
                "s3:PutObject",
                "s3:GetObject",
                "s3:ListBucket",
                "s3:DeleteObject",
                "s3:DeleteBucket"
            ],
            "Resource": [
                "*"
            ]
        }
    ]
}
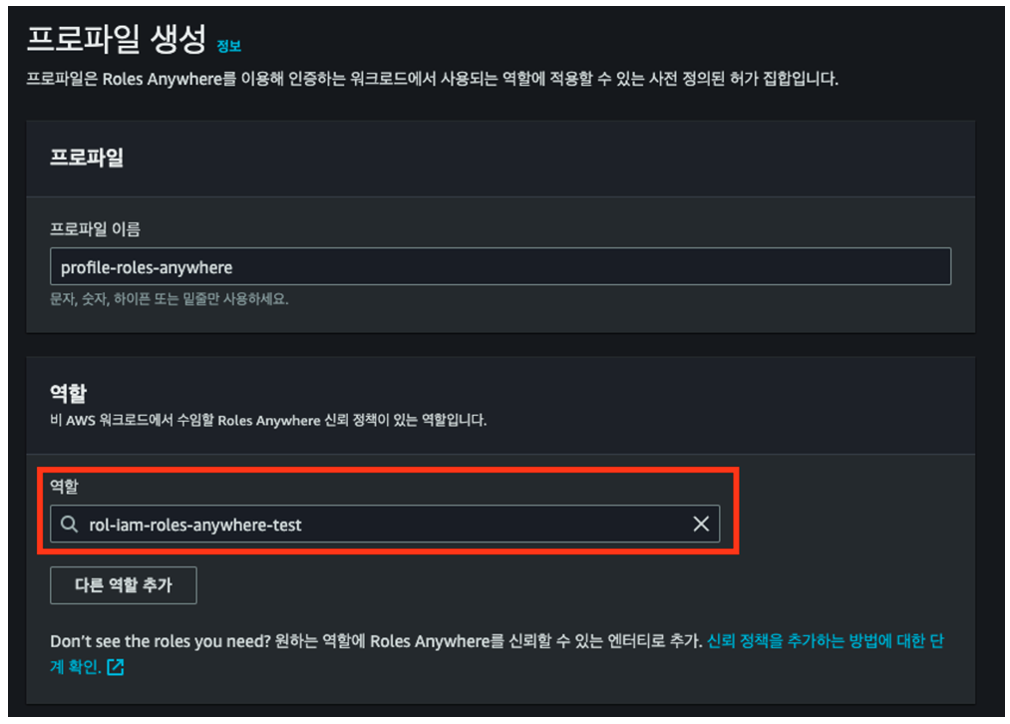
2.4. IAM Role 과 연결될 Instance Profile 생성
다시 Roles Anyhwhere UI 로 돌아와 Instance Profile 을 생성합니다.

Profile 생성 시 연동할 IAM Role 을 선택해줍니다.
온프레미스 환경과 연동할 IAM Roles Anywhere 구성이 완료되었습니다.
다음은 실제 온프레미스 환경에서 IAM Roles Anywhere 를 사용하기 위한 Key 를 생성해보겠습니다.
3. 온프레미스 Client Key 구성
Key 생성은 앞서 진행했던 절차와 거의 동일합니다.
마찬가지로 ECDSA 암호화를 통해 사설 인증서를 생성하겠습니다.
Client Key 를 위한 타원 곡선 키 생성
openssl ecparam -genkey -name secp384r1 -out client.key
Client Key 의 Certificate Signing Request (CSR) 를 위한 Config 생성
touch client_req.config
####################### Req Section ##########################
# This is used with the 'openssl req' command to sign a request

[ req ]
prompt                 = no
string_mask            = default
distinguished_name     = req_dn

[ req_dn ]
countryName            = KR
localityName           = Seoul
organizationName       = Kimalarm Inc.
Client Key 의 Certificate Signing Request (CSR) 생성
openssl req -sha512 -new -key client.key -out client.csr -nodes -config client_req.config
Client Certificate Config file 생성
앞서 생성한 Config 파일과 다른 별개의 Config 파일을 생성합니다.
touch client_cert.config
basicConstraints   = critical, CA:FALSE
keyUsage           = critical, digitalSignature
Client CA certificate 생성
Trust Anchor 에 등록된 rootCA 와 인증되는 Client Key 를 생성합니다.
openssl x509 -req -sha512 -days 365 -in client.csr -CA rootCA.pem -CAkey rootCA.key -CAcreateserial -out client.pem -extfile client_cert.config

Client CA 발행 확인
성공적으로 발행되면, 다음과 같은 화면이 출력됩니다.
openssl verify -verbose -CAfile rootCA.pem client.pem

4. AWS IAM Roles Anywhere 활용하기
4.1. AWS Signing Helper 다운로드
온프레미스 환경에서 AWS IAM Roles Anywhere 를 활용하기 위해 AWS Signing Helper 를 다운받아야 합니다.
Obtaining temporary security credentials from AWS Identity and Access Management Roles Anywhere - IAM Roles Anywhere
Note that this disables TLS host authentication, and can open the connection to man-in-the-middle attacks. This option should only be used under specific, tightly controlled scenarios, such as debugging proxy connections.
docs.aws.amazon.com
# 다운로드
curl https://rolesanywhere.amazonaws.com/releases/1.0.4/X86_64/Linux/aws_signing_helper --output aws_signing_helper

# 실행 권한 부여
chmod 755 aws_signing_helper
4.2. AWS Signing Helper 를 통한 STS Token 발급 확인
Helper 가 준비되었다면 다음과 같은 명령어를 통해 올바르게 단기자격증명이 발급되는 지 확인해봅니다.
./aws_signing_helper credential-process \
  --certificate client.pem \
  --private-key client.key \
  --trust-anchor-arn <anchor-arn> \
  --profile-arn <profile-arn> \
  --role-arn <role-arn>

4.3. AWS Config 편집
해당 자격증명을 AWS CLI 명령어와 함께 사용하기 위해 aws conifg 를 수정합니다.
이 때 client.pem & client.key 의 경로는 절대 경로로 지정하는 것이 좋습니다.
echo "[profile iam]
credential_process = ./aws_signing_helper credential-process \
  --certificate client.pem \
  --private-key client.key \
  --trust-anchor-arn <anchor-arn> \
  --profile-arn <profile-arn> \
  --role-arn <role-arn>" >> ~/.aws/config
AWS Config 는 아래 형태로 들어가게 됩니다.

4.4. AWS CLI 사용
CLI 를 사용할 때 Profile 을 반드시 지정하여 사용하여야 합니다.
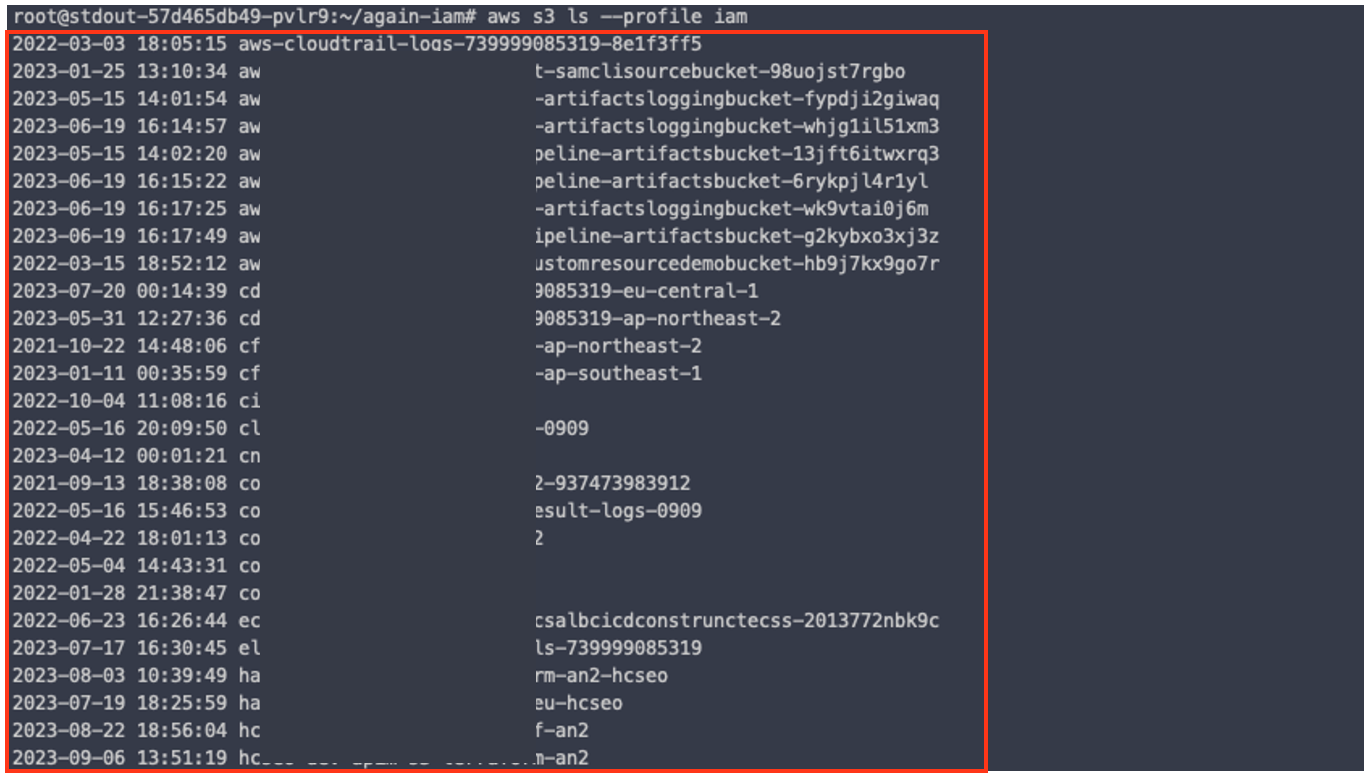
aws s3 ls --profile iam온프레미스 환경에서도 성공적으로 AWS 리소스에 접근할 수 있는 권한을 가지게 되었습니다.
데모에서는 AWS CLI 만을 사용했으나, 실제 Application 에서 사용하기 위해서는 SDK 등을 활용해야 할 것입니다.
참고 문서
1. https://catalog.workshops.aws/deep-dive-on-roles-anywhere/en-US
2. https://jimmydqv.com/iam-anywhere/
3. https://aws.amazon.com/ko/blogs/security/iam-roles-anywhere-with-an-external-certificate-authority/
4. https://github.com/ivanr/bulletproof-tls
Contents