[MinIO Study 2주차] MinIO 와 DirectPV
- -
CoudNet@ 팀의 가시다님께서 리딩하시는 MinIO Study 2주차 스터디 내용 정리
이번 주차에는 MinIO 스토리지 사용과 관련된 DirectPV 그리고 성능에 대해서 공부했습니다.
1. 실습 환경 구성
이번 주차부터는 AWS EC2 에 K3S 를 설치하여 MinIO 실습을 진행했습니다.
EC2 환경은 AWS IaC 서비스인 CloudFormation 으로 배포했습니다.
1.1. CloudFormation 배포
AWS CLI 를 통해 CloudFormation 을 배포했으며, CloudFormation 을 사용하는 방법은 따로 명시하지 않았습니다.
# YAML 파일 다운로드
curl -O https://s3.ap-northeast-2.amazonaws.com/cloudformation.cloudneta.net/K8S/minio-ec2-1node.yaml

# CloudFormation 배포
aws cloudformation deploy \
  --template-file minio-ec2-1node.yaml \
  --stack-name miniolab \
  --parameter-overrides KeyName=kp-alarm SgIngressSshCidr=$(curl -s ipinfo.io/ip)/32 \
  --region ap-northeast-2
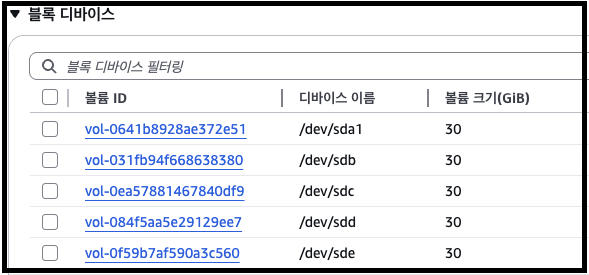
배포 하면 스토리지가 5개인 EC2 가 생성된 것을 확인할 수 있습니다.
각 스토리지는 DirectPV 실습에 사용될 예정으로, root Volume 1개 + DirectPV 4개로 이루어져 있습니다.
1.2. 실습을 위한 도구 설치
EC2 에 SSH 접속을 하여 향후 실습에 필요한 도구를 설치해줍니다.
# Install Krew
wget -P /root "https://github.com/kubernetes-sigs/krew/releases/latest/download/krew-linux_amd64.tar.gz"
tar zxvf "/root/krew-linux_amd64.tar.gz" --warning=no-unknown-keyword
./krew-linux_amd64 install krew

export PATH="${KREW_ROOT:-$HOME/.krew}/bin:$PATH" # export PATH="$PATH:/root/.krew/bin"
echo 'export PATH="$PATH:/root/.krew/bin:/root/go/bin"' >> /etc/profile
kubectl krew install get-all neat rolesum pexec stern
kubectl krew list

2. MinIO 최적화를 위한 서버 튜닝
2.1. EBS 성능 측정
fio 도구를 통해서 EBS IOPS 성능을 간단하게 측정해볼 수 있습니다.
아래 명령어를 통해 EC2 에 연결된 EBS 5개의 정보를 확인할 수 있습니다.
# EBS 정보 조회
lsblk -a -o NAME,KNAME,MAJ:MIN,SIZE,TYPE,MOUNTPOINT,FSTYPE,UUID,MODEL,SERIAL

EBS 성능 측정
# 측정 기본
## IOPS: 초당 입출력 횟수
## Throughput: 초당 MB 전송량
## Block size, Queue depth, RW 패턴 (랜덤/순차, 읽기/쓰기) 조합에 따라 결과가 달라집니다.
## AWS gp3는 기본 IOPS 3000/Throughput 125MB/s

# 4k 랜덤 읽기/쓰기, iodepth=16, numjobs=4
## --rw=randrw : 랜덤 읽기/쓰기 혼합
## --rwmixread=70 : 70% 읽기 / 30% 쓰기
## --bs=4k : 4KB 블록 → IOPS 측정용
## --iodepth=16 : 큐 깊이 16
## --numjobs=4 : 4개의 병렬 job
## --time_based --runtime=60 : 60초 동안 측정
## --group_reporting : 그룹 단위 결과 요약
fio --name=randrw_test \
  --filename=/mnt/testfile \
  --size=4G \
  --rw=randrw \
  --rwmixread=70 \
  --bs=4k \
  --iodepth=16 \
  --numjobs=4 \
  --time_based \
  --runtime=60 \
  --group_reporting
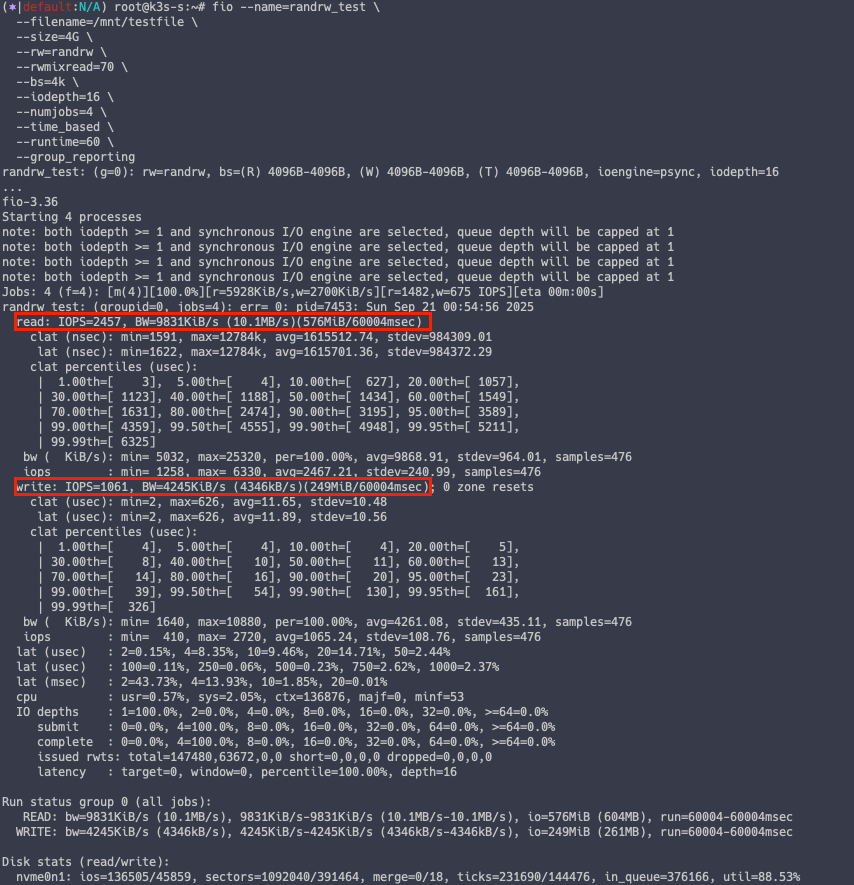
측정 결과 Read IOPS 는 평균 2382, Write 평균 IOPS 는 1028 로 확인되었습니다.
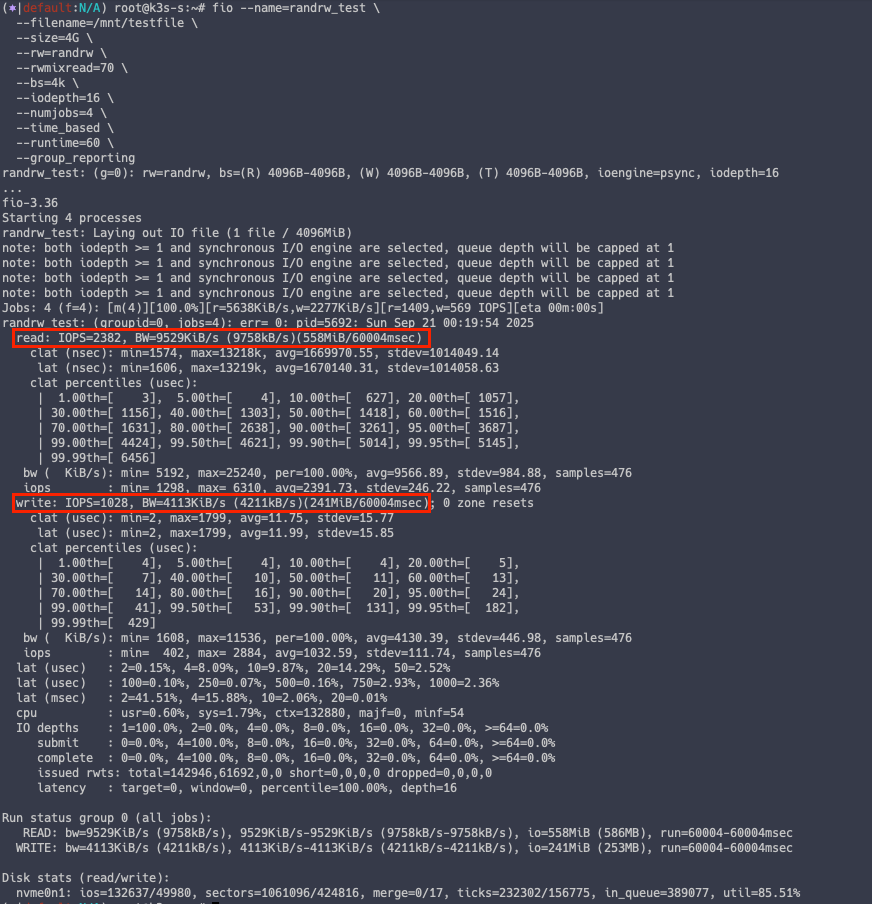
참고로 해당 IOPS 는 EBS gp3 배포 시에 적용된 IOPS 수치에 영향을 받습니다.

2.2. MinIO Software Checklist
MinIO 공식 문서를 보면 MinIO 를 운영 환경에서 동작시키기 위한 Software 체크리스트가 존재합니다.
해당 문서를 하나씩 확인하면서 MinIO 서버를 최적화해보겠습니다.
Software Checklist — MinIO Object Storage (AGPLv3)
Software Checklist Table of Contents Use the following checklist when planning the software configuration for a production, distributed MinIO deployment. Servers running a Linux operating system with a 6.6+ kernel. Red Hat Enterprise Linux (RHEL) 10 or Ubu
docs.min.io
1. 6.6 버전 이상의 커널을 실행 중인 Linux OS Server

# 현재 Linux 서버 커널 확인
uname -r
6.14 버전이므로 통과

2. 시간 동기화 여부

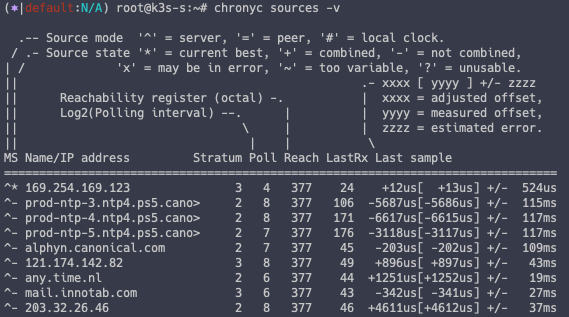
EC2 의 경우 기본적으로 시간 동기화 설정이 다 되어 있음
chronyc sources -v
chronyc tracking
3. 파일 시스템, 시스템 수준 호출 또는 커널 수준 호출을 색인하거나 스캔하거나 감사하는 시스템 서비스 비활성화
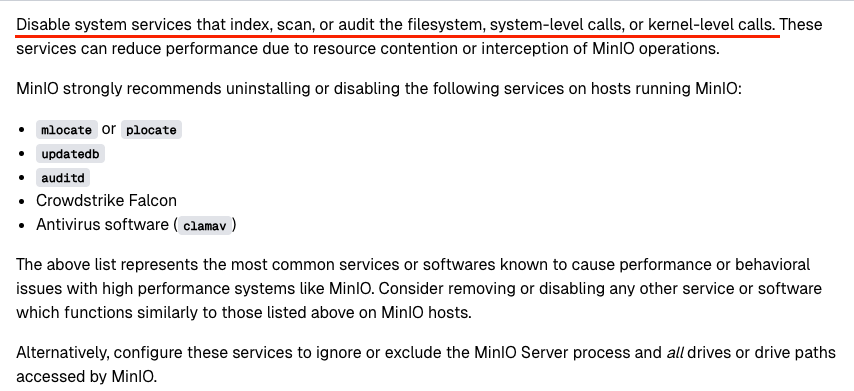
스토리지 서버인만큼 볼륨 IOPS 에 영향을 줄 수 있는 서비스는 비활성화 할 것을 권장하고 있습니다.
다만 그 중에서는 서버 보안을 위해 적용하는 Auditd, ClamAV 같은 도구도 포함되어 있어 해당 도구를 비활성화할 것인지 충분한 고려가 필요하며,
필요할 경우에는 MinIO 가 접근하는 디렉토리는 해당 도구 영향 범위에서 제외시켜야 합니다.
# mlocate or plocate
systemctl disable --now plocate-updatedb
systemctl list-timers | grep locate

# updatedb
systemctl disable --now updatedb.timer
systemctl list-timers | grep updatedb

# auditd
systemctl disable --now auditd
systemctl list-timers | grep audit
그 외 추가적인 체크리스트가 있으니 관심이 있을 경우 개인적으로 확인해보는 것도 좋을 것 같습니다.
2.3. MinIO Tuning
MinIO 스토리지 최적화를 위해 TuneD 도구를 사용할 수 있습니다.
해당 도구는 시스템 장치 모니터링 및 적응형 조정 데몬으로 서버의 환경에 맞게 각종 서버 자원을 튜닝해주는 도구로 레드햇 공식 문서에도 나와있을 정도로 신뢰성 높은 도구입니다.
# TuneD 설치 전 시스템 설정 백업
sysctl -a > before.txt

# tuned 설치
apt install tuned -y

# tuned 실행
systemctl start tuned && systemctl enable tuned

# Systemd 정보 확인
cat /usr/lib/systemd/system/tuned.service
TuneD 에서는 기본적으로 제공되는 Profile 을 통해 시스템 설정을 간단하게 최적화 할 수 있습니다.
# 현재 Profile 확인
tuned-adm active

# 현재 Profile 설정 모드 확인
tuned-adm profile_mode

# 사용가능한 Profile 리스트 출력
tuned-adm list

# Profile 변경
tuned-adm profile aws

# 변경된 시스템 설정
sysctl -a > after.txt

# 시스템 설정 변경 사항 확인
vi -d before.txt after.txt
튜닝 전과 후의 fio 테스트를 해보면 튜닝 후의 값이 살짝 상승한 것을 알 수 있습니다.
3. DirectPV 정보
MinIO 의 공식문서에서 DirectPV 는 별도의 항목 문서로 독립되어 만들어져 있을 만큼 권장되는 스토리지 사용 방법입니다.
AIStor Object Store Documentation
docs.min.io
3.1. DirectPV 소개
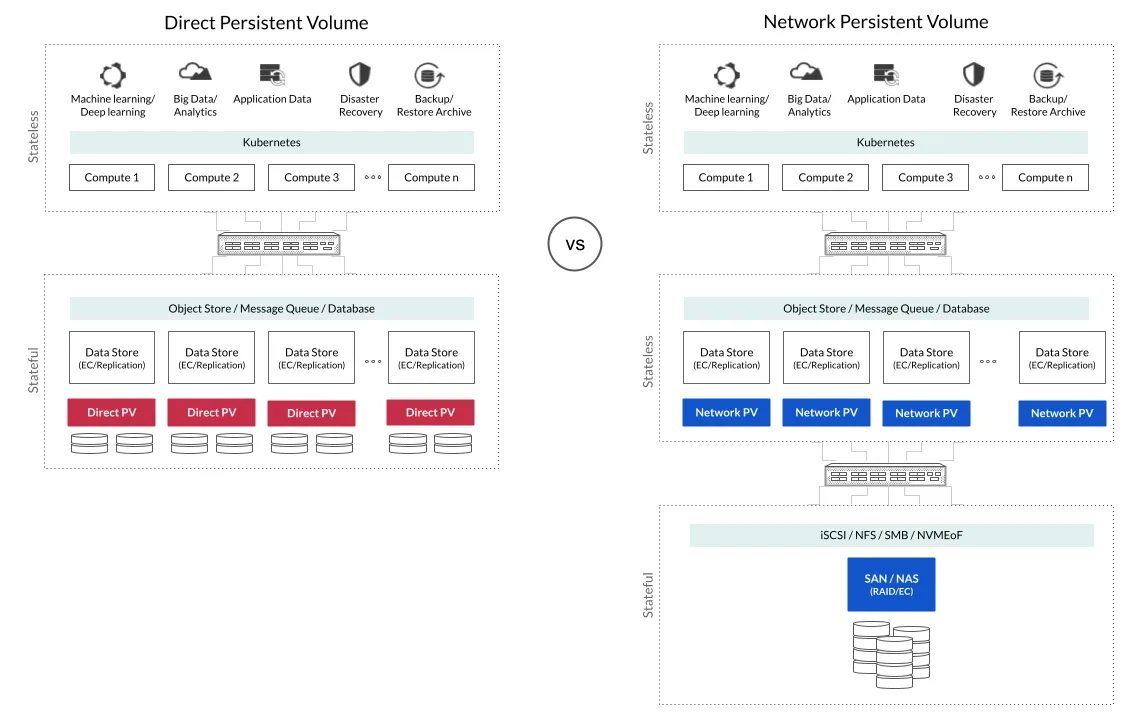
DirectPV 는 MinIO 에서 개발한 스토리지 관련 오픈소스 중의 하나로 Kubernetes 환경에서 로컬 디스크를 Persistent Volume(PV)로 직접 활용할 수 있도록 해주는 CSI(Container Storage Interface) 드라이버입니다.
보통 Kubernetes에서 스토리지를 쓰려면 NFS, Ceph 같은 외부 스토리지 시스템을 붙이는 경우가 많은데,
DirectPV는 이런 외부 시스템 없이 노드에 장착된 디스크(Local Disk)를 직접 PV로 제공해 줍니다.
DirectPV 구성 요소
a. CSI Driver
- 로컬 볼륨을 프로비저닝하는 Kubernetes 클러스터에 직접 설치된 DirectPV CSI 드라이버
b. Plugin
- 명령줄 인터페이스를 통해 DirectPV CSI 드라이버를 관리하기 위해 로컬 머신에 설치된 DirectPV 플러그인
Local Path Provisioner 와의 차이점
| 항목 | DirectPV | LocalPV / HostPath |
| PV 제공 방식 | PVC 요청 시 동적으로 PV 생성 가능 | LocalPV 는 사전에 정적(static)으로 PV 리소스 생성 필요 HostPath 는 Pod 삭제/재시작 시 데이터 손실 가능성 있음 |
| Pod / 노드 재시작 시 데이터 지속성 | 노드 재부팅 또는 Pod 재시작 후에도 PV, PVC가 유지 | LocalPV는 PV 유지 HostPath 는 Pod 삭제/재시작 시 데이터 손실 가능성 있음 |
| 관리의 복잡성 / 자동화 | 드라이브: 초기화 및 관리하는 과정 필요 사용자 개입이 적고 PVC 요청만으로 PV 생성 가능 |
LocalPV 는 스토리지 소스 / PV 리소스 생성 등을 사전에 설정해야 해서 관리 부담이 큼 |
| Disk 선정 / 할당 방식 | DirectPV 는 노드 로컬 드라이브 중 “초기화된”(managed) 드라이브만 사용. Pod가 Schedule 된 노드 내에서 디스크를 선택함. (Topology / 노드 선택 고려) |
LocalPV / HostPath는 보통 특정 노드나 노드 그룹에 미리 PV가 선언되어 있고, Pod 스케줄링이나 Disk 선택 로직이 DirectPV만큼 동적이지 않음 |
| 지원되지 않는 기능 | DirectPV 는 ReadWriteMany 지원 안 함 CSI snapshot 기능 없음 |
LocalPV / HostPath 도 RWX, 스냅샷 등이 제한적 |
| 성능 및 경로 | 로컬 디스크를 직접 사용함으로써 네트워크 경로(network hops)가 없어서 I/O 성능이 좋음 | HostPath 도 로컬 경로이기 때문에 네트워크 홉은 없음 |
3.2. DirectPV 아키텍처
1. Controller

- 컨트롤러는 Deployment 이름의 controller Pod 로 실행
- DirectPV 컨트롤러는 3 개의 Replica 보유
- 각 복제본들은 요청을 처리할 인스턴스를 선출 (leader election)
Controller Pod 구성
a. Controller
- CSI 요청을 처리하여 볼륨을 생성(Create), 삭제(Delete) 및 확장(Expand)
b. CSI provisioner
- PVC(Persistent Volume Claim) 의 볼륨 생성 및 삭제 요청을 CSI 컨트롤러로 전달
c. CSI Resizer
- PVC(Persistent Volume Claim) 의 볼륨 확장 요청을 CSI 컨트롤러로 전달
2. Node Server
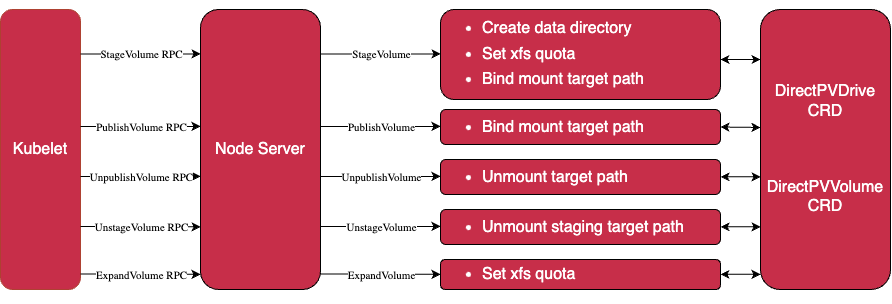
- 노드 서버는 Kubernetes 노드에서 node-server 이름을 가진 데몬셋으로 기동
- 각 노드 서버 Pod 는 독립적으로 노드에서 실행
Node Server Pod 구성
a. Node driver registrar
- 노드 서버를 kubelet 에 등록하여 CSI RPC 호출 수신
b. Node Server
- stage , unstage , publish , unpublish 및 expand 볼륨 RPC 요청 처리
c. Node controller
- DirectPVDrive , DirectPVVolume , DirectPVNode 및 DirectPVInitRequest 에서 발생하는 CRD 이벤트 처리
d. Liveness probe
- Node Server 헬스 체크
4. DirectPV 사용
4.1. DirectPV 설치
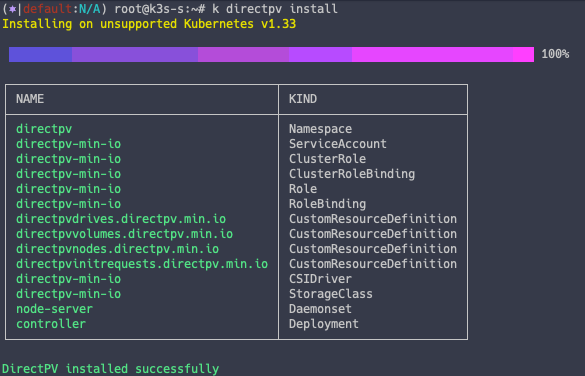
DirectPV 는 Krew 플러그인을 통해서 쉽게 설치할 수 있습니다.
k krew install directpv
k directpv -h
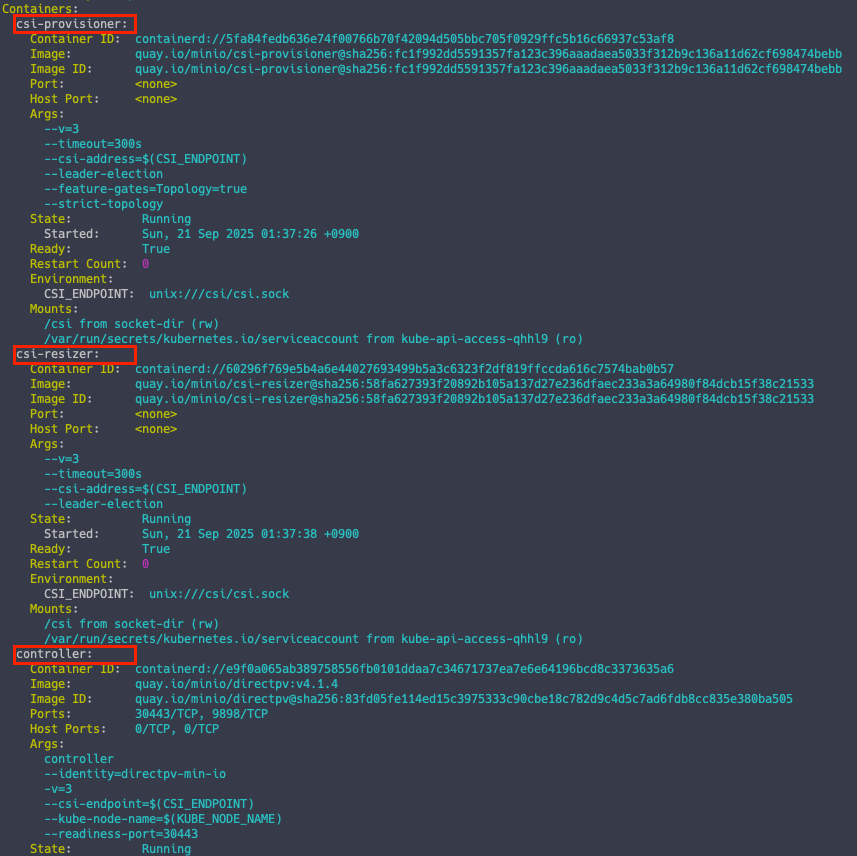
DirectPV Controller 확인
kc describe pod -n directpv
아키텍처 단계에서 확인했던 3개의 컨테이너가 배포된 것을 확인할 수 있습니다.
Node Server 확인
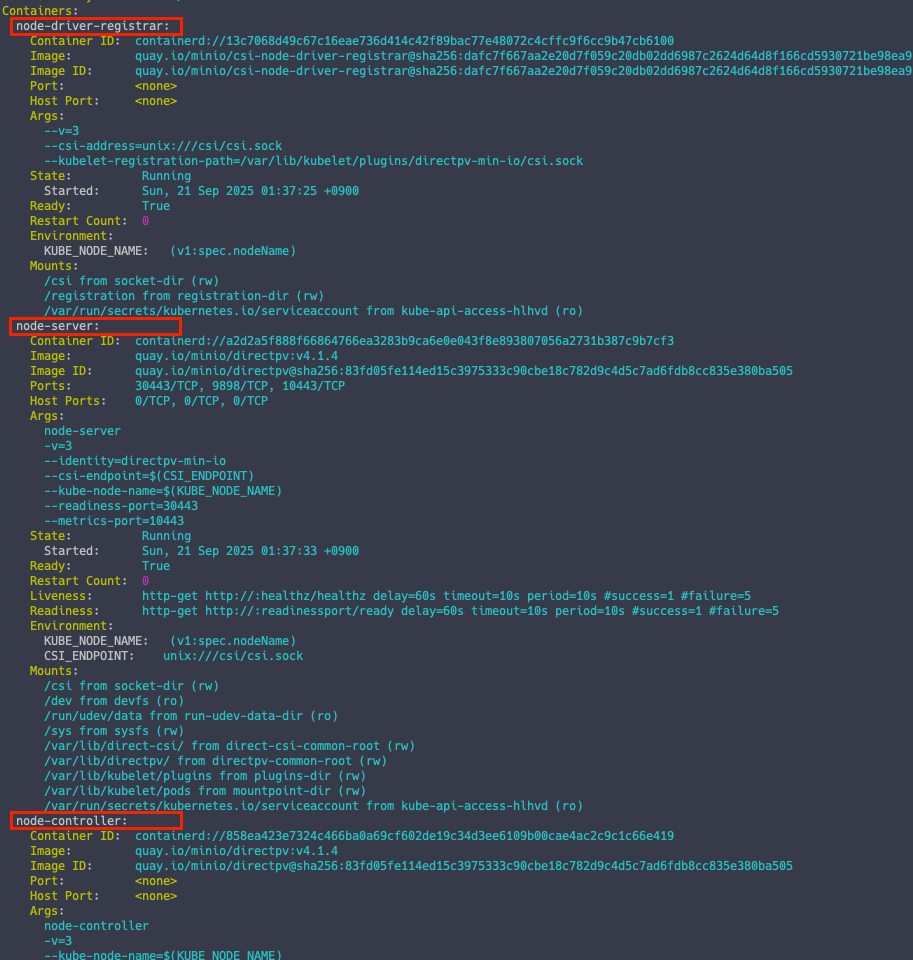
kc describe pod -n directpv -l selector.directpv.min.io.service=enabled
사진에는 전부 표시가 안되었지만, 아키텍처 단계에서 확인했던 4개의 컨테이너가 배포된 것을 확인할 수 있습니다.
4.2. DirectPV 배포
현재 directpv 정보 확인
k directpv info

DirectPV 검색
# 노드 directpv 검색
k directpv discover

# directpv drive yaml 파일 생성
cat drives.yaml | yq

DirectPV 배포
k directpv init drives.yaml

# directpv 배포 수행
k directpv init drives.yaml --dangerous
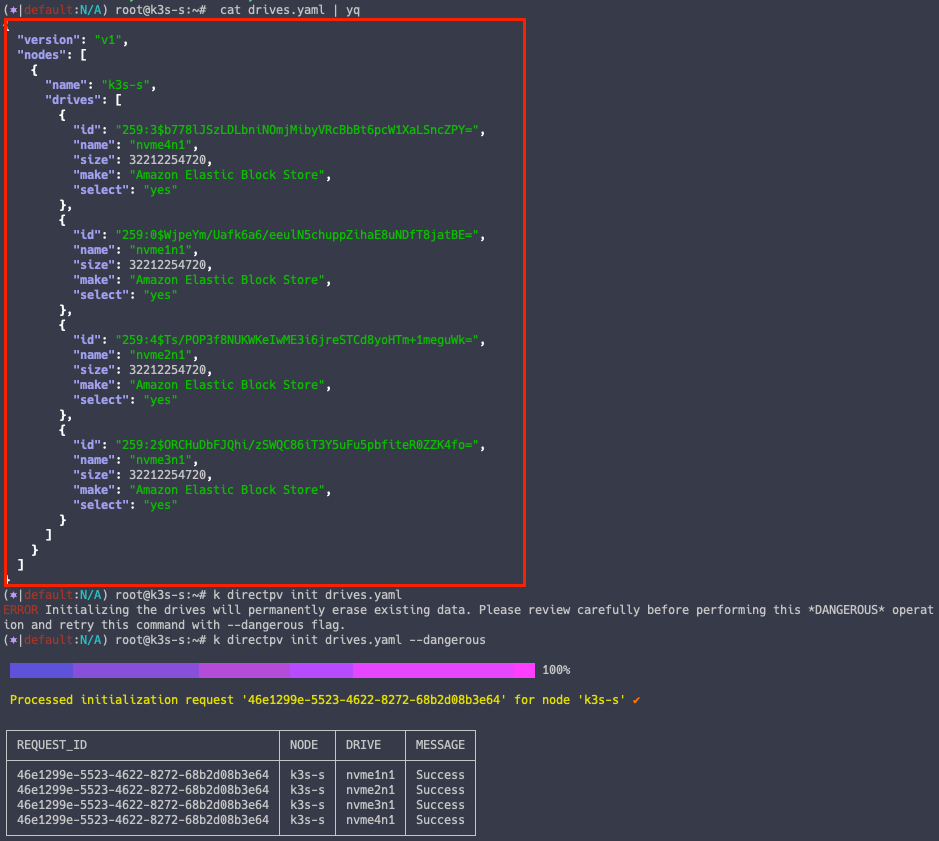
directpv 배포 확인
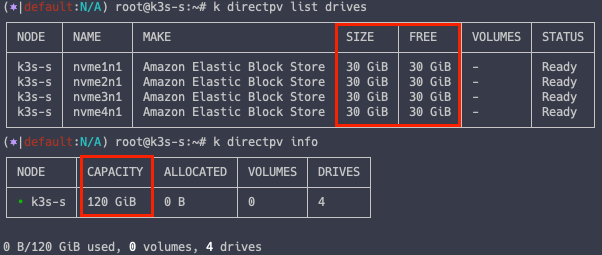
4.3. DirectPV 테스트
DirectPV 드라이브는 배포했지만 아직 실제로 파드가 사용할 수 있는 볼륨은 배포하지 않았습니다.
이제 볼륨을 배포하고 파드에 직접 연결해보겠습니다.
cat << EOF | kubectl apply -f -
apiVersion: v1
kind: PersistentVolumeClaim
metadata:
  name: nginx-pvc
spec:
  volumeMode: Filesystem
  storageClassName: directpv-min-io
  accessModes: [ "ReadWriteOnce" ]
  resources:
    requests:
      storage: 8Mi
---
apiVersion: v1
kind: Pod
metadata:
  name: nginx-pod
spec:
  volumes:
    - name: nginx-volume
      persistentVolumeClaim:
        claimName: nginx-pvc
  containers:
    - name: nginx-container
      image: nginx:alpine
      volumeMounts:
        - mountPath: "/mnt"
          name: nginx-volume
EOF

# 파드 확인
kc get pod,pvc,pv
파드가 정상적으로 잘 배포가 되었고, DirectPV 를 이용하여 PV 가 생성된 것을 알 수 있습니다.

다음 실습을 위한 파드 정리
k delete pod nginx-pod
k delete pvc nginx-pvc
4.4. DirectPV 라벨링
DirectPV 도 쿠버네티스 리소스인만큼 Label 을 통해 특정 Disk 사용이 가능합니다.
공식문서의 create-storage-class.sh 문서를 생성하여 적용합니다.
DirectPV Resource Management Scripts
replace.sh Use the below script to replace a drive. See replacing a drive for more information on how to use this script. #!/usr/bin/env bash # # This file is part of MinIO DirectPV # Copyright (c) 2023 MinIO, Inc. # # This program is free software: you ca
docs.min.io
#!/usr/bin/env bash
#
# This file is part of MinIO DirectPV
# Copyright (c) 2023 MinIO, Inc.
#
# This program is free software: you can redistribute it and/or modify
# it under the terms of the GNU Affero General Public License as published by
# the Free Software Foundation, either version 3 of the License, or
# (at your option) any later version.
#
# This program is distributed in the hope that it will be useful,
# but WITHOUT ANY WARRANTY; without even the implied warranty of
# MERCHANTABILITY or FITNESS FOR A PARTICULAR PURPOSE.  See the
# GNU Affero General Public License for more details.
#
# You should have received a copy of the GNU Affero General Public License
# along with this program.  If not, see <http://www.gnu.org/licenses/>.
set -e -C -o pipefail
declare NAME
declare -a DRIVE_LABELS
function init() {
    if [[ $# -lt 2 ]]; then
        cat <<EOF
USAGE:
  create-storage-class.sh <NAME> <DRIVE-LABELS> ...
ARGUMENTS:
  NAME           new storage class name.
  DRIVE-LABELS   drive labels to be attached.
EXAMPLE:
  # Create new storage class 'fast-tier-storage' with drive labels 'directpv.min.io/tier: fast'
  $ create-storage-class.sh fast-tier-storage 'directpv.min.io/tier: fast'
  # Create new storage class with more than one drive label
  $ create-storage-class.sh fast-tier-unique 'directpv.min.io/tier: fast' 'directpv.min.io/volume-claim-id: bcea279a-df70-4d23-be41-9490f9933004'
EOF
        exit 255
    fi
    NAME="$1"
    shift
    DRIVE_LABELS=( "$@" )
    for val in "${DRIVE_LABELS[@]}"; do
        if ! [[ "${val}" =~ ^directpv.min.io/.* ]]; then
            echo "invalid label ${val}; label must start with 'directpv.min.io/'"
            exit 255
        fi
        if [[ "${val}" =~ ^directpv.min.io/volume-claim-id:.* ]] && ! [[ "${val#directpv.min.io/volume-claim-id: }" =~ ^[a-fA-F0-9]{8}-[a-fA-F0-9]{4}-[a-fA-F0-9]{4}-[a-fA-F0-9]{4}-[a-fA-F0-9]{12}$ ]]; then
            echo "invalid volume-claim-id value; the value must be UUID as textual representation mentioned in https://en.wikipedia.org/wiki/Universally_unique_identifier#Textual_representation"
            exit 255
        fi
    done
    if ! which kubectl >/dev/null 2>&1; then
        echo "kubectl not found; please install"
        exit 255
    fi
}
function main() {
    kubectl apply -f - <<EOF
allowVolumeExpansion: true
allowedTopologies:
- matchLabelExpressions:
  - key: directpv.min.io/identity
    values:
    - directpv-min-io
apiVersion: storage.k8s.io/v1
kind: StorageClass
metadata:
  finalizers:
  - foregroundDeletion
  labels:
    application-name: directpv.min.io
    application-type: CSIDriver
    directpv.min.io/created-by: kubectl-directpv
    directpv.min.io/version: v1beta1
  name: ${NAME}
parameters:
  fstype: xfs
$(printf '  %s\n' "${DRIVE_LABELS[@]}")
provisioner: directpv-min-io
reclaimPolicy: Delete
volumeBindingMode: WaitForFirstConsumer
EOF
}
init "$@"
main "$@"
nvme1n1 라벨링
# Label 부착
kubectl directpv label drives --drives=nvme1n1 tier=fast

# Label 확인
k directpv list drives --show-labels

create-storage-class.sh 실행을 통한 Storage Class 배포
chmod +x create-storage-class.sh

# label 부착 및 sc 배포
./create-storage-class.sh fast-tier-storage 'directpv.min.io/tier: fast'
Pod 배포
cat << EOF | kubectl apply -f -
apiVersion: v1
kind: PersistentVolumeClaim
metadata:
  name: nginx-pvc
spec:
  volumeMode: Filesystem
  storageClassName: fast-tier-storage
  accessModes: [ "ReadWriteOnce" ]
  resources:
    requests:
      storage: 8Mi
---
apiVersion: v1
kind: Pod
metadata:
  name: nginx-pod
spec:
  volumes:
    - name: nginx-volume
      persistentVolumeClaim:
        claimName: nginx-pvc
  containers:
    - name: nginx-container
      image: nginx:alpine
      volumeMounts:
        - mountPath: "/mnt"
          name: nginx-volume
EOF
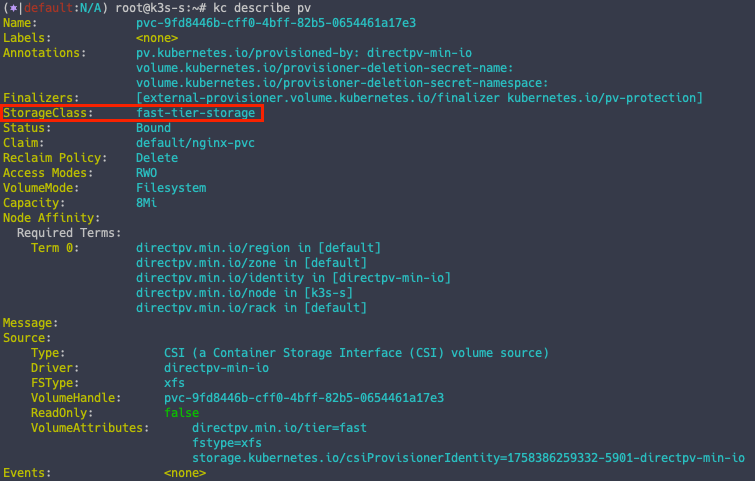
Pod 생성 시 fast-tier-storage 스토리지 클래스를 지정했기 때문에 라벨링이 된 PV 를 부착하는 것을 알 수 있습니다.
kc describe pv
5. DirectPV + MinIO 사용
이때까지 DirectPV 에 대한 개념과 동작에 대해서 알아보았다면, 이제 MinIO 를 사용할 때 DirectPV 를 함께 사용해보도록 하겠습니다.
5.1. MinIO 배포
Helm 을 통한 MinIO 배포
# Helm Repo 등록
helm repo add minio-operator https://operator.min.io

# Value 수정
cat << EOF > minio-operator-values.yaml
operator:
  env:
  - name: MINIO_OPERATOR_RUNTIME
    value: "Rancher"
  replicaCount: 1
EOF

# MinIO 배포
helm install --namespace minio-operator --create-namespace minio-operator minio-operator/operator --values minio-operator-values.yaml
5.2. MinIO Tenant 배포
Helm 을 통한 Tenant 배포
# 서버 1대
# 볼륨 4대
# StorageClass 를 DirectPV 로 지정

cat << EOF > minio-tenant-1-values.yaml
tenant:
  name: tenant1

  configSecret:
    name: tenant1-env-configuration
    accessKey: minio
    secretKey: minio123

  pools:
    - servers: 1
      name: pool-0
      volumesPerServer: 4
      size: 10Gi
      storageClassName: directpv-min-io
  env:
    - name: MINIO_STORAGE_CLASS_STANDARD
      value: "EC:1"

  metrics:
    enabled: true
    port: 9000
    protocol: http
EOF

#
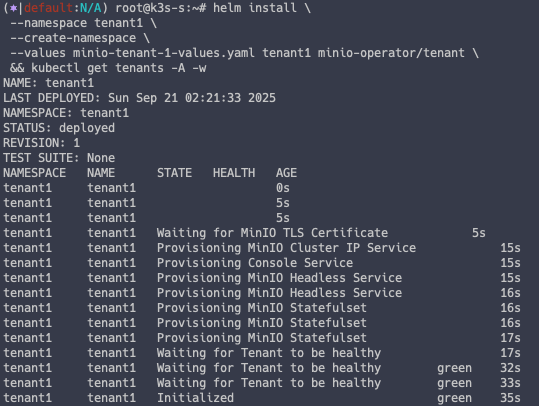
helm install \
 --namespace tenant1 \
 --create-namespace \
 --values minio-tenant-1-values.yaml tenant1 minio-operator/tenant \
 && kubectl get tenants -A -w
DirectPV 정보 확인
MinIO 를 배포하면서 DirectPV 를 가져다 사용했기 떄문에 DirectPV 의 가용 용량이 줄어든 것을 알 수 있습니다.
k directpv list drives
k directpv list volumes

MinIO 접근
# 웹콘솔 포트 오픈
kubectl patch svc -n tenant1 tenant1-console -p '{"spec": {"type": "NodePort", "ports": [{"port": 9443, "targetPort": 9443, "nodePort": 30001}]}}'

# 접근 (minio , minio123)
echo "https://$(curl -s ipinfo.io/ip):30001"

# MC 포트 오픈
kubectl patch svc -n tenant1 minio -p '{"spec": {"type": "NodePort", "ports": [{"port": 443, "targetPort": 9000, "nodePort": 30002}]}}'

# mc 접근
mc alias set k8s-tenant1 https://127.0.0.1:30002 minio minio123 --insecure
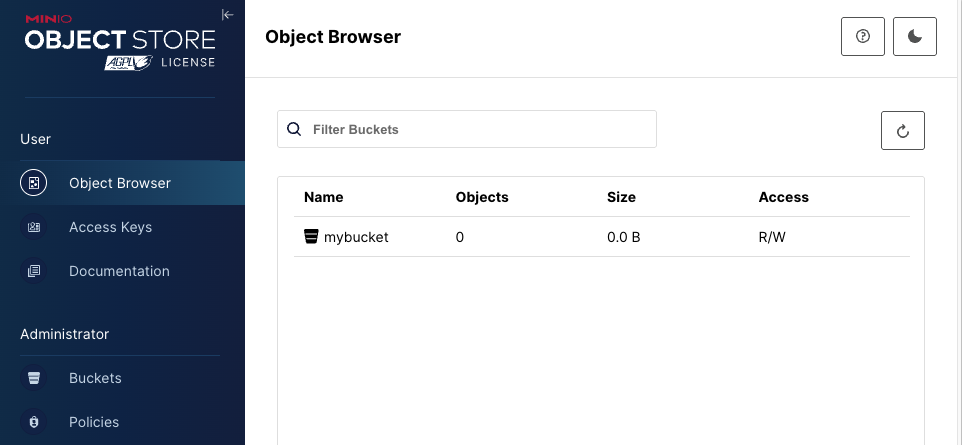
설정이 다 되었다면 mybucket 을 생성해놓습니다.
5.3. MinIO 이벤트 모니터링
mc admin trace 명령어를 통해 MinIO Trace 를 모니터링 할 수 있습니다.
mc admin trace -v -a k8s-tenant1 --insecure
MinIO 조회 이벤트
mc ls --summarize --recursive k8s-tenant1 --insecure

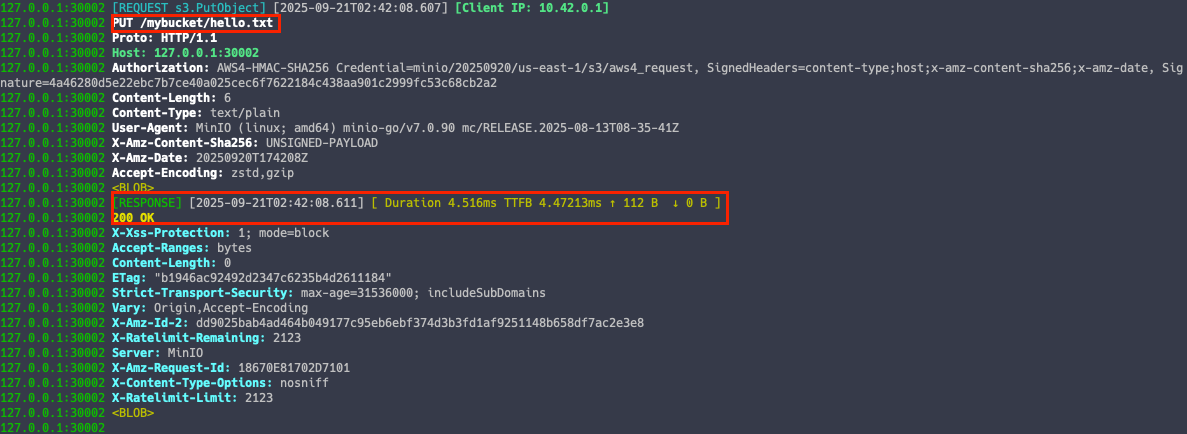
MinIO 쓰기 이벤트
echo hello > hello.txt
mc cp ./hello.txt k8s-tenant1/mybucket/ --insecure
Multipart 업로드 이벤트
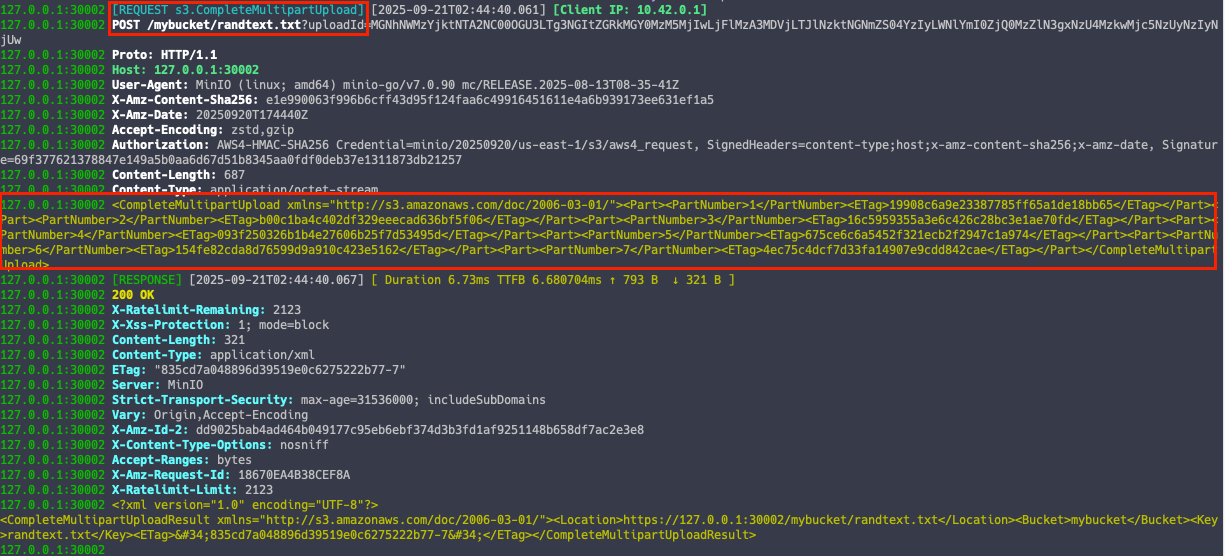
S3 처럼 MinIO 도 대용량 파일 업로드 시 멀티파트 업로드를 지원합니다.
# 100MB 파일 생성
</dev/urandom tr -dc 'A-Za-z0-9' | head -c 100M > randtext.txt
ls -alh randtext.txt

# 파일 업로드
mc cp ./randtext.txt k8s-tenant1/mybucket/ --insecure
로그를 확인해보면 파트 넘버가 쪼개져서 올라간 것을 확인할 수 있습니다.
5.4. DirectPV 볼륨 확장
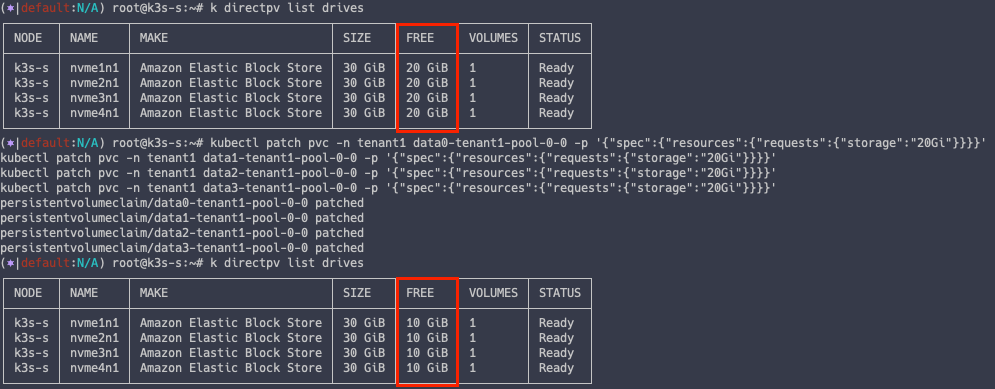
현재 각 디스크 볼륨은 전체 30G 중 10G 만 사용중이며, 20G 의 여유 공간이 존재합니다.
k directpv list drives

PVC 스펙 변경을 통한 볼륨 확장
kubectl patch pvc -n tenant1 data0-tenant1-pool-0-0 -p '{"spec":{"resources":{"requests":{"storage":"20Gi"}}}}'
kubectl patch pvc -n tenant1 data1-tenant1-pool-0-0 -p '{"spec":{"resources":{"requests":{"storage":"20Gi"}}}}'
kubectl patch pvc -n tenant1 data2-tenant1-pool-0-0 -p '{"spec":{"resources":{"requests":{"storage":"20Gi"}}}}'
kubectl patch pvc -n tenant1 data3-tenant1-pool-0-0 -p '{"spec":{"resources":{"requests":{"storage":"20Gi"}}}}'
# 디스크 볼륨 재조회
k directpv list drives
이제 각 디스크 볼륨의 사용량은 20G 로 올라갔고, 10G 의 여유공간만이 존재하는 것을 알 수 있습니다.
실습 종료 후 리소스 삭제
aws cloudformation delete-stack --stack-name miniolab
'Storage' 카테고리의 다른 글
| [MinIO Study 3주차] MinIO 접근 제어 (feat. LDAP) (0) | 2025.09.25 |
|---|---|
| [MinIO Study 3주차] MinIO 접근 제어 (feat. PBAC) (0) | 2025.09.25 |
| [MinIO Study 2주차] MinIO Performance (0) | 2025.09.21 |
| [MinIO Study 1주차] MinIO 배포 및 기본 활용 (1) | 2025.09.14 |
| [MinIO Study 1주차] MinIO 소개 (0) | 2025.09.14 |