Kubernetes
[Study 8주차] 쿠버네티스 Cilium CNI - 서비스 통신 확인
- -
CoudNet@ 팀의 가시다님께서 리딩하시는 KANS Study (Kubernetes Advanced Networking Study) 8주차 스터디 내용 정리
이번에는 지난 글에 이어 Cilium CNI 의 통신 흐름 및 동작 원리에 대해서 알아보겠습니다.
1. 노드 간 Pod 통신
1.1. 환경 배포
이전 글에서 배포한 쿠버네티스 환경에 파드를 배포합니다.
cat <<EOF | kubectl create -f - apiVersion: v1 kind: Pod metadata: name: netpod labels: app: netpod spec: nodeName: k8s-s containers: - name: netshoot-pod image: nicolaka/netshoot command: ["tail"] args: ["-f", "/dev/null"] terminationGracePeriodSeconds: 0 --- apiVersion: v1 kind: Pod metadata: name: webpod1 labels: app: webpod spec: nodeName: k8s-w1 containers: - name: container image: traefik/whoami terminationGracePeriodSeconds: 0 --- apiVersion: v1 kind: Pod metadata: name: webpod2 labels: app: webpod spec: nodeName: k8s-w2 containers: - name: container image: traefik/whoami terminationGracePeriodSeconds: 0 EOF

실습 환경 간소화를 위한 파드 변수 지정
# 테스트 파드들 IP NETPODIP=$(kubectl get pods netpod -o jsonpath='{.status.podIP}') WEBPOD1IP=$(kubectl get pods webpod1 -o jsonpath='{.status.podIP}') WEBPOD2IP=$(kubectl get pods webpod2 -o jsonpath='{.status.podIP}') # 단축키(alias) 지정 alias p0="kubectl exec -it netpod -- " alias p1="kubectl exec -it webpod1 -- " alias p2="kubectl exec -it webpod2 -- "
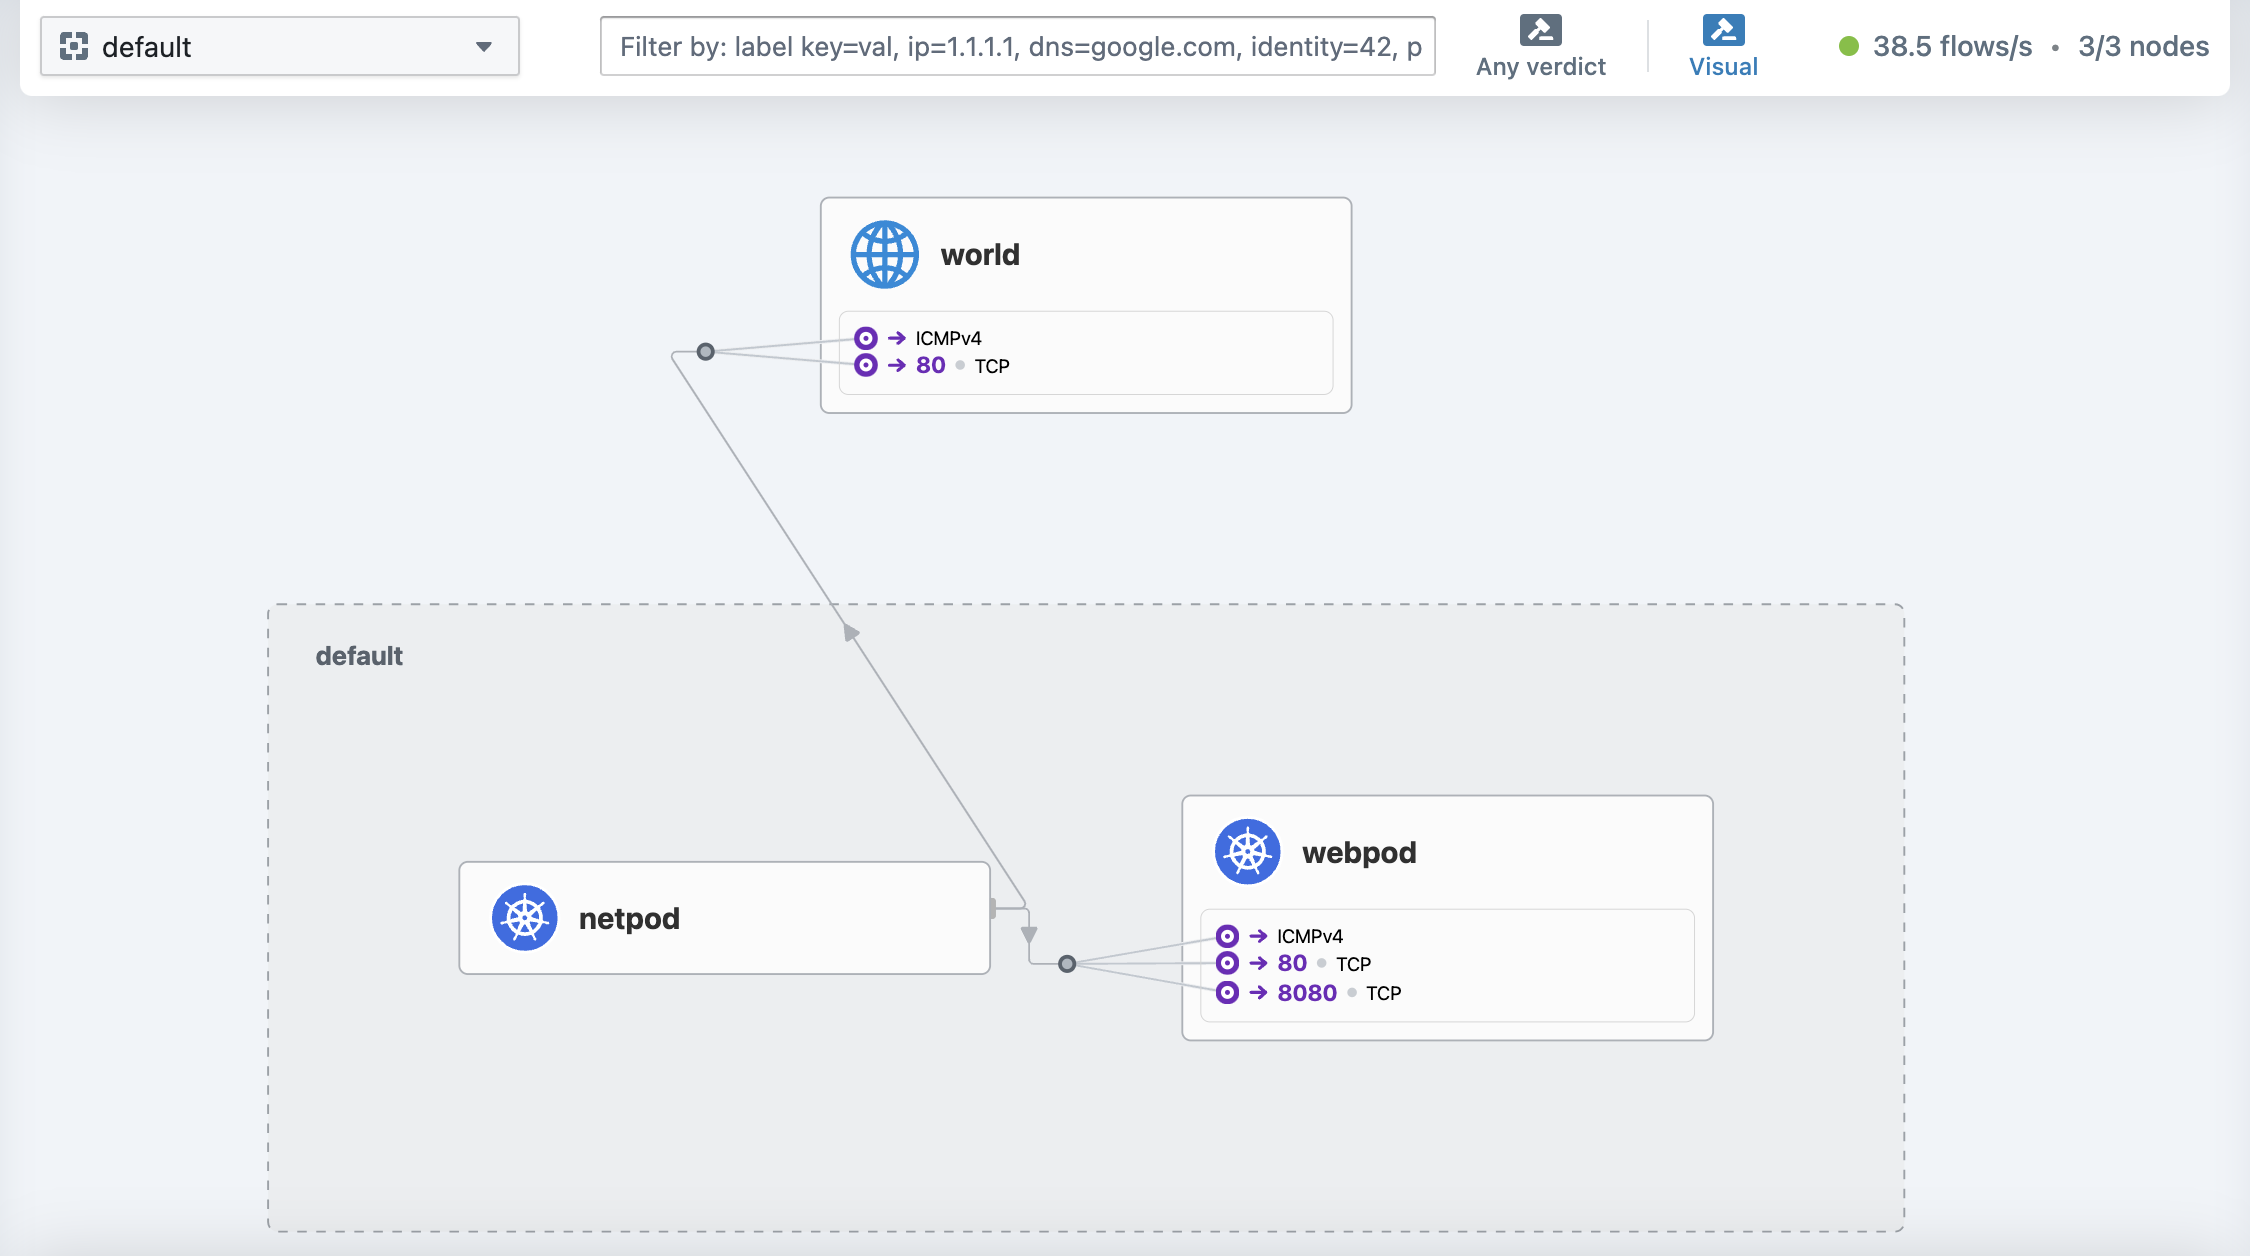
1.2. 통신 테스트
# Web 파드 1번, Web 파드 2번 Ping 통신 p0 ping -c 1 $WEBPOD1IP && p0 ping -c 1 $WEBPOD2IP
통신이 성공한 것을 알 수 있고, 이를 Hubble 에서도 확인이 가능합니다.
# 다른 포트 및 명령어 실행 p0 curl -s $WEBPOD1IP && p0 curl -s $WEBPOD2IP p0 curl -s $WEBPOD1IP:8080 ; p0 curl -s $WEBPOD2IP:8080 p0 ping -c 1 8.8.8.8 && p0 curl -s wttr.in/seoul
입력했던 통신에 대한 내용이 캡처되는 것을 알 수 있습니다.
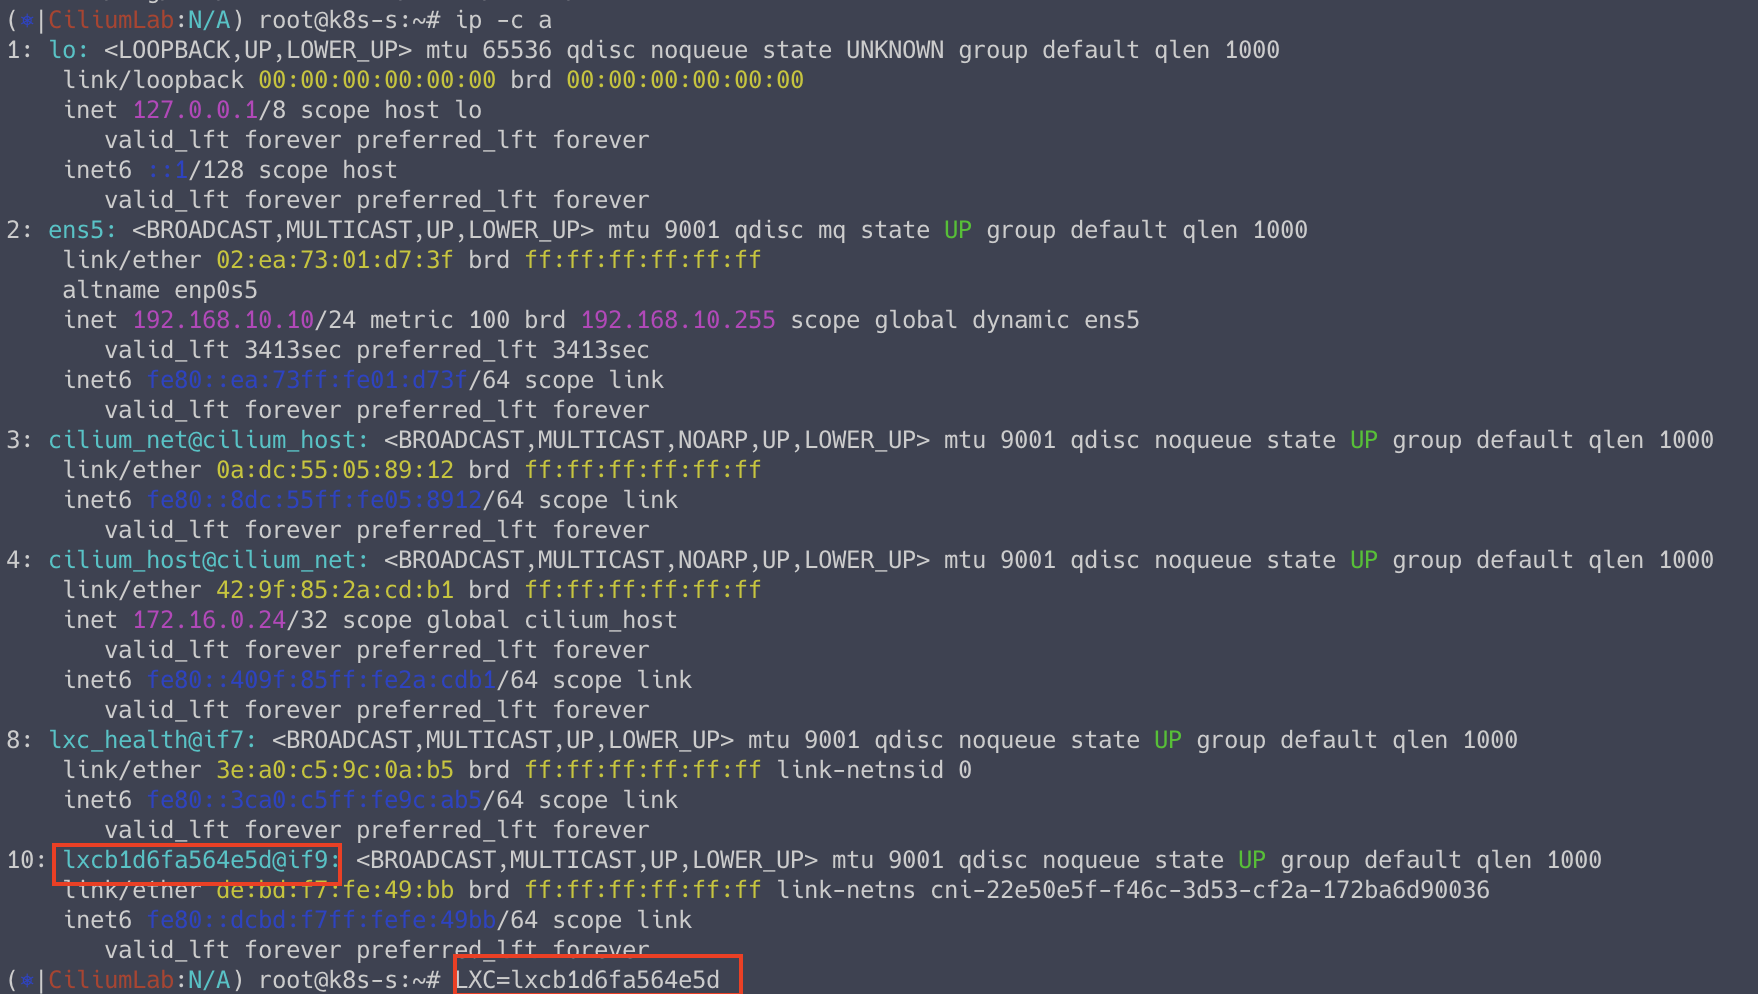
netpod 의 LXC 변수 지정
ip -c a LXC=<k8s-s의 가장 나중에 lxc 이름>
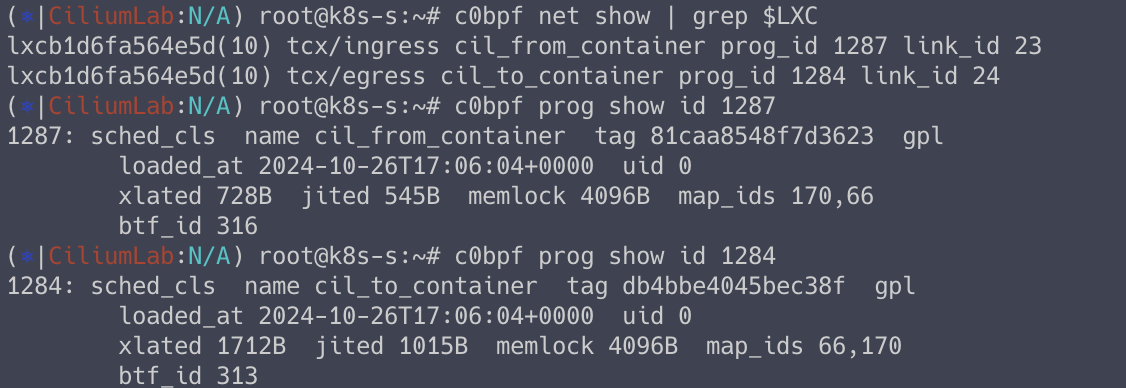
Node’s eBPF programs
# list of eBPF programs c0bpf net show | grep $LXC # Use bpftool prog show id to view additional information about a program, including a list of attached eBPF maps: c0bpf prog show id <출력된 prog id 입력> c0bpf map list
2. 서비스 통신 확인
2.1. 환경 배포

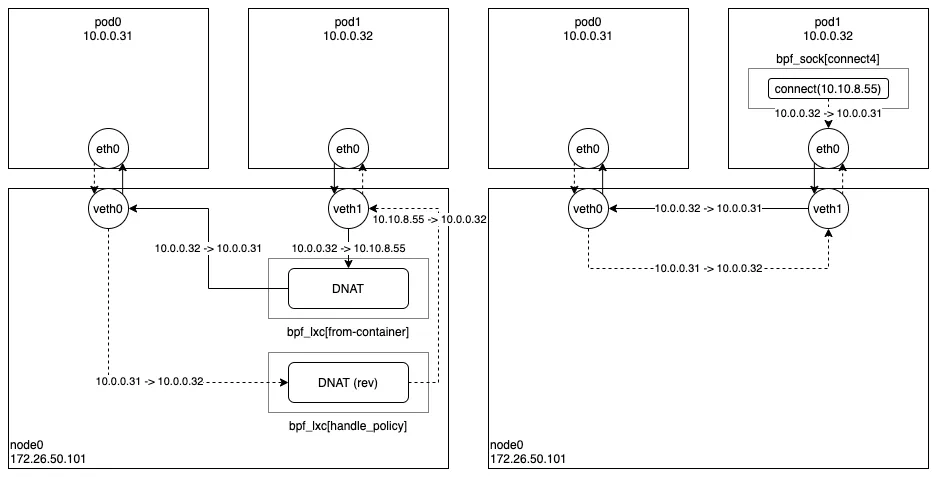
위 그림은 네트워크 기반의 로드밸런싱과 소켓 기반의 로드밸런싱에 대한 차이를 보여주는 그림입니다.
소켓 기반의 로드밸런싱 처리 시, 다음과 같이 네트워크 트래픽이 통신이 간소화해집니다.
서비스 배포
cat <<EOF | kubectl create -f - apiVersion: v1 kind: Service metadata: name: svc spec: ports: - name: svc-webport port: 80 targetPort: 80 selector: app: webpod type: ClusterIP EOF
# 서비스 확인 kubectl get svc,ep svc # 서비스 변수 설정 SVCIP=$(kubectl get svc svc -o jsonpath='{.spec.clusterIP}')
2.2. 서비스 통신 테스트
# 트래픽 반복 생성 SVCIP=$(kubectl get svc svc -o jsonpath='{.spec.clusterIP}') while true; do kubectl exec netpod -- curl -s $SVCIP | grep Hostname;echo "-----";sleep 1;done
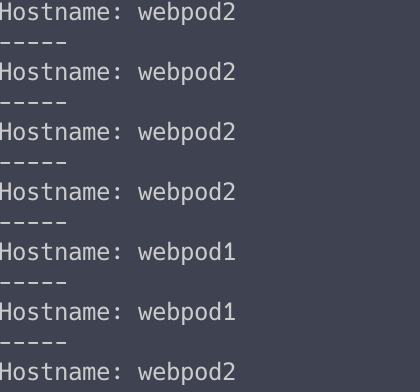
# TCP 덤프 kubectl exec netpod -- tcpdump -enni any -q
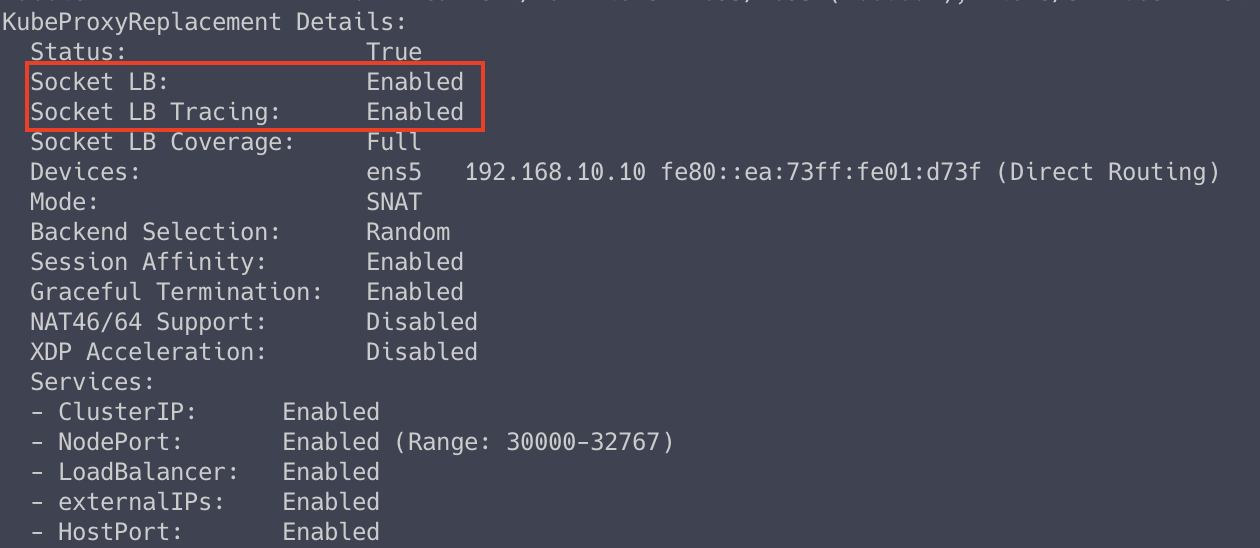
파드 내부에서 트래픽 캡처를 한 것임에도 불구하고 SVC 의 Cluster IP 가 보이지 않는 것을 알 수 있습니다.
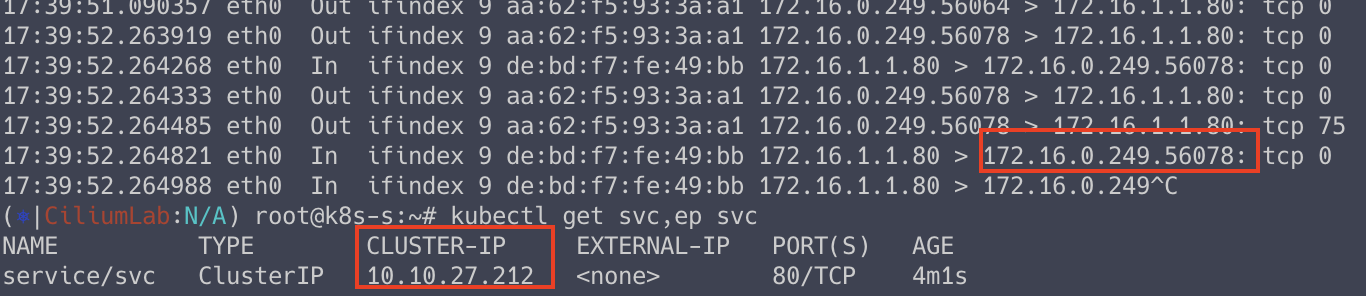
이는 Socket Based Loadbalancing 이 활성화 되어 있기 때문에 가능합니다.
c0 status --verbose
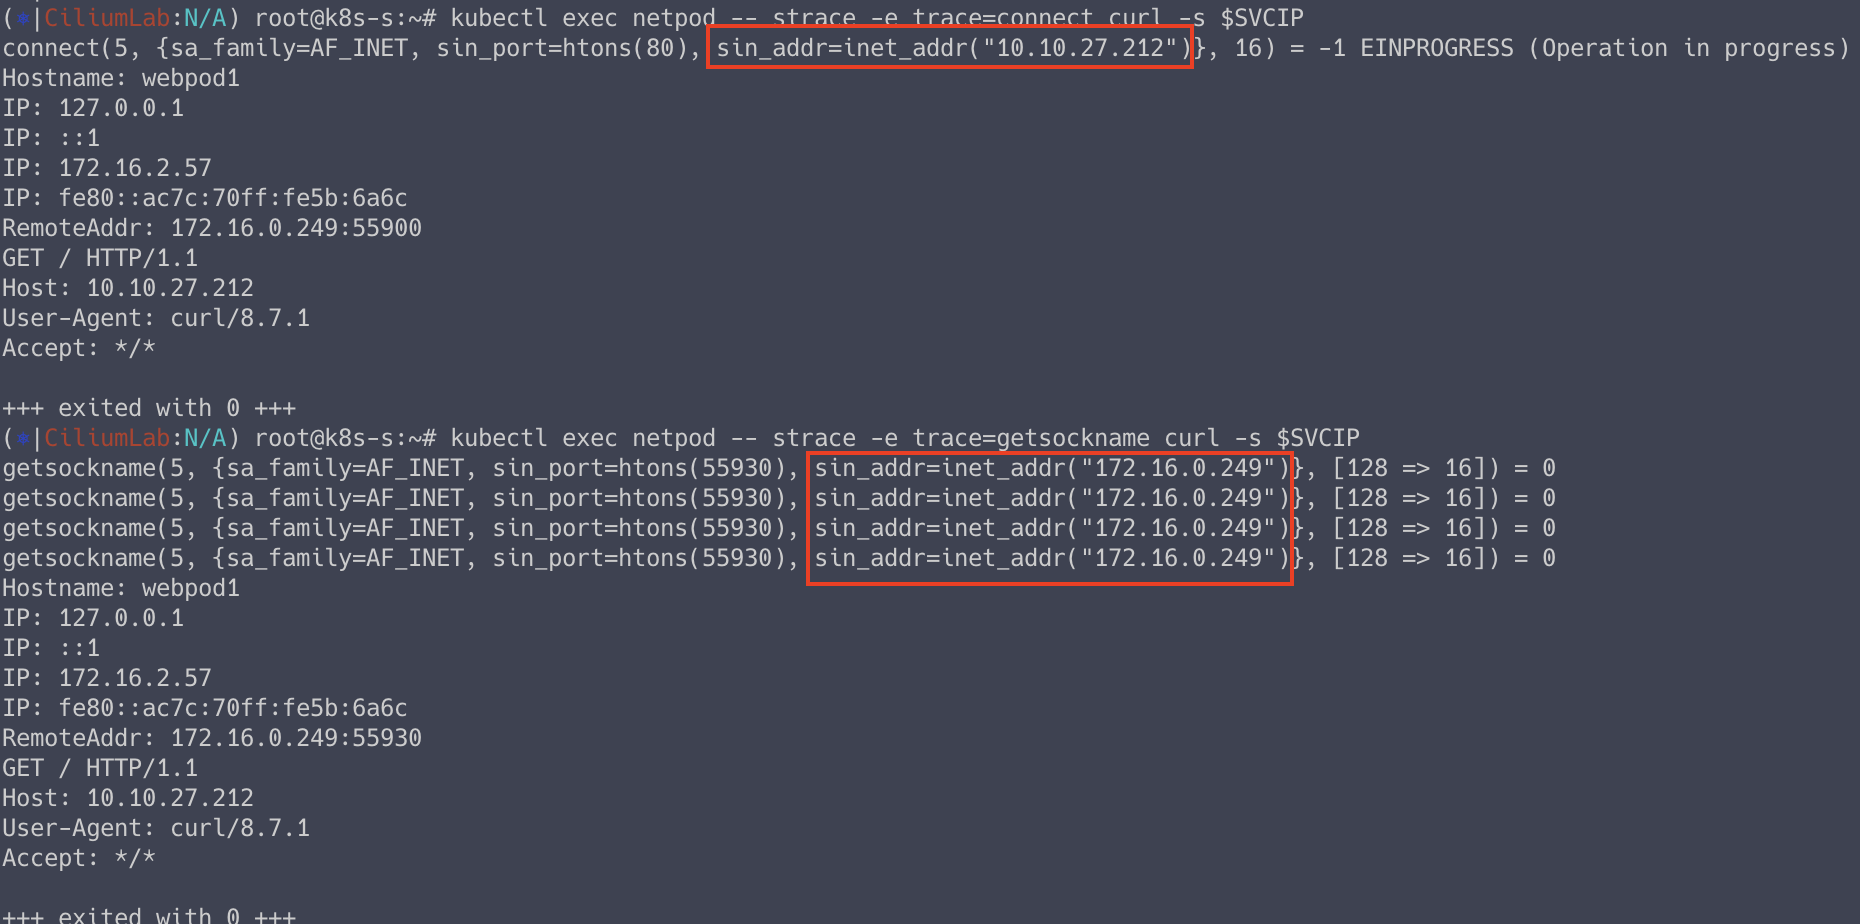
2.3. strace 시스템 콜 트레이싱 도구를 통해 파드 내에서 동작 확인
# Syscall 호출확인 kubectl exec netpod -- strace -c curl -s $SVCIP
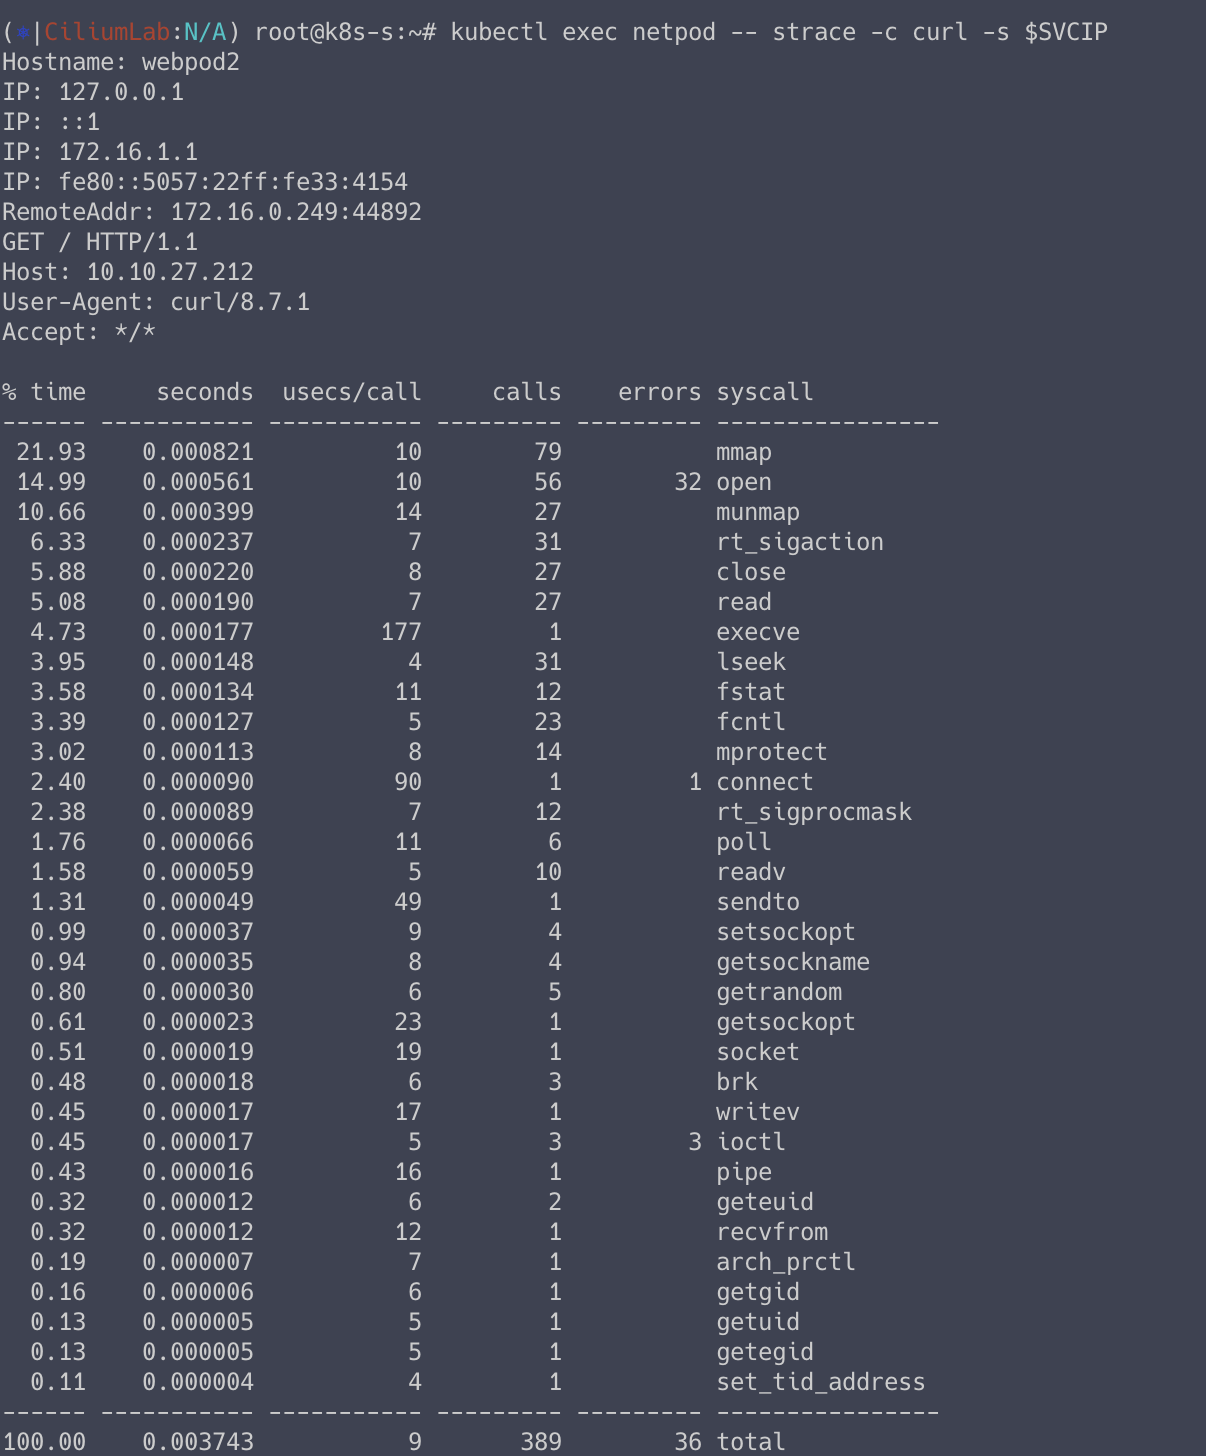
# 출력 내용을 편집기에서 확인(검색) kubectl exec netpod -- strace -s 65535 -f -tt curl -s $SVCIP ... # SRC IP Address 가 바뀌어 있는 것을 알 수 있습니다. 17:52:03.757019 connect(5, {sa_family=AF_INET, sin_port=htons(80), sin_addr=inet_addr("10.10.27.212")}, 16) = -1 EINPROGRESS (Operation in progress) 17:52:03.757592 getsockname(5, {sa_family=AF_INET, sin_port=htons(47844), sin_addr=inet_addr("172.16.0.249")}, [128 => 16]) = 0 ... # 특정 이벤트 : -e kubectl exec netpod -- strace -e trace=connect curl -s $SVCIP kubectl exec netpod -- strace -e trace=getsockname curl -s $SVCIP
3. Network Policy (L3, L4, L7)
Cilium 은 다양한 레벨에서의 보안을 제공합니다.
1. ID 기반 연결 정책 (L3)
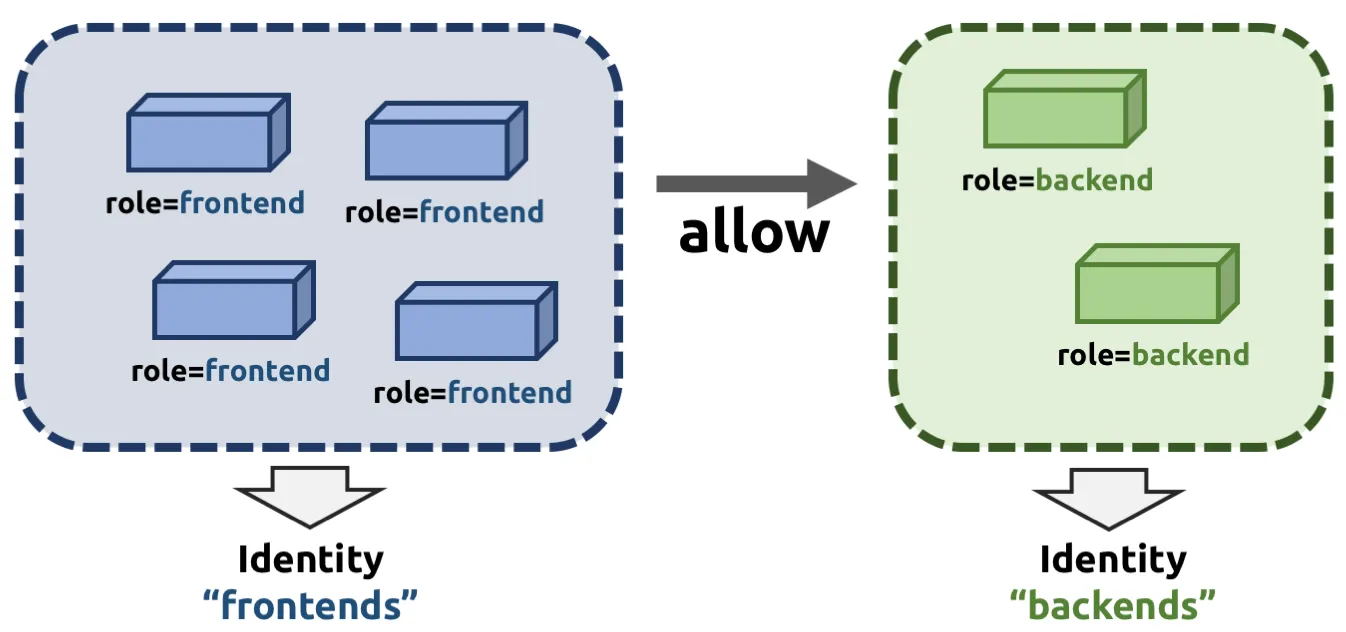
- 확장성과 유연성을 제한할 수 있는 네트워크 주소 기반의 보안을 피하기 위해 레이블을 통해 파생된 포드의 ID 를 기반으로 보안 연결
2. 포트 기반 연결 정책 (L4)
- Inbound / Outbound 연결에 대해 접근 가능한 포트(Layer 4)를 제한
3. 애플리케이션 (HTTP) 기반 (L7)
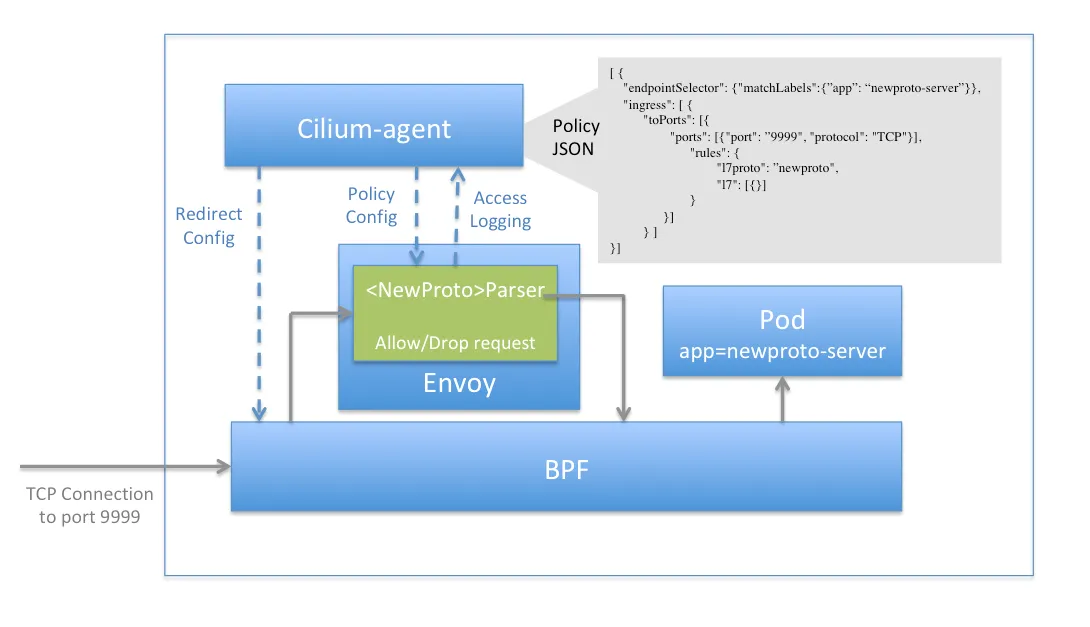
- 어플리케이션 수준에서의 세밀한 제어. 이를 위해 Envoy 프록시를 사용합니다.
3.1. 환경 배포
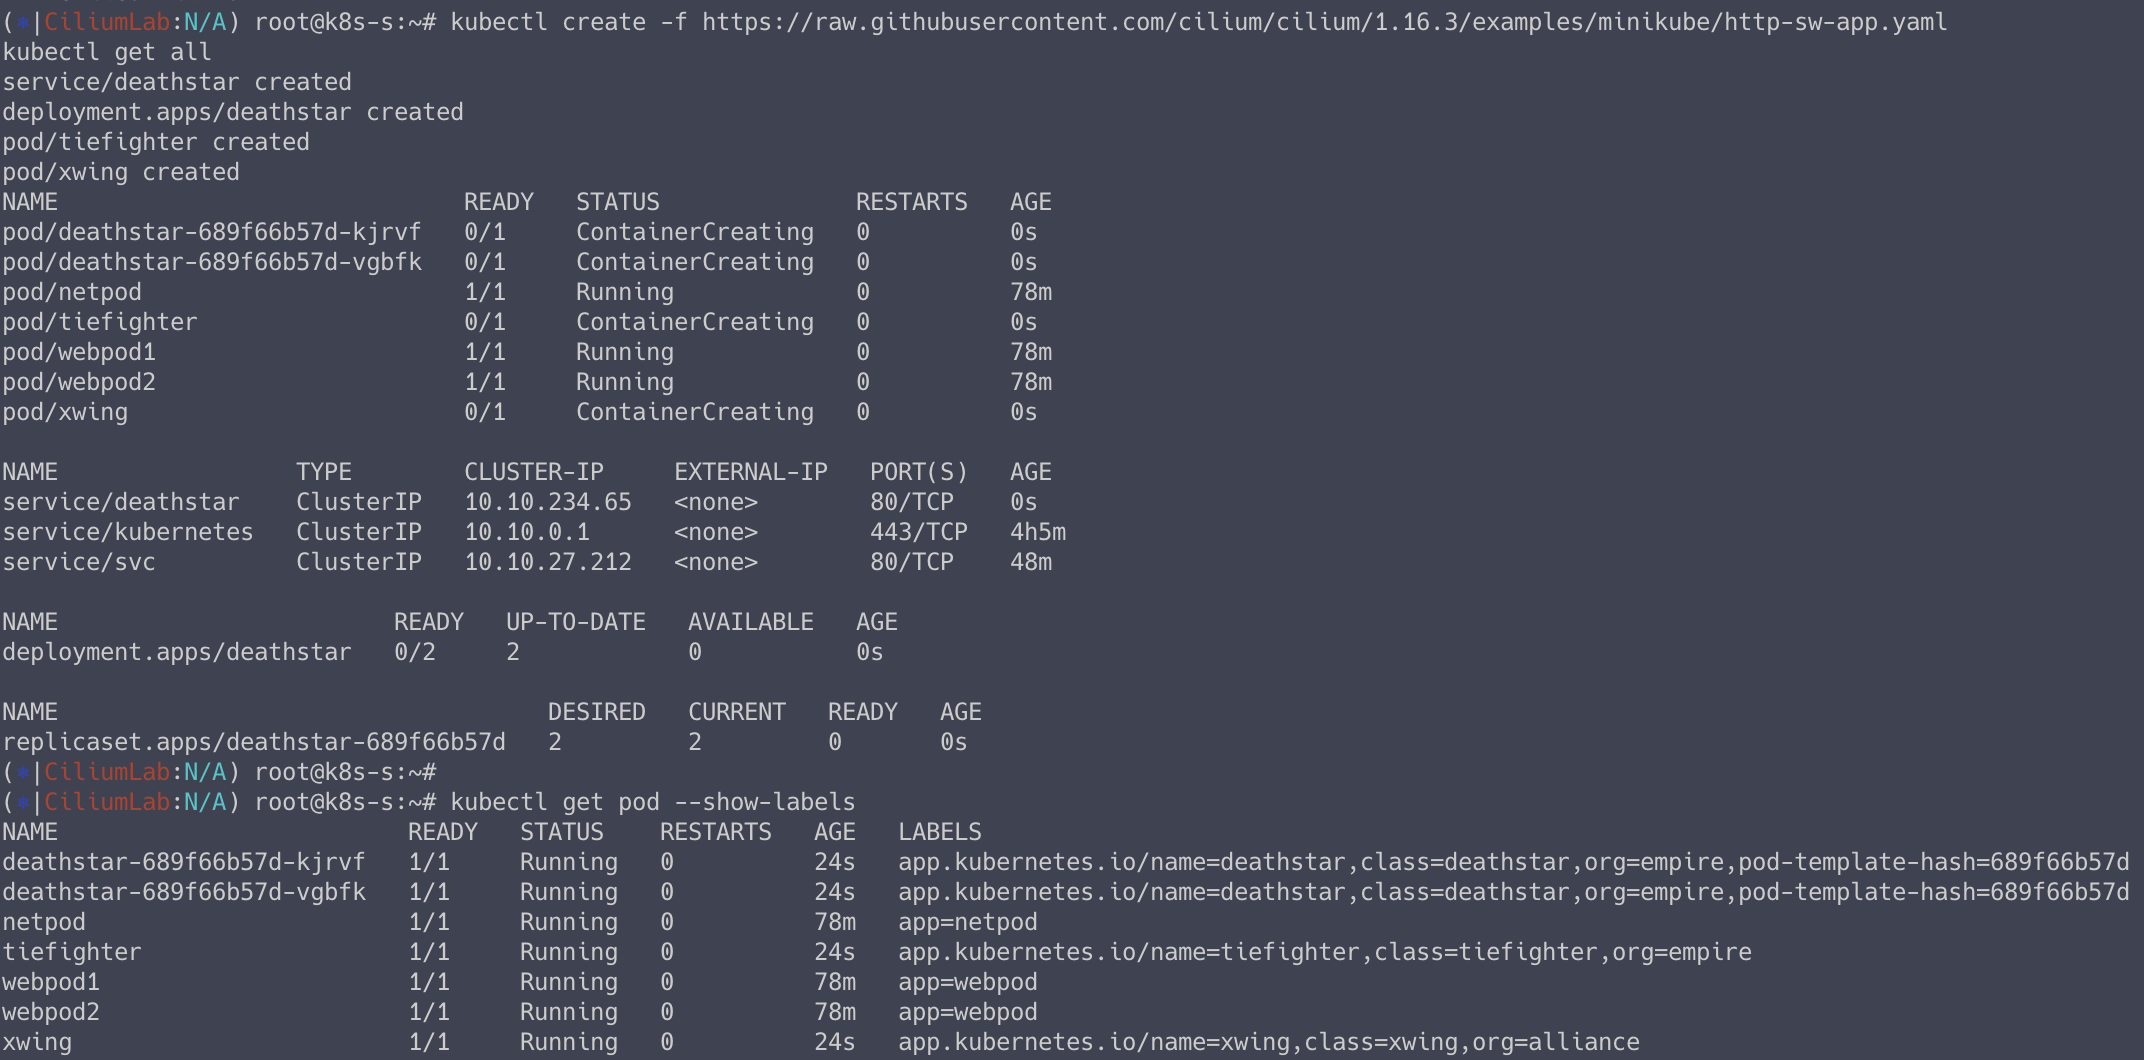
DeathStar 데모 어플리케이션을 배포합니다.
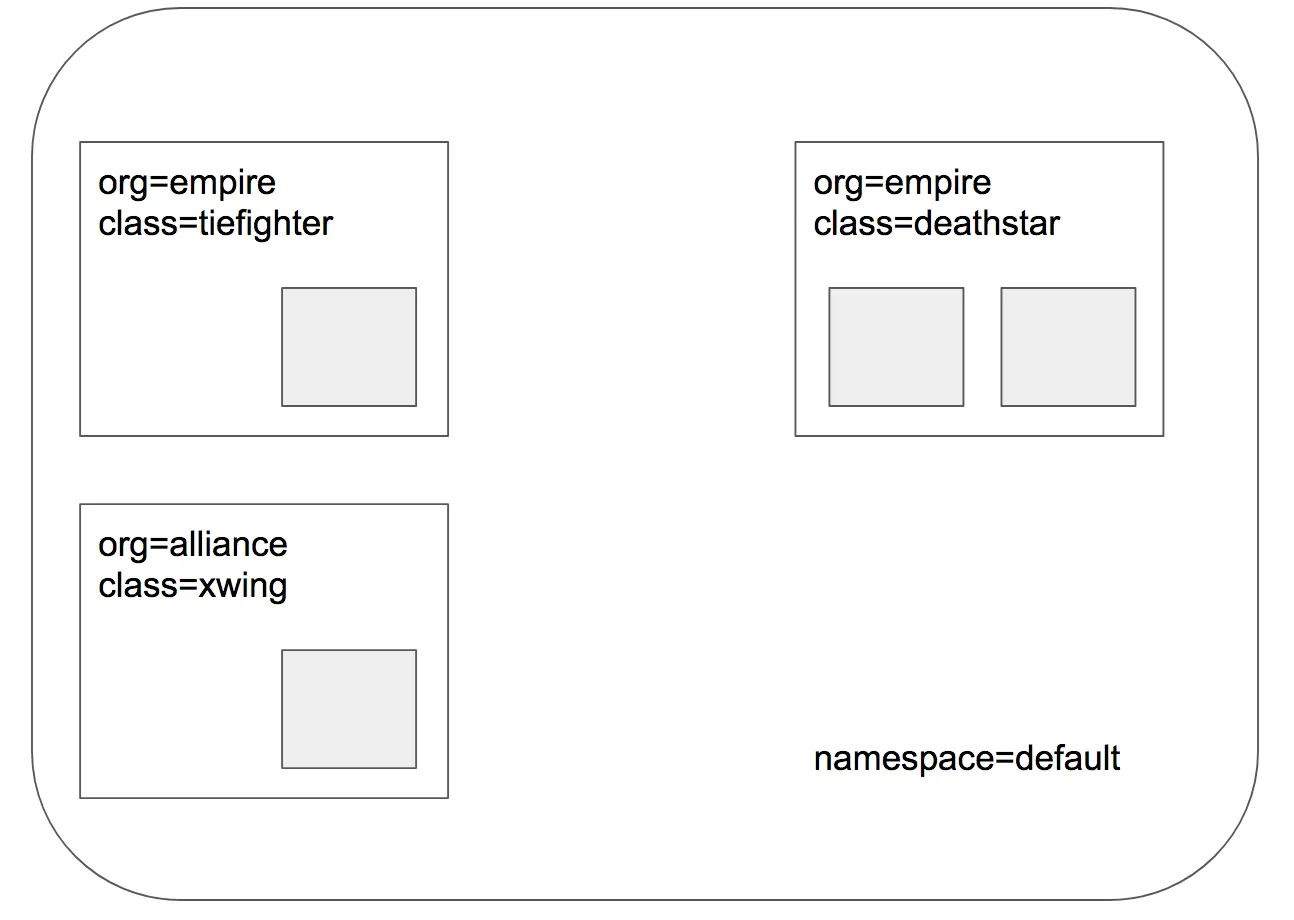
kubectl create -f https://raw.githubusercontent.com/cilium/cilium/1.16.3/examples/minikube/http-sw-app.yaml kubectl get all kubectl get pod --show-labels
3.2. 트래픽 테스트
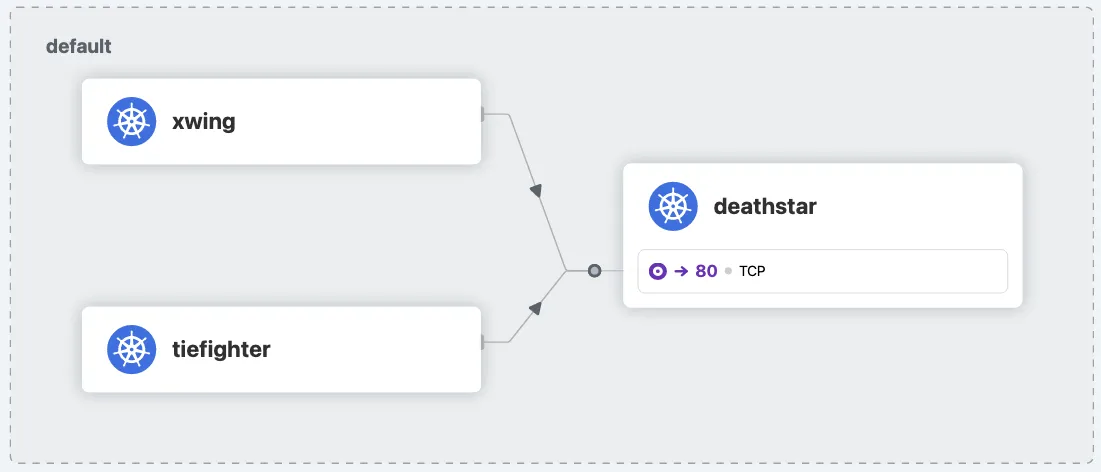
# 데스스타 SVC(ClusterIP) 접속하여 웹 파드 연결 확인 >> Hubble UI 에서 실시간 확인해보자! kubectl exec xwing -- curl -s -XPOST deathstar.default.svc.cluster.local/v1/request-landing Ship landed kubectl exec tiefighter -- curl -s -XPOST deathstar.default.svc.cluster.local/v1/request-landing Ship landed

Hubble UI 에서 확인해봅니다.
ID 기반 연결 정책
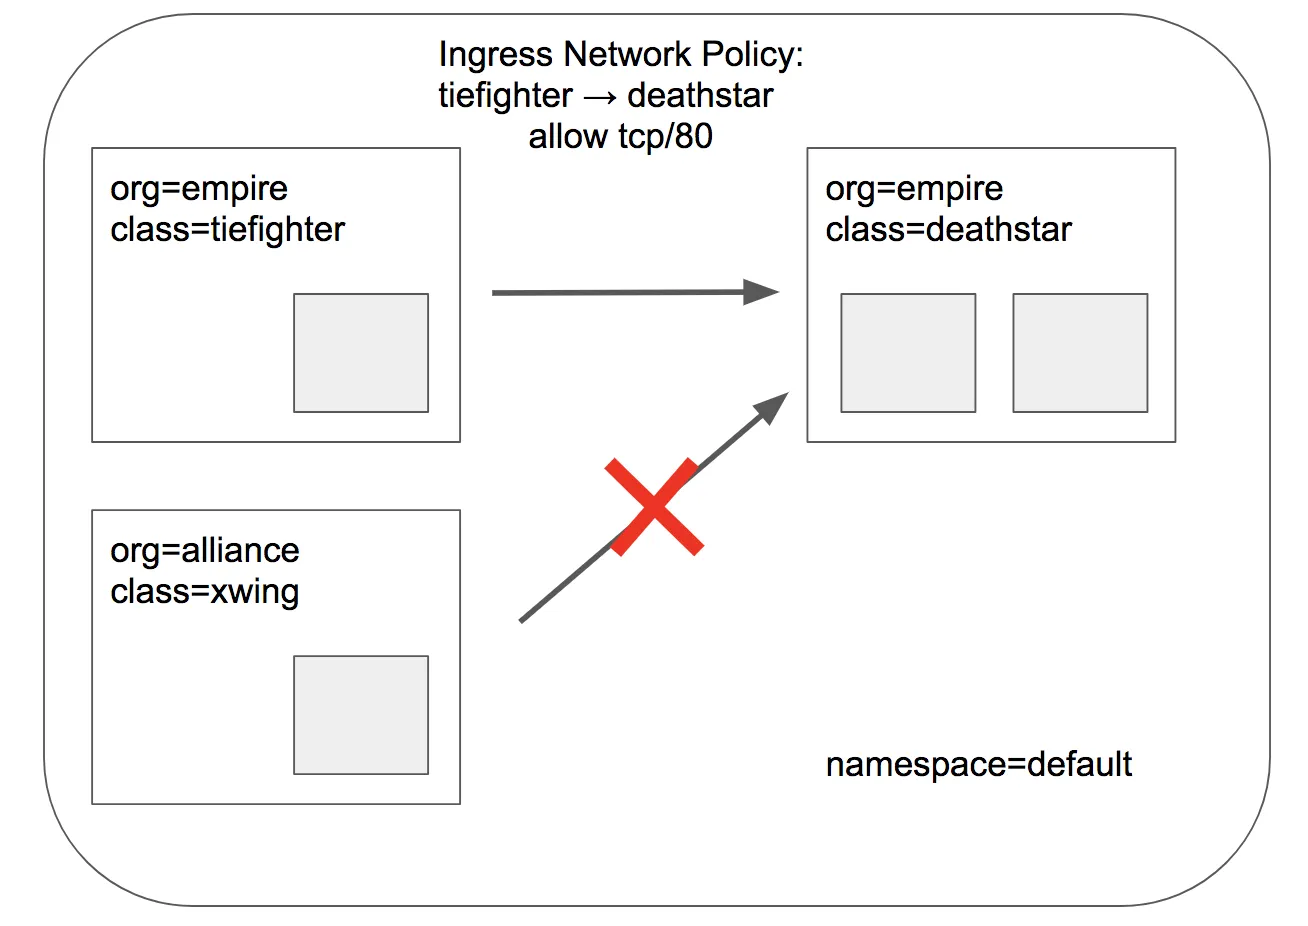
'org=empire' Labels(라벨) 부착된 파드만 허용
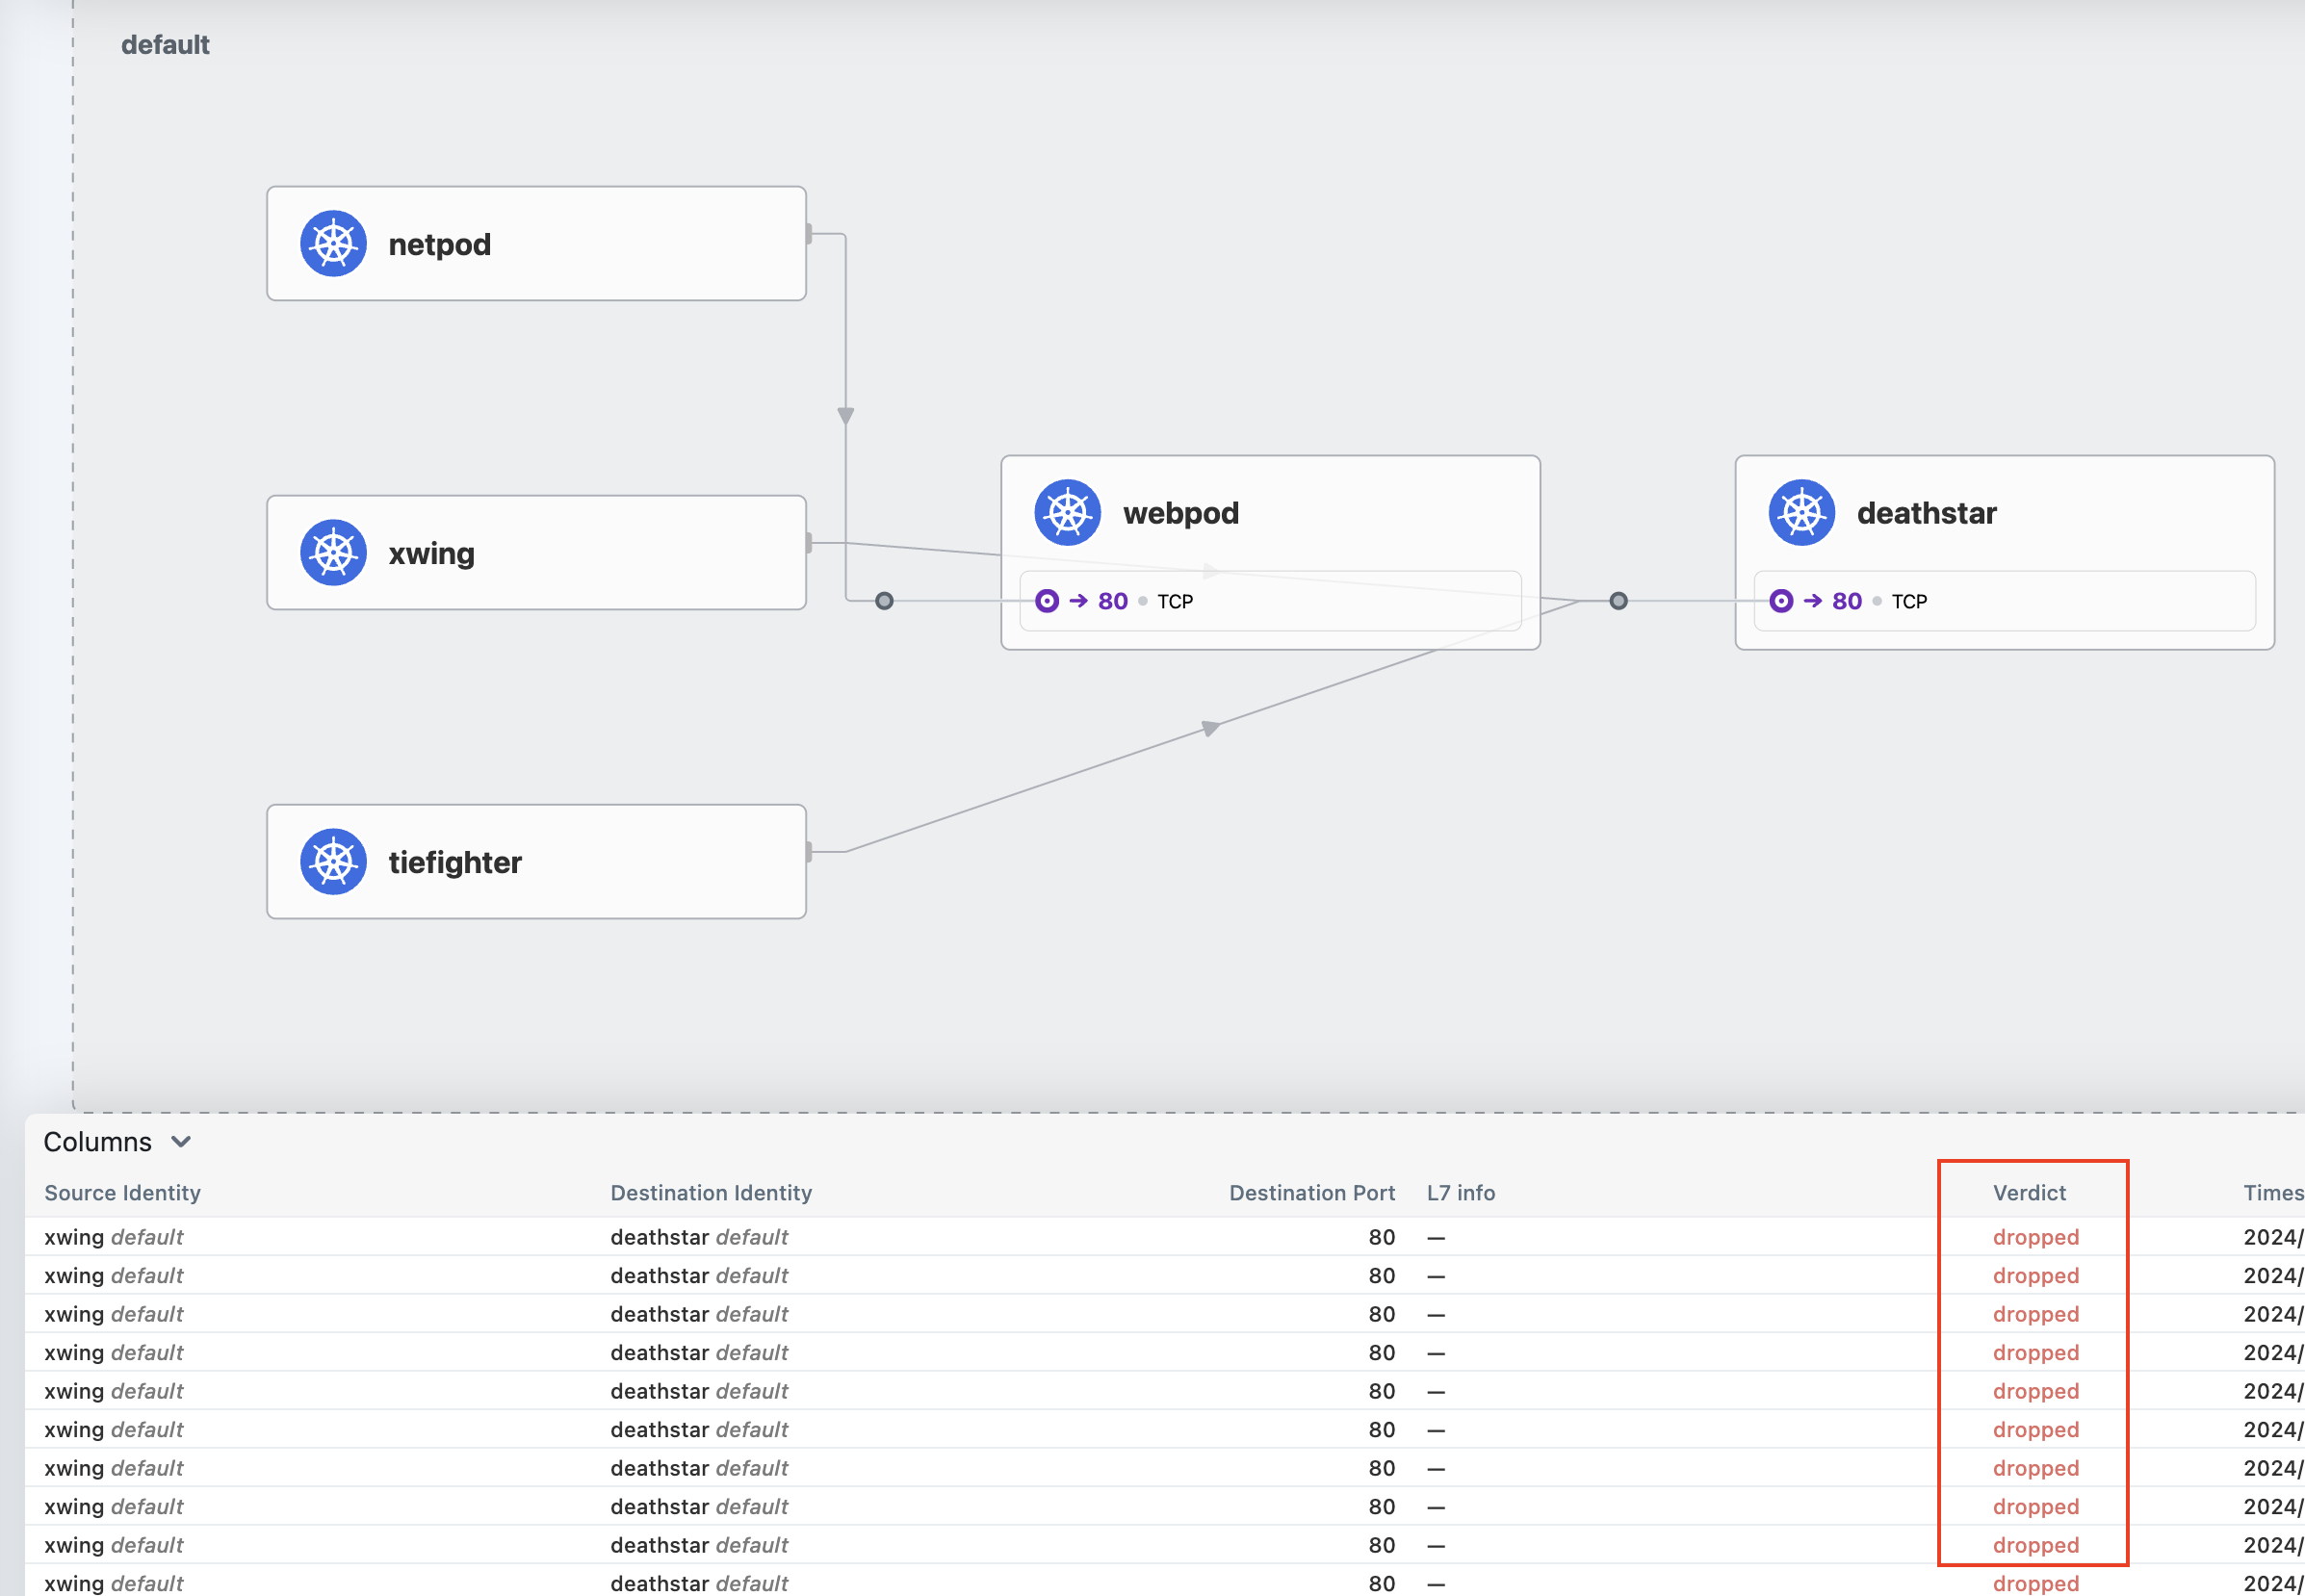
# L3/L4 정책 생성 cat <<EOF | kubectl apply -f - apiVersion: "cilium.io/v2" kind: CiliumNetworkPolicy metadata: name: "rule1" spec: description: "L3-L4 policy to restrict deathstar access to empire ships only" endpointSelector: matchLabels: org: empire class: deathstar ingress: - fromEndpoints: - matchLabels: org: empire toPorts: - ports: - port: "80" protocol: TCP EOF # 데스스타 SVC(ClusterIP) 접속하여 웹 파드 연결 확인 >> Hubble UI 에서 drop 확인! kubectl exec tiefighter -- curl -s -XPOST deathstar.default.svc.cluster.local/v1/request-landing Ship landed kubectl exec xwing -- curl -s -XPOST deathstar.default.svc.cluster.local/v1/request-landing drop
xwing 의 경우, 트래픽이 Drop 되는 것을 알 수 있습니다.
HTTP 기반 연결 정책 (L7)
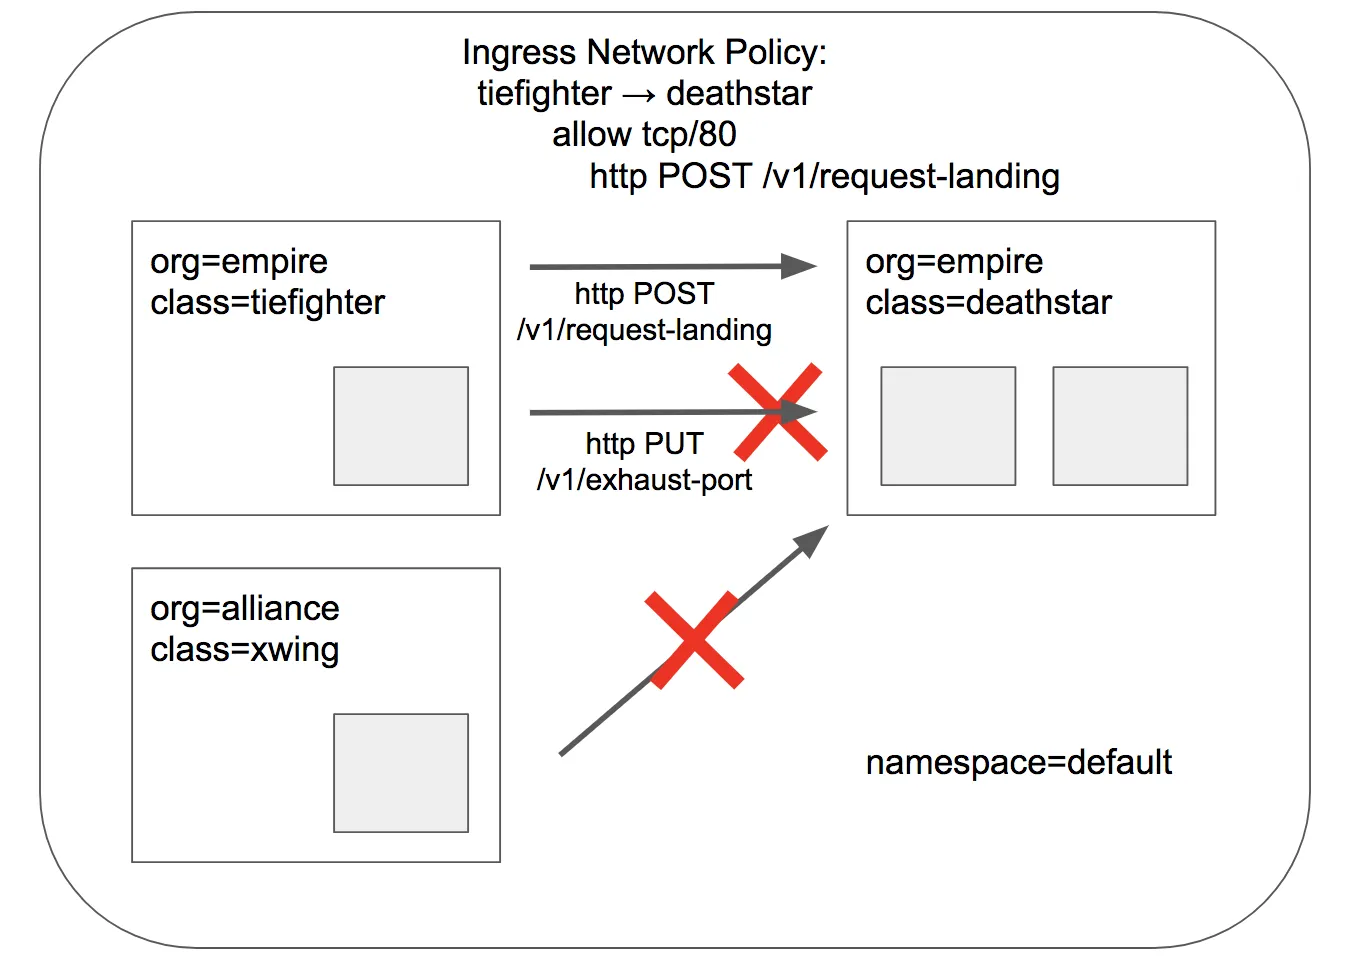
HTTP L7 필터링을 적용 : PUT /v1/exhaust-port 요청을 차단!
# POST /v1/request-landing API 호출만 허용 정책으로 기존 정책 내용을 업데이트(configured)! cat <<EOF | kubectl apply -f - apiVersion: "cilium.io/v2" kind: CiliumNetworkPolicy metadata: name: "rule1" spec: description: "L7 policy to restrict access to specific HTTP call" endpointSelector: matchLabels: org: empire class: deathstar ingress: - fromEndpoints: - matchLabels: org: empire toPorts: - ports: - port: "80" protocol: TCP rules: http: - method: "POST" path: "/v1/request-landing" EOF # 접근 테스트 kubectl exec tiefighter -- curl -s -XPOST deathstar.default.svc.cluster.local/v1/request-landing Ship landed kubectl exec tiefighter -- curl -s -XPUT deathstar.default.svc.cluster.local/v1/exhaust-port Access denied # Hubble CLI 로그 확인 hubble observe --pod deathstar --protocol http

4. BandWidth Manager
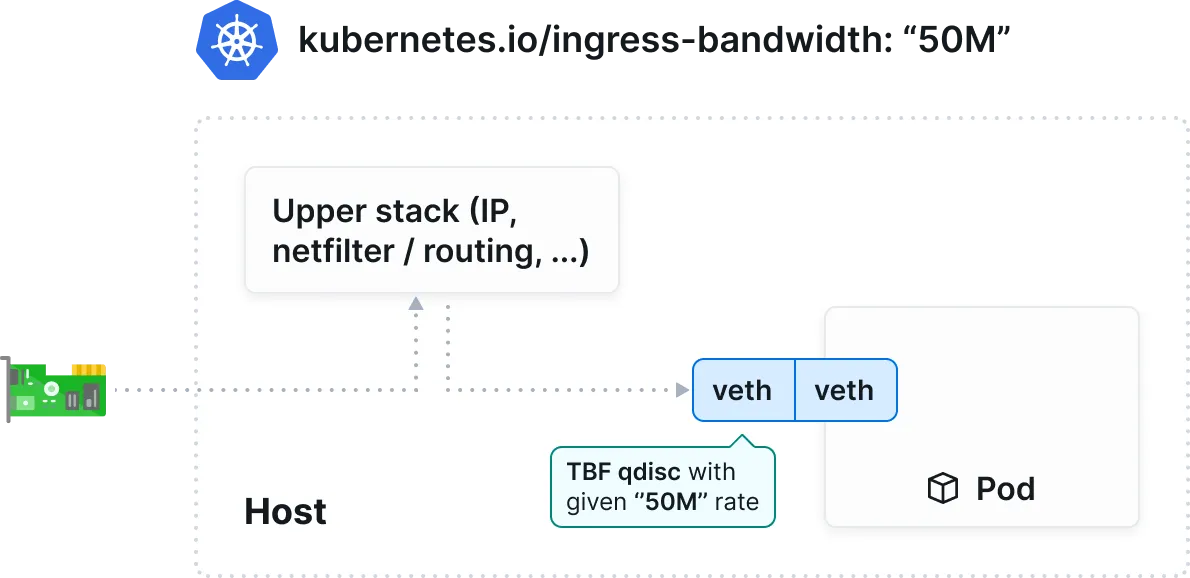
BandWidth Manager 는 개별 파드의 네트워크 속도를 제한하는 기능입니다.
현재는 egress 만 설정이 가능합니다.
4.1. 테스트
# 인터페이스 tc qdisc 확인 tc qdisc show dev ens5 # Bandwidth Manager 활성화 helm upgrade cilium cilium/cilium --namespace kube-system --reuse-values --set bandwidthManager.enabled=true # 적용 확인 cilium config view | grep bandwidth c0 status | grep BandwidthManager

트래픽 발생 파드 생성
cat <<EOF | kubectl apply -f - --- apiVersion: v1 kind: Pod metadata: annotations: # Limits egress bandwidth to 10Mbit/s. kubernetes.io/egress-bandwidth: "10M" labels: # This pod will act as server. app.kubernetes.io/name: netperf-server name: netperf-server spec: containers: - name: netperf image: cilium/netperf ports: - containerPort: 12865 --- apiVersion: v1 kind: Pod metadata: # This Pod will act as client. name: netperf-client spec: affinity: # Prevents the client from being scheduled to the # same node as the server. podAntiAffinity: requiredDuringSchedulingIgnoredDuringExecution: - labelSelector: matchExpressions: - key: app.kubernetes.io/name operator: In values: - netperf-server topologyKey: kubernetes.io/hostname containers: - name: netperf args: - sleep - infinity image: cilium/netperf EOF # egress BW 제한 정보 확인 kubectl describe pod netperf-server | grep Annotations:

트래픽 발생
# 변수 지정 NETPERF_SERVER_IP=$(kubectl get pod netperf-server -o jsonpath='{.status.podIP}') # 최대 네트워크 트래픽 발생 kubectl exec netperf-client -- netperf -t TCP_MAERTS -H "${NETPERF_SERVER_IP}"

# 5M 제한 설정 후 테스트 kubectl get pod netperf-server -o json | sed -e 's|10M|5M|g' | kubectl apply -f - kubectl exec netperf-client -- netperf -t TCP_MAERTS -H "${NETPERF_SERVER_IP}"

# 20M 제한 설정 후 테스트 kubectl get pod netperf-server -o json | sed -e 's|5M|20M|g' | kubectl apply -f - kubectl exec netperf-client -- netperf -t TCP_MAERTS -H "${NETPERF_SERVER_IP}"

5. L2 Announcements / L2 Aware LB

L2 Announcements는 로컬 영역 네트워크에서 서비스를 표시하고 도달 가능하게 만드는 기능입니다.
이 기능은 주로 사무실 또는 캠퍼스 네트워크와 같이 BGP 기반 라우팅이 없는 네트워크 내에서 온프레미스 배포를 위해 고안되었습니다.
이 기능을 사용하면 ExternalIP 및/또는 LoadBalancer IP에 대한 ARP 쿼리에 응답합니다.
이러한 IP는 여러 노드의 가상 IP(네트워크 장치에 설치되지 않음)이므로 각 서비스에 대해 한 번에 한 노드가 ARP 쿼리에 응답하고 MAC 주소로 응답합니다.
NodePort 서비스에 비해 이 기능의 장점은 각 서비스가 고유한 IP를 사용할 수 있으므로 여러 서비스가 동일한 포트 번호를 사용할 수 있다는 것입니다.
5.1. 테스트
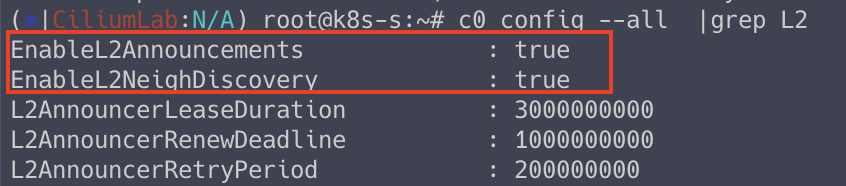
# 설정 활성화 helm upgrade cilium cilium/cilium --namespace kube-system --reuse-values \ --set l2announcements.enabled=true --set externalIPs.enabled=true \ --set l2announcements.leaseDuration=3s --set l2announcements.leaseRenewDeadline=1s --set l2announcements.leaseRetryPeriod=200ms # 확인 c0 config --all |grep L2
정책 배포
# CiliumL2AnnouncementPolicy 생성 cat <<EOF | kubectl apply -f - apiVersion: "cilium.io/v2alpha1" kind: CiliumL2AnnouncementPolicy metadata: name: policy1 spec: serviceSelector: matchLabels: color: blue nodeSelector: matchExpressions: - key: node-role.kubernetes.io/control-plane operator: DoesNotExist interfaces: - ^ens[0-9]+ externalIPs: true loadBalancerIPs: true EOF # IP Pool 생성 cat <<EOF | kubectl apply -f - apiVersion: "cilium.io/v2alpha1" kind: CiliumLoadBalancerIPPool metadata: name: "cilium-pool" spec: allowFirstLastIPs: "No" blocks: - cidr: "10.10.200.0/29" EOF # 확인 kubectl get ciliuml2announcementpolicy,CiliumLoadBalancerIPPool

테스트용 파드 생성
# cat <<EOF | kubectl apply -f - apiVersion: v1 kind: Pod metadata: name: webpod1 labels: app: webpod spec: nodeName: k8s-w1 containers: - name: container image: traefik/whoami terminationGracePeriodSeconds: 0 --- apiVersion: v1 kind: Pod metadata: name: webpod2 labels: app: webpod spec: nodeName: k8s-w2 containers: - name: container image: traefik/whoami terminationGracePeriodSeconds: 0 --- apiVersion: v1 kind: Service metadata: name: svc1 spec: ports: - name: svc1-webport port: 80 targetPort: 80 selector: app: webpod type: LoadBalancer # 서비스 타입이 LoadBalancer --- apiVersion: v1 kind: Service metadata: name: svc2 spec: ports: - name: svc2-webport port: 80 targetPort: 80 selector: app: webpod type: LoadBalancer --- apiVersion: v1 kind: Service metadata: name: svc3 spec: ports: - name: svc3-webport port: 80 targetPort: 80 selector: app: webpod type: LoadBalancer EOF
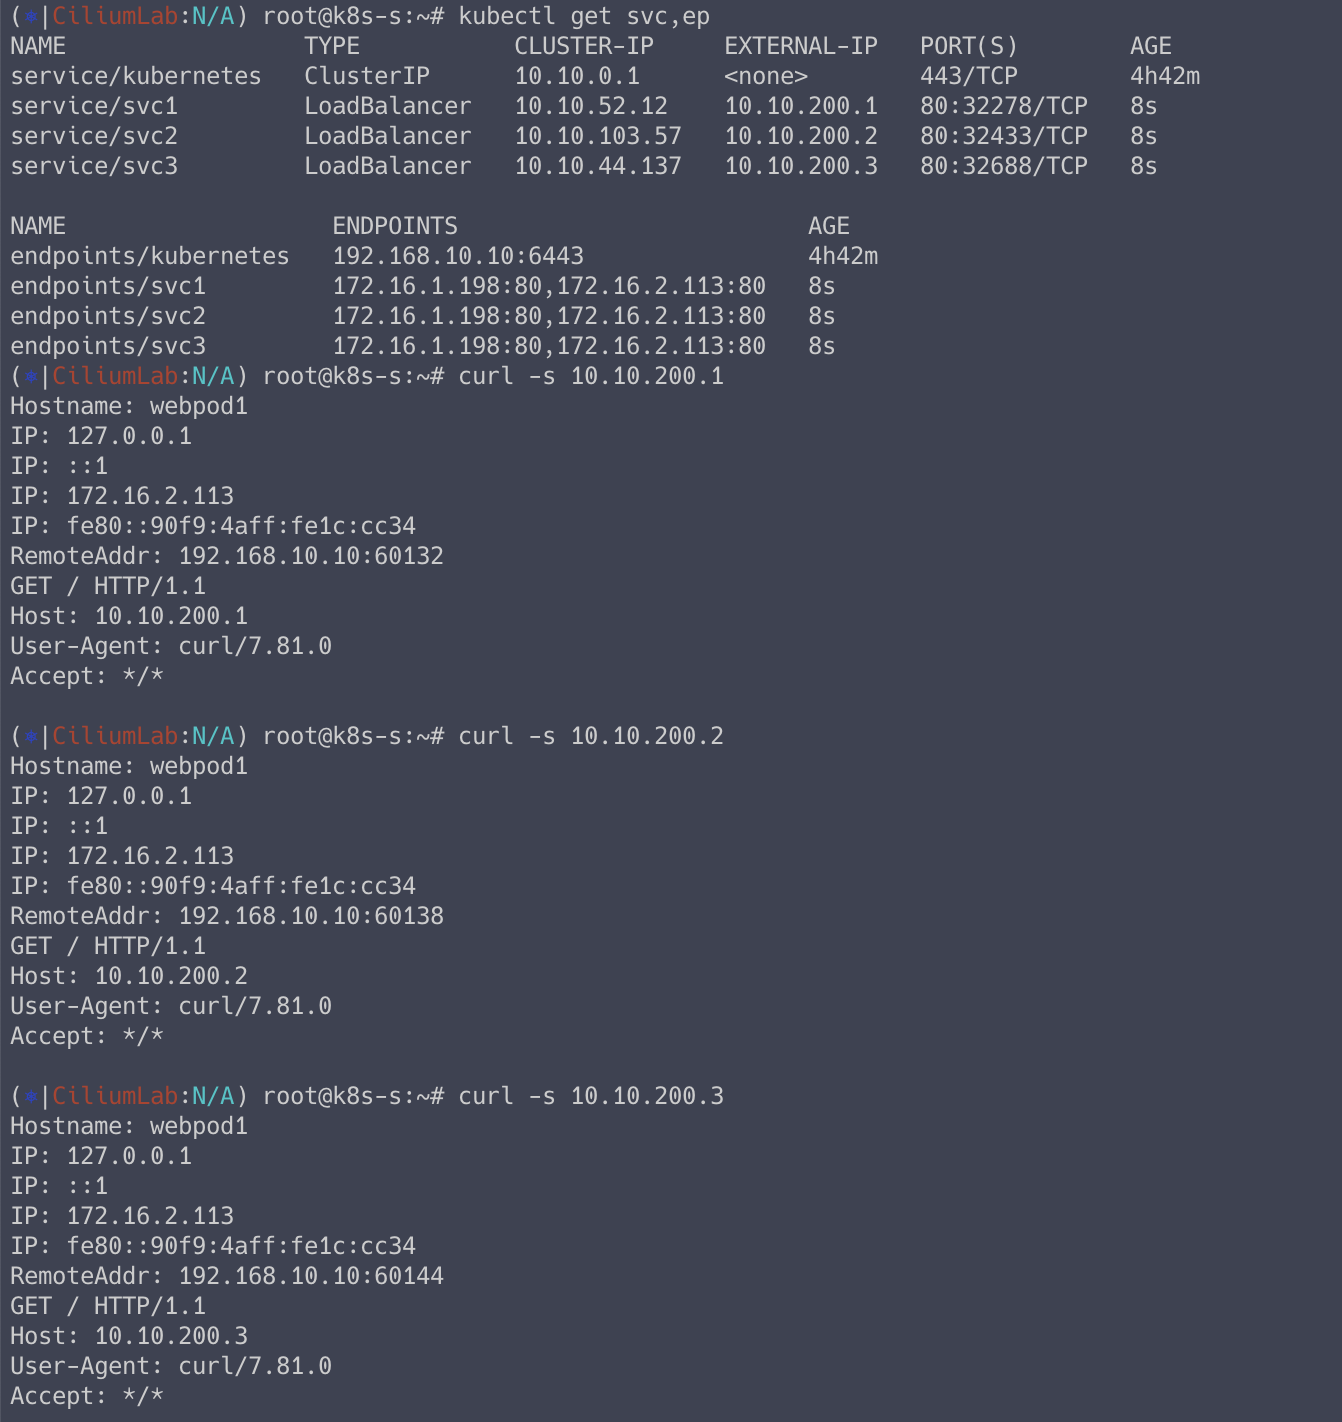
접속 확인
kubectl get svc,ep curl -s 10.10.200.1 curl -s 10.10.200.2 curl -s 10.10.200.3
이번 주차도 양이 상당했습니다.
이번 주에는 야근을 매일해서 공부할 절대적으로 부족하긴 했습니다.
Cilium 을 공부함으로써 정말 다양한 기능이 제공되는 것을 알았고, 엄청 효율적으로 동작하는 CNI 라고 확신하게 되었습니다.
시간적인 여유가 생기면 Cilium 을 좀 더 깊게 공부해놓으려고 합니다.
Contents