Kubernetes
[Study 6주차] 쿠버네티스 Gateway API
- -
CoudNet@ 팀의 가시다님께서 리딩하시는 KANS Study (Kubernetes Advanced Networking Study) 6주차 스터디 내용 정리
이번 글에서는 쿠버네티스의 Gateway API 에 대해 공부한 것을 알아보겠습니다.
1. Gateway API
1.1. Gateway API 소개
앞선 글에서 Ingress 는 더이상 업데이트가 되지 않을 것이라고 말씀 드렸습니다.
앞으로 Ingress 의 기능은 Gateway API 가 계승할 것입니다.
그렇다면, Ingress 에 비해 Gateway API 는 어떠한 점이 달라질까요??
Gateway API 의 주요 기능은 다음과 같습니다.
Gateway API 주요 기능
1. 개선된 리소스 모델
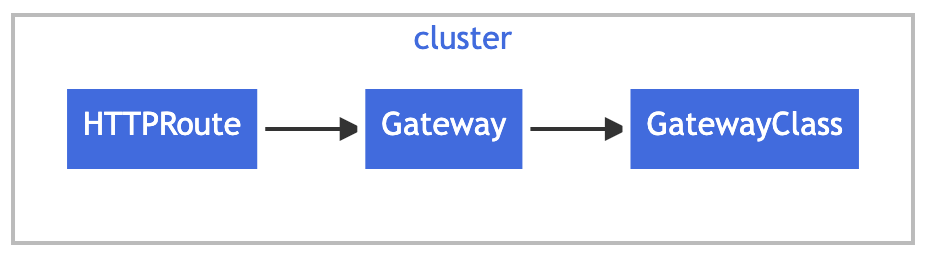
GatewayClass, Gateway, Route(HTTPRoute, TCPRoute 등)과 같은 새로운 CRD 도입
2. 프로토콜 독립적
HTTP 용으로 설계된 Ingress 와는 달리 Gateway API 는 TCP, UDP, TLS 등의 여러가지 프로토콜 지원
3. 보안 강화
TLS 구성 및 더욱 세부적인 액세스 제어 기능 제공
4. 교차 네임스페이스 지원
서로 다른 네임스페이스 간 트래픽 라우팅 지원
5. 확장성
API는 사용자 정의 리소스 및 정책으로 쉽게 확장할 수 있도록 설계
6. 역할 분리
클러스터 운영자, 애플리케이션 개발자, 보안 팀 간의 우려를 명확하게 분리
Gateway APi 의 구성 요소 (Resource / CRD)

1. GatewayClass
Gateway API 컨트롤러에 구현되는 리소스
Gateway 는 GatewayClass 를 참조해야 함
2. Gateway
트래픽을 처리하는 인프라 인스턴스를 설명
네트워크 엔드포인트 정의
3. HTTPRoute
Gateway 리스너에서 백엔드 네트워크 엔드포인트로의 HTTP 요청 라우팅 동작 지정
즉, 트래픽 경로 구성
4. TCPRoute
5. Service
Gateway API 의 역할 분리
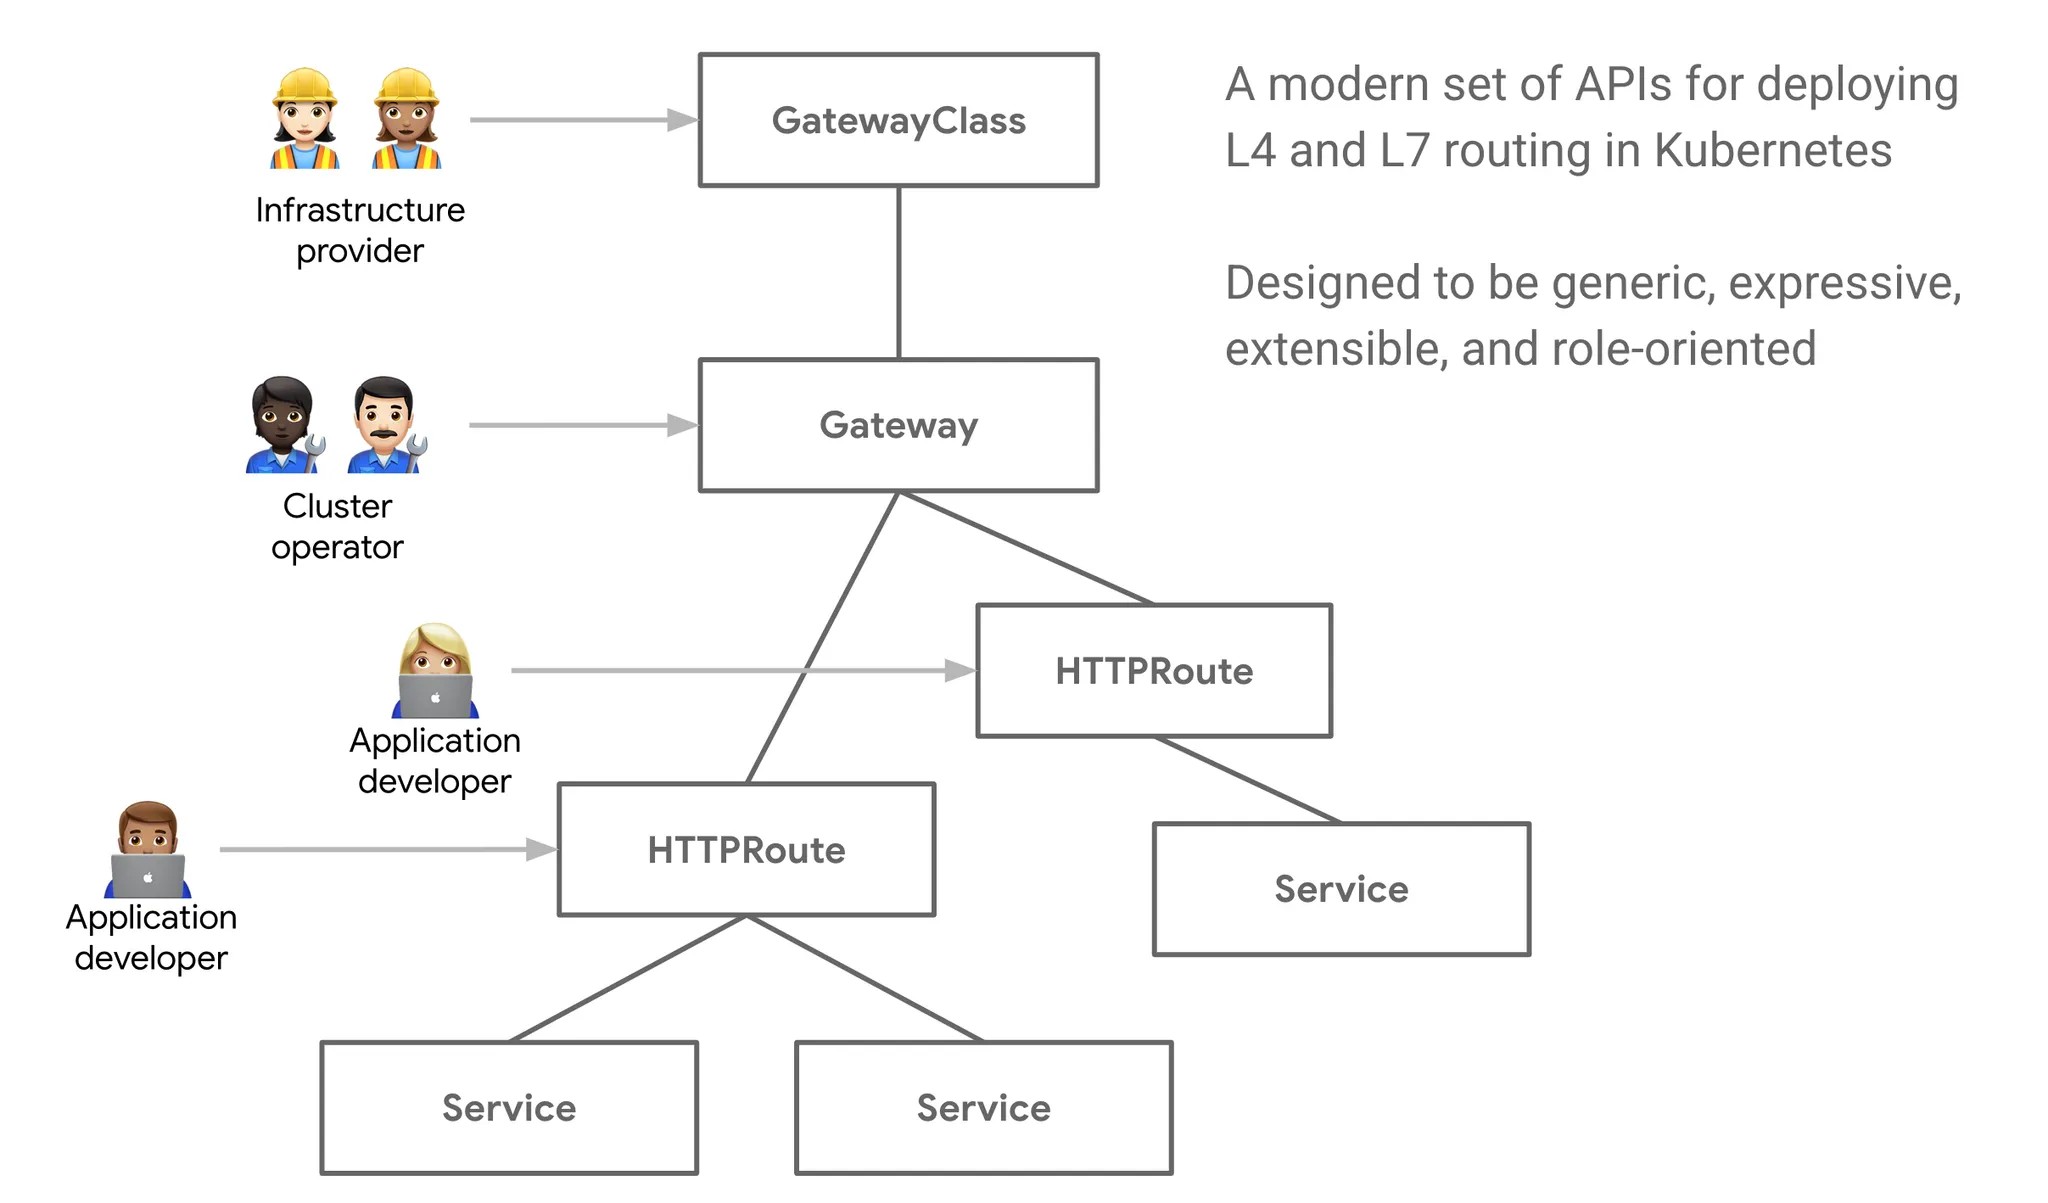
인프라 제공자, 클러스터 운영자, 애플리케이션 개발자 별로 담당하는 Gateway API 리소스 (CRD) 가 다릅니다.
이는 리소스가 하나로 병합되어 있던 Ingress 와의 큰 차이점입니다.
Gateway API 를 이용하면, 개발자들이 경로 설정을 직접 담당할 수 있게 됩니다.
이제 Gateway API 구현체 중, 간단하게 구성할 수 있는 Gloo Gateway 를 활용하여 Gateway API 를 테스트해보겠습니다.

1.2. 실습 환경 구성
Gateway API 실습 환경은 kind 클러스터를 이용합니다.
cat <<EOT> kind-1node.yaml
kind: Cluster
apiVersion: kind.x-k8s.io/v1alpha4
nodes:
- role: control-plane
  extraPortMappings:
  - containerPort: 30000
    hostPort: 30000
  - containerPort: 30001
    hostPort: 30001
  - containerPort: 30002
    hostPort: 30002
EOT

# Install KinD Cluster
kind create cluster --image kindest/node:v1.30.0 --config kind-1node.yaml --name myk8s

# 노드에 기본 툴 설치
docker exec -it myk8s-control-plane sh -c 'apt update && apt install tree psmisc lsof wget bsdmainutils bridge-utils net-tools dnsutils tcpdump ngrep iputils-ping git vim -y'

# Install Gateway API CRDs
kubectl apply -f https://github.com/kubernetes-sigs/gateway-api/releases/download/v1.0.0/standard-install.yaml

kubectl get crd
Kind 에서 Gateway APi 를 사용하기 위해서는 Gateway API CRD 를 먼저 설치해야 합니다.

Glooctl 도구 설치
각 Gateway API 구현체 별로 별도의 CLI 도구를 가지고 있습니다.
gloo 가 설치된 Control Plane 에서 CLI 를 설치합니다.
# [신규 터미널] 아래 bash 진입 후 glooctl 툴 사용
docker exec -it myk8s-control-plane bash

curl -sL https://run.solo.io/gloo/install | GLOO_VERSION=v1.17.7 sh
export PATH=$HOME/.gloo/bin:$PATH

# 버전 확인
glooctl version

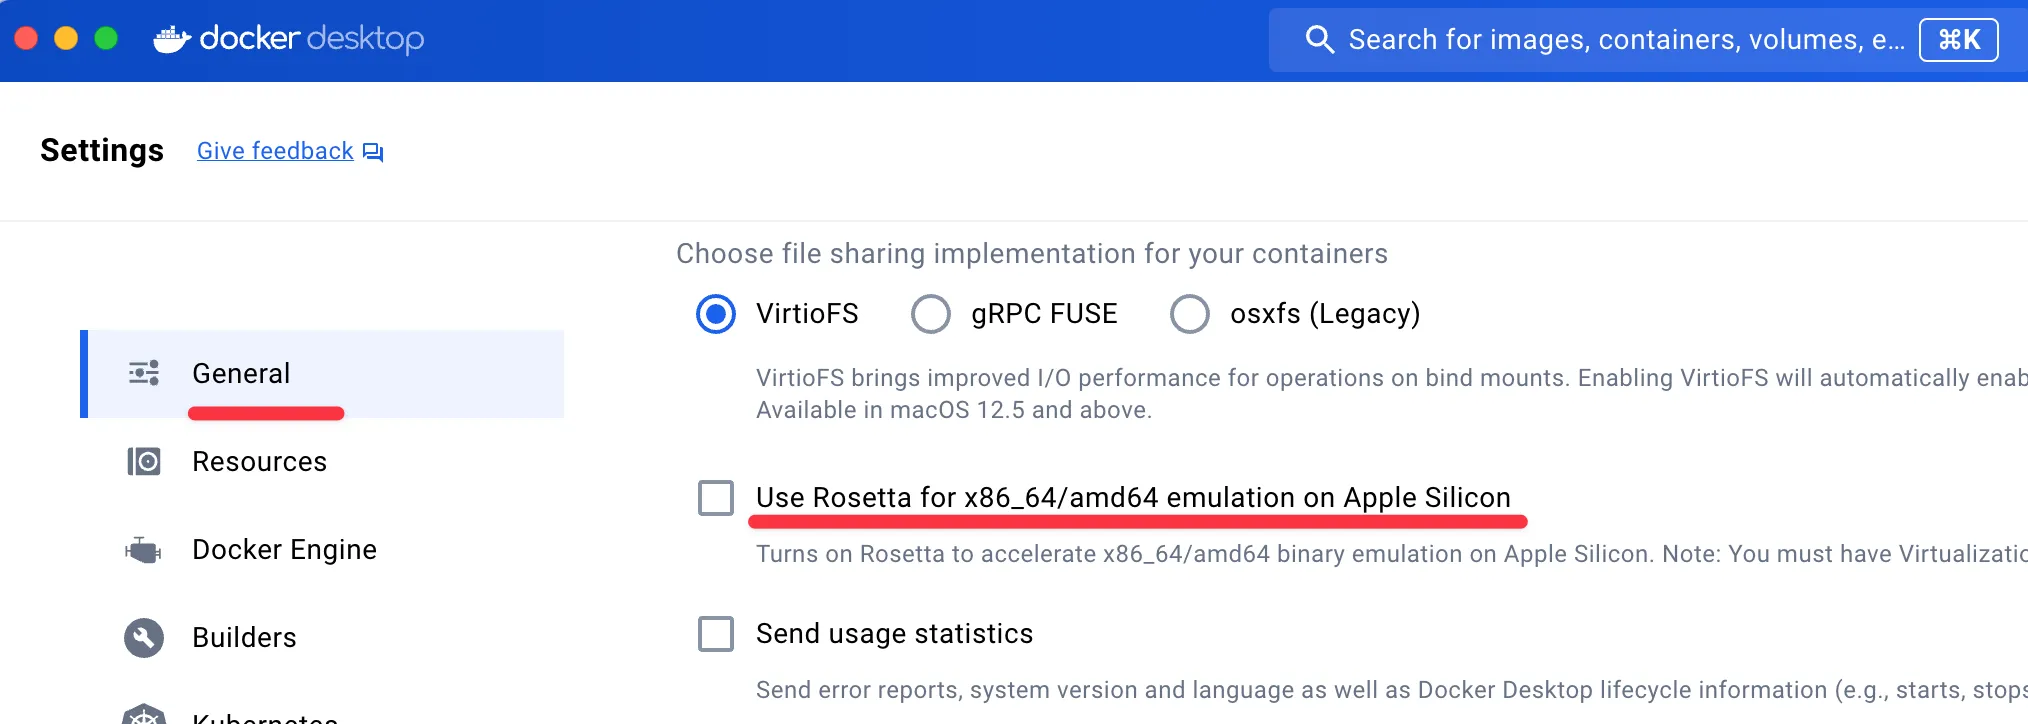
그리고 Gloo Gateway 를 테스트할 때, Docker Desktop 을 사용하는 경우에는 아래 옵션을 비활성화하는 것이 필요합니다.
1.3. Gloo Gateway 설치
Gloo Gateway 는 Helm 으로 설치합니다.
# Helm 설치
helm repo add gloo https://storage.googleapis.com/solo-public-helm
helm repo update
helm install -n gloo-system gloo-gateway gloo/gloo \
--create-namespace \
--version 1.17.7 \
--set kubeGateway.enabled=true \
--set gloo.disableLeaderElection=true \
--set discovery.enabled=false

# 설치 확인
kubectl get crd | grep 'networking.k8s.io'
kubectl get pod,svc,endpointslices -n gloo-system

# GatewayClass 확인
kubectl get gatewayclasses


Httpbin Application 설치
공식문서에서 제공하는 어플리케이션을 설치합니다.
# Install Httpbin Application
kubectl apply -f https://raw.githubusercontent.com/solo-io/solo-blog/main/gateway-api-tutorial/01-httpbin-svc.yaml
# 설치 확인
kubectl get deploy,pod,svc,endpointslices,sa -n httpbin
kubectl rollout status deploy/httpbin -n httpbin
# (옵션) NodePort 설정
cat <<EOF | kubectl apply -f -
apiVersion: v1
kind: Service
metadata:
labels:
app: httpbin
service: httpbin
name: httpbin
namespace: httpbin
spec:
type: NodePort
ports:
- name: http
port: 8000
targetPort: 80
nodePort: 30000
selector:
app: httpbin
EOF
# (옵션) 로컬 접속 확인
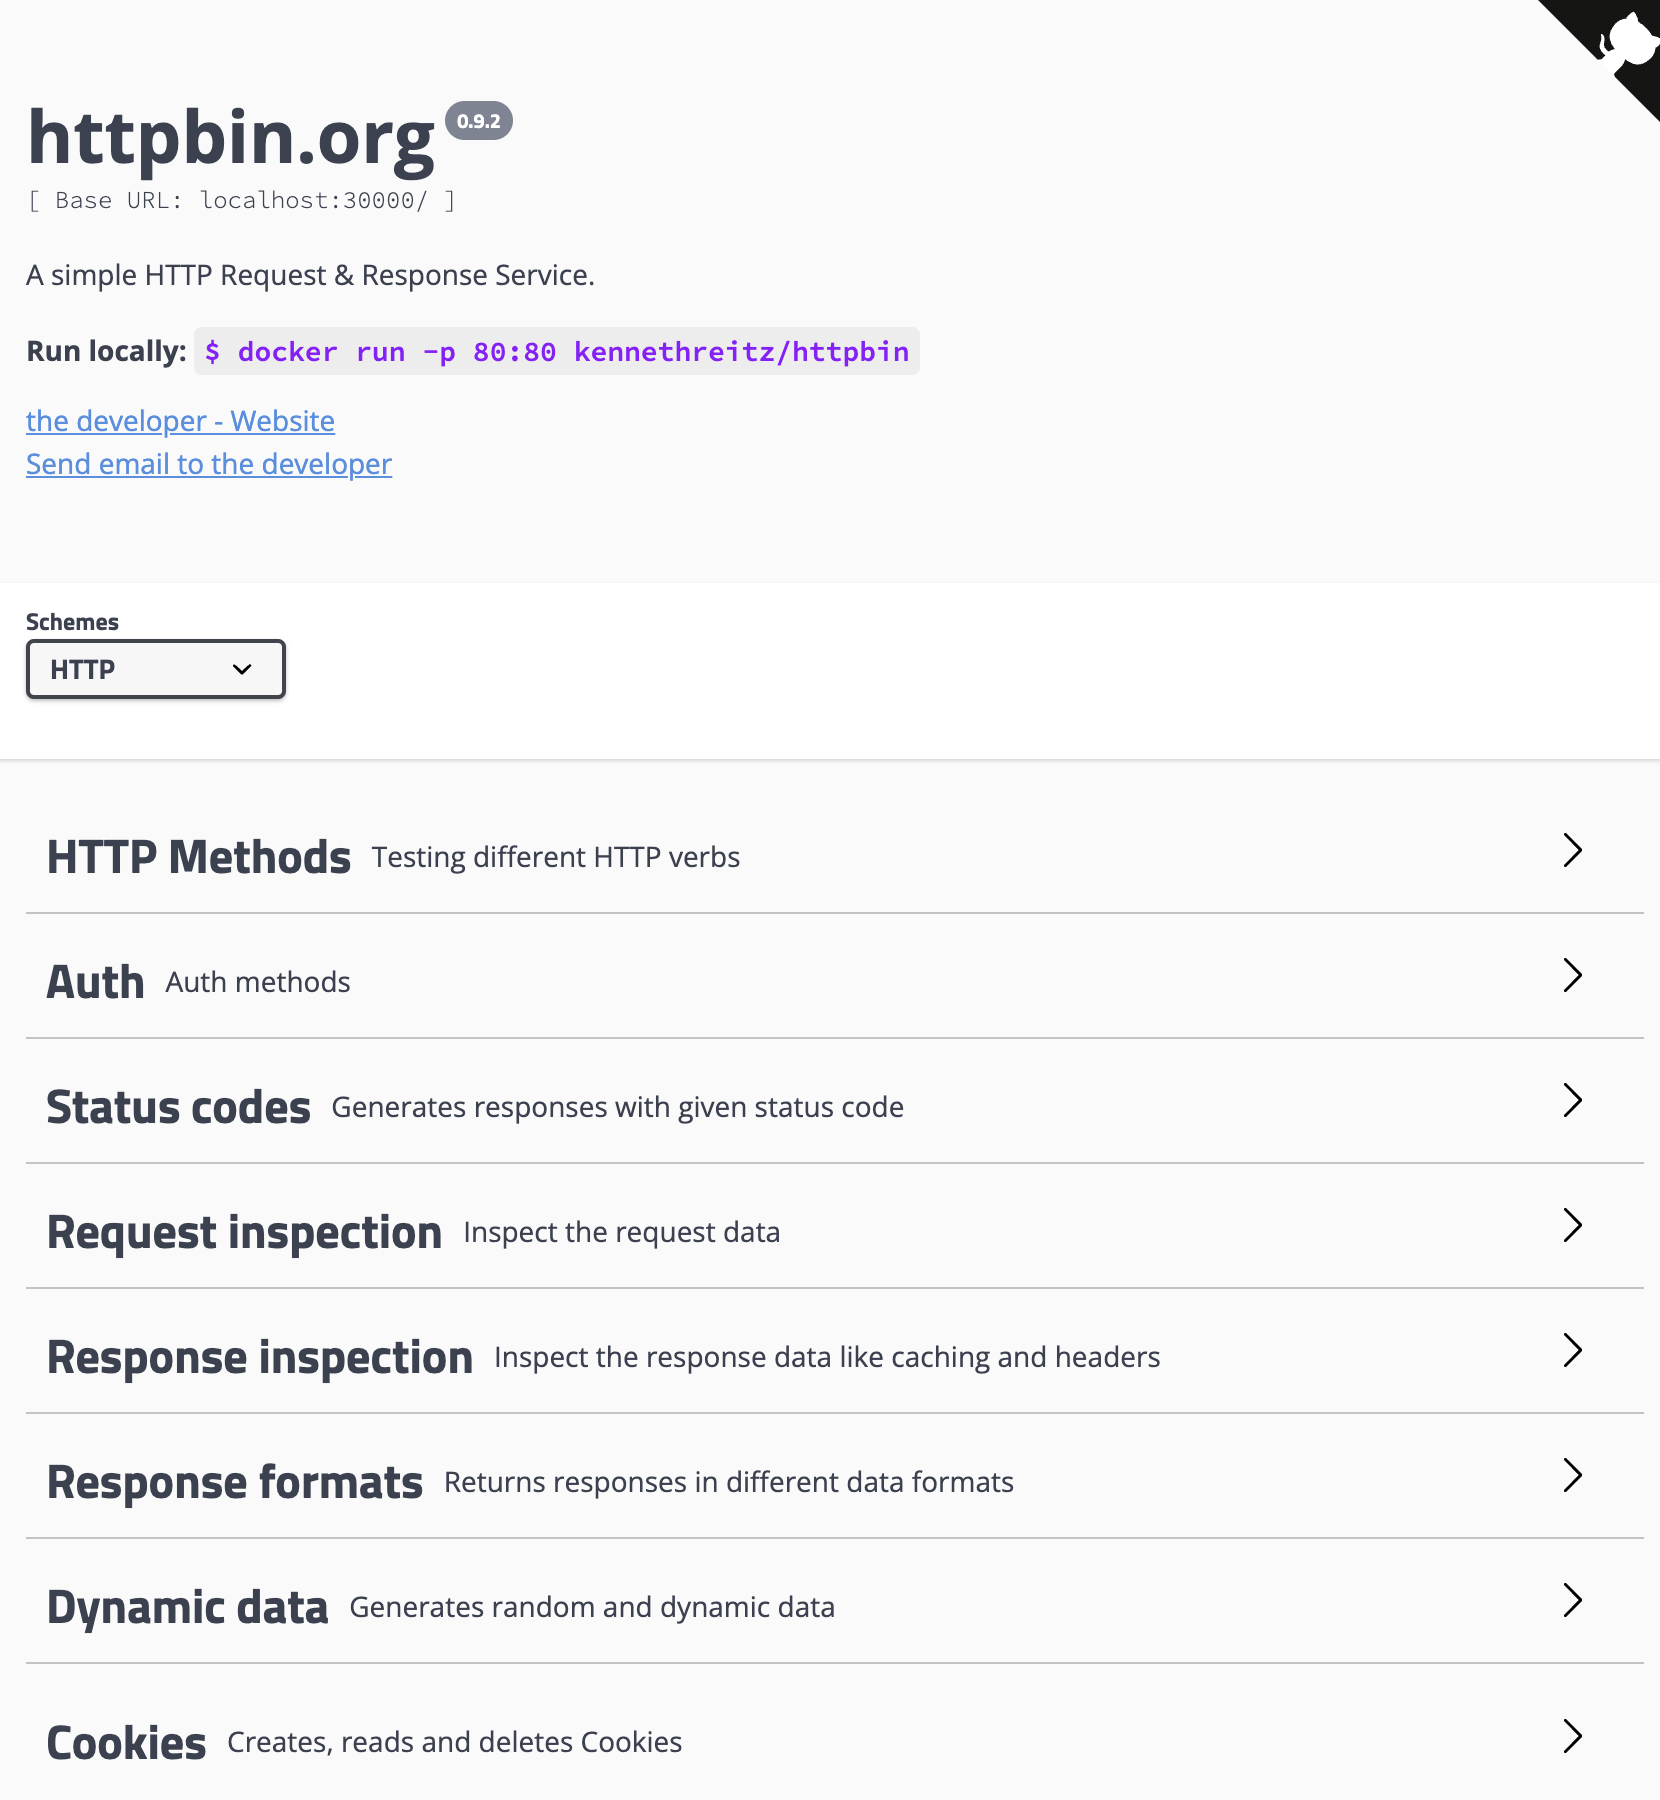
echo "httpbin web - http://localhost:30000" # macOS 사용자
로컬 접속 시 아래와 같은 화면이 출력됩니다.
2. Gloo Gateway 활용
2.1. Gateway 설정
아래와 같은 Gateway 리소스를 생성하겠습니다.
kind: Gateway
apiVersion: gateway.networking.k8s.io/v1
metadata:
  name: http
spec:
  gatewayClassName: gloo-gateway
  listeners:
  - protocol: HTTP
    port: 8080
    name: http
    allowedRoutes:
      namespaces:
        from: All
Gateway 배포
# gateway 리소스 생성
kubectl apply -f https://raw.githubusercontent.com/solo-io/gloo-gateway-use-cases/main/gateway-api-tutorial/02-gateway.yaml

# 확인 : Now we can confirm that the Gateway has been activated
kubectl get gateway -n gloo-system
kubectl get gateway -n gloo-system -o yaml | k neat
Gloo Proxy 를 NodePort 로 활용할 수 있도록 변경
# gloo-proxy-http NodePort 30001 설정
cat <<EOF | kubectl apply -f -
apiVersion: v1
kind: Service
metadata:
  labels:
    app.kubernetes.io/instance: http
    app.kubernetes.io/managed-by: Helm
    app.kubernetes.io/name: gloo-proxy-http
    app.kubernetes.io/version: 1.17.7
    gateway.networking.k8s.io/gateway-name: http
    gloo: kube-gateway
    helm.sh/chart: gloo-gateway-1.17.7
  name: gloo-proxy-http
  namespace: gloo-system
spec:
  ports:
  - name: http
    nodePort: 30001
    port: 8080
  selector:
    app.kubernetes.io/instance: http
    app.kubernetes.io/name: gloo-proxy-http
    gateway.networking.k8s.io/gateway-name: http
  type: LoadBalancer
EOF

# 확인
kubectl get svc -n gloo-system gloo-proxy-http

2.2. HTTPRoute 설정
Gateway 를 설정했으니, 이제 규칙을 만들어 줄 차례입니다.
아래와 같은 경로 규칙을 가진 HTTPRoute 리소스를 생성합니다.
apiVersion: gateway.networking.k8s.io/v1beta1
kind: HTTPRoute
metadata:
  name: httpbin
  namespace: httpbin
  labels:
    example: httpbin-route
spec:
  parentRefs:
    - name: http
      namespace: gloo-system
  hostnames:
    - "api.example.com"
  rules:
  - matches:
    - path:
        type: Exact
        value: /get
    backendRefs:
      - name: httpbin
        port: 8000
리소스 배포
kubectl apply -f https://raw.githubusercontent.com/solo-io/gloo-gateway-use-cases/main/gateway-api-tutorial/03-httpbin-route.yaml

# 확인
kubectl get httproute -n httpbin

Gateway API 접근
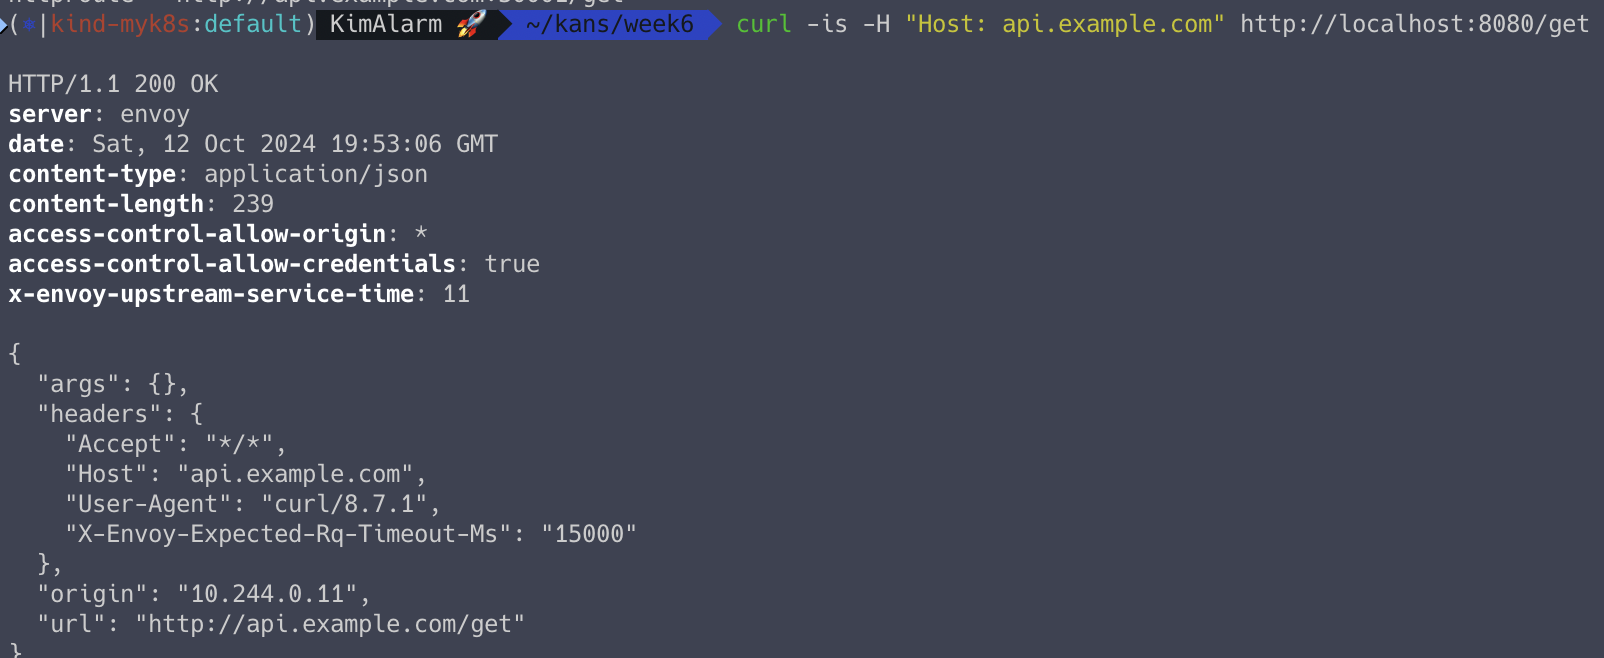
로컬 PC 에서 Gateway API 로 접근을 시도합니다.
# host 파일에 기입
echo "127.0.0.1 api.example.com" | sudo tee -a /etc/hosts
echo "httproute - http://api.example.com:30001/get" # 웹브라우저


# Port-fowarding 방법
kubectl port-forward deployment/gloo-proxy-http -n gloo-system 8080:8080 &

curl -is -H "Host: api.example.com" http://localhost:8080/get

2.3. PATH URL Rewrite
아래와 같이 '/api/http/bin' 경로로 들어오는 URL 을 '/' 경로로 변환할 수 있습니다.
# Here are the modifications we’ll apply to our HTTPRoute:

    - matches:
        # Switch from an Exact Matcher(정확한 매팅) to a PathPrefix (경로 매팅) Matcher
        - path:
            type: PathPrefix
            value: /api/httpbin/
      filters:
        # Replace(변경) the /api/httpbin matched prefix with /
        - type: URLRewrite
          urlRewrite:
            path:
              type: ReplacePrefixMatch
              replacePrefixMatch: /
적용 테스트
# 적용
kubectl apply -f https://raw.githubusercontent.com/solo-io/gloo-gateway-use-cases/main/gateway-api-tutorial/04-httpbin-rewrite.yaml

# 적용 확인
echo "httproute - http://api.example.com:30001/api/httpbin/get" # 웹브라우저
혹은
curl -is -H "Host: api.example.com" http://localhost:8080/api/httpbin/get # kubectl port-forward 사용 시

2.4. Migration
이번에는 Gateway API 를 활용한 카나리 업데이트에 대해서 알아보겠습니다.
서비스 버전은 2가지가 존재하며, 버전 1에서 버전 2로 업데이트를 해야하는 시나리오 입니다.
# 배포
kubectl apply -f https://raw.githubusercontent.com/solo-io/gloo-gateway-use-cases/main/gateway-api-tutorial/06-workload-svcs.yaml

# 확인
kubectl get deploy,pod,svc,endpointslices -n my-workload

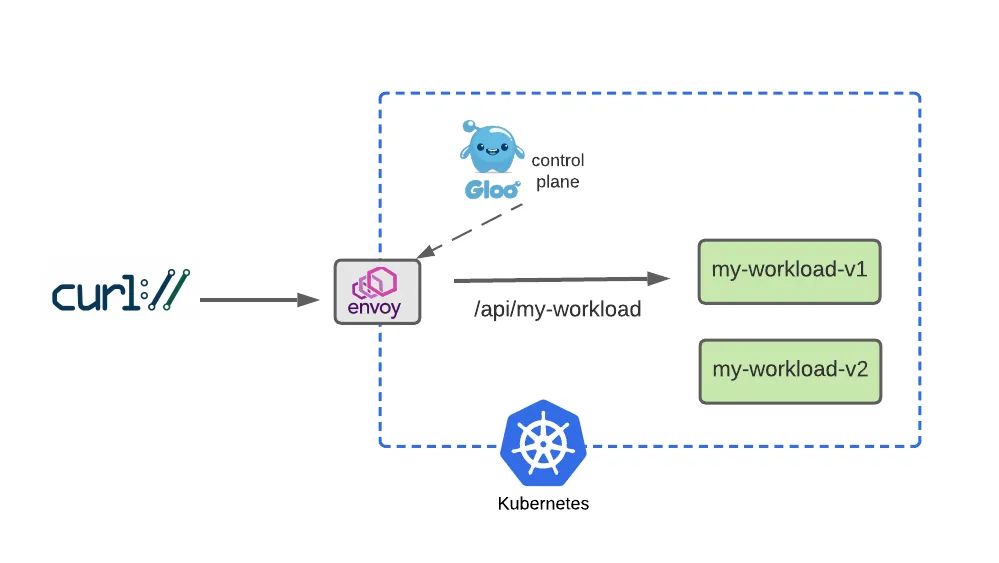
버전 1 라우팅 경로
apiVersion: gateway.networking.k8s.io/v1beta1
kind: HTTPRoute
metadata:
  name: my-workload
  namespace: my-workload
  labels:
    example: my-workload-route
spec:
  parentRefs:
    - name: http
      namespace: gloo-system
  hostnames:
    - "api.example.com"
  rules:
    - matches:
      - path:
          type: PathPrefix
          value: /api/my-workload
      backendRefs:
        - name: my-workload-v1
          namespace: my-workload
          port: 8080
버전 1 적용
kubectl apply -f https://raw.githubusercontent.com/solo-io/gloo-gateway-use-cases/main/gateway-api-tutorial/07-workload-route.yaml

# 확인
kubectl get httproute -n my-workload

# 서비스 호출
curl -is -H "Host: api.example.com" http://localhost:8080/api/my-workload

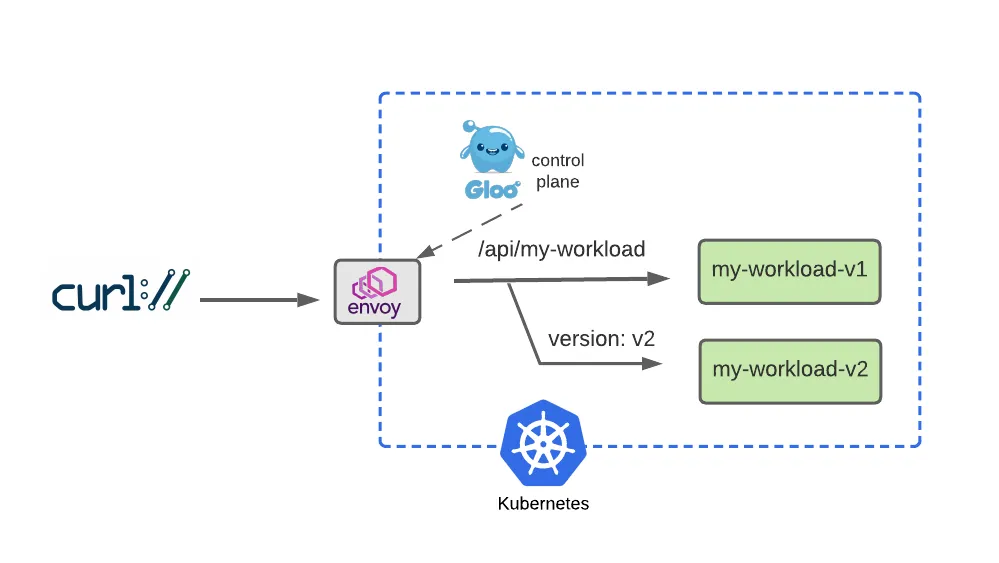
버전 2 경로 규칙
  rules:
    - matches:
      - path:
          type: PathPrefix
          value: /api/my-workload
        # Add a matcher to route requests with a v2 version header to v2
        # version=v2 헤더값이 있는 사용자만 v2 라우팅
        headers:
        - name: version
          value: v2
      backendRefs:
        - name: my-workload-v2
          namespace: my-workload
          port: 8080
    - matches:
      # Route requests without the version header to v1 as before
      # 대다수 일반 사용자는 기존 처럼 v1 라우팅
      - path:
          type: PathPrefix
          value: /api/my-workload
      backendRefs:
        - name: my-workload-v1
          namespace: my-workload
          port: 8080
# 적용
kubectl apply -f https://raw.githubusercontent.com/solo-io/gloo-gateway-use-cases/main/gateway-api-tutorial/08-workload-route-header.yaml

# 배포 확인
curl -is -H "Host: api.example.com" http://localhost:8080/api/my-workload
curl -is -H "Host: api.example.com" http://localhost:8080/api/my-workload | grep body

# But it we supply the version: v2 header, note that our gateway routes the request to v2 as expected:
curl -is -H "Host: api.example.com" -H "version: v2" http://localhost:8080/api/my-workload
curl -is -H "Host: api.example.com" -H "version: v2" http://localhost:8080/api/my-workload | grep body

특정 (버전) 헤더가 있을 경우, 서비스 2번으로 트래픽이 전송되는 것을 알 수 있습니다.
이를 통해, 사내 QA 팀 등이 안전하게 테스트를 진행할 수 있습니다.

만약 이전에 테스트가 완수되었다면, 조금씩 새로운 버전으로 트래픽을 흘리는 것이 필요합니다.
카나리 업데이트
  rules:
    - matches:
      - path:
          type: PathPrefix
          value: /api/my-workload
      # Configure a 50-50 traffic split across v1 and v2 : 버전 1,2 50:50 비율
      backendRefs:
        - name: my-workload-v1
          namespace: my-workload
          port: 8080
          weight: 50
        - name: my-workload-v2
          namespace: my-workload
          port: 8080
          weight: 50
# Apply this 50-50 routing policy with kubectl:
kubectl apply -f https://raw.githubusercontent.com/solo-io/gloo-gateway-use-cases/main/gateway-api-tutorial/09-workload-route-split.yaml

# 적용 확인
for i in {1..100}; do curl -s -H "Host: api.example.com" http://localhost:8080/api/my-workload/ | grep body; done | sort | uniq -c | sort -nr
for i in {1..200}; do curl -s -H "Host: api.example.com" http://localhost:8080/api/my-workload/ | grep body; done | sort | uniq -c | sort -nr

랜덤 값으로 균등하게 분산되는 것을 알 수 있습니다.
이번에는 Gateway API 애 대해 알아보았습니다.
아직까지 Gateway API 의 모든 기능을 다뤄보진 못했지만, 지금 알 수 있는 것은 Ingress 보다 훨씬 복잡해졌다는 것입니다.
Ingress 가 결국 업데이트가 중지되니, 이번에 Gateway API 를 공부한 것을 좀 더 복습을 많이 해서 완벽하게 내것으로 만들어야 한다고 느끼게 되었습니다.
'Kubernetes' 카테고리의 다른 글
| [Study 7주차] 쿠버네티스 Service Mesh - Istio 기능 & Bookinfo 실습 (4) | 2024.10.19 |
|---|---|
| [Study 7주차] 쿠버네티스 Service Mesh - Envoy Proxy, Istio (1) | 2024.10.19 |
| [Study 6주차] 쿠버네티스 Ingress (4) | 2024.10.13 |
| [Study 5주차] 쿠버네티스 Service - IPVS Proxy 모드 (2) | 2024.10.02 |
| [Study 5주차] 쿠버네티스 Service - LoadBalancer (MetalLB) (0) | 2024.10.02 |
Contents